8
LP460 REPAIR INSTRUCTIONS
To Check Valves
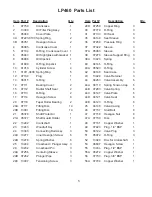
Discharge Valves: screw off tension plugs (50). Take the spring tension cap (44A) out of the ex
-
posed discharge valve with flat nose pliers.
Remove the valve seat (44D), if necessary with an M12 screw (screwing it into the M12 thread).
If the valve is extracted as a complete unity, position a screwdriver through the recess in the
spring tension cap and press down on the valve plate to gently lever the valve apart.
Check parts and replace if worn. Tighten plugs (50) at 107 ft.-lbs. (145 Nm).
Suction Valves: unscrew the 8 nuts (47) and remove the valve casing (45) from seal sleeves (35).
Using two screwdrivers, lever the seal case (42) out of the valve casing. Remove spring tension
cap with flat nose pliers. Remove the valve seat (44D), if necessary with an M12 screw. Replace
worn parts.
Tighten nuts (47) evenly at 59 ft.-lbs. (80 Nm) to secure the valve casing.
To Check Seals and Plunger Pipe
Unscrew the 8 nuts (47) and remove the valve casing by pulling it off to the front. Take the seal
sleeves (35) out of their guides in the crankcase. If necessary, remove the seal case (42) from the
seal sleeve (35). Remove tension spring (38A) and seal parts (36-38) from the seal sleeve (35).
Check plunger surfaces and seals (37/37A). Replace worn parts.
If plunger pipe (29B) is worn out, loosen tension screws (29C) and pull plunger pipe off to the
front. Clean front surface of plunger (25) thoroughly.
Then place the new plunger pipe through the oiled seals (37/37A) and push seal sleeve with
plunger pipe into the crankcase guide. Turn gear until the plunger (25) comes up against the
plunger pipe.
Put a new copper gasket (29D) onto the tension screw (29C), cover the thread of the tension
screw and gasket with glue (Loctite) and tighten to 22 ft.-lbs. (30 Nm).
Important!
Make sure that no glue gets between the plunger pipe (29B) and the centering sleeve
(29A). The plunger pipe should not be strained by improper tightening of the tension screw or it
may break.
Tighten nuts (47) evenly at 59 ft.-lbs. (80 Nm) to secure the valve casing.
Summary of Contents for LP460
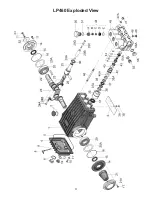
Page 4: ...4 LP460 Exploded View...
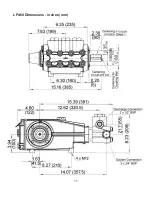
Page 11: ...LP460 Dimensions inches mm 11...


