Giada MI-H67 User Manual Download Page 13

24

23

www.giadatech.com

Note

The descriptions relating to BIOS in this Manual can only be used for reference 

as the BIOS version of the motherboard is upgraded continuously. Giada provides

 no guarantee that the contents in this Manual be consistent with the information 

you acquire.

BIOS is a basic I/O control program saved in the Flash Memory. Bridging the

 motherboard and the operating system, BIOS is used for managing the setup

 of the related parameters between them. When the computer is activated, the 

system is first controlled by the BIOS program. First, a self-detection called POST

 is performed to check all hard devices and confirm the parameters of the 

synchronous hardware. Once all detections are completed, BIOS will hand over 

the controlling to the operating system (OS). As BIOS serves as the only channel

 that connects the hardware and software, whether your computer can run stably 

and work in optimized state will hinge on how to properly set the parameters in

 BIOS. Therefore, the correct setup of BIOS plays a key role in stably running the

 system and optimizing its performance.

The CMOS Setup will save the set parameters in the built-in CMOS SRAM on the

 motherboard. When the power is shut off, the lithium battery on the motherboard

 will provide continuously power for CMOS SRAM. The BIOS setup program will

 allow you to configure the following items:

1. HD drive, floppy drive and peripheral devices;

2. Video display type and display items;

3 Password protection;

4. Power management characteristics. 

A.State of BIOS Setup

When the computer is started up, BIOS will run the self-detection (Post) program. 

This program includes series of diagnosis fixed in BIOS. When this program is 

executed, the following information will appear if any error is found:

Press F1 to Run Setup

Press F 2 to Load default values and continue

III. BIOS Setting

C. Auxiliary information
Main interface
When the system enters the main interface of Setup, the major selected contents
will be displayed at the lower part of the interface with the change of the options.
Set interface
When you set the value for each column, you can view the preset value of the 
column and the values that can be set if you press F1, for example, the BIOS
 default values or CMOS Setup values. To exit the interface for auxiliary
 information, press [ESC].

To enter BIOS, you can press F1; to load the default values and enter the system, 

you can press F2. After the self-detection process is completed, you can press

 DEL to enter the BIOS interface if no error is found. If the indicative information 

disappears before you can act, you can shut off the computer and turn on it again, 

or you can press the key RESET on the machine case. To restart your computer,

 you can also simultaneously press <Ctrl>+<Alt>+<Delete>.

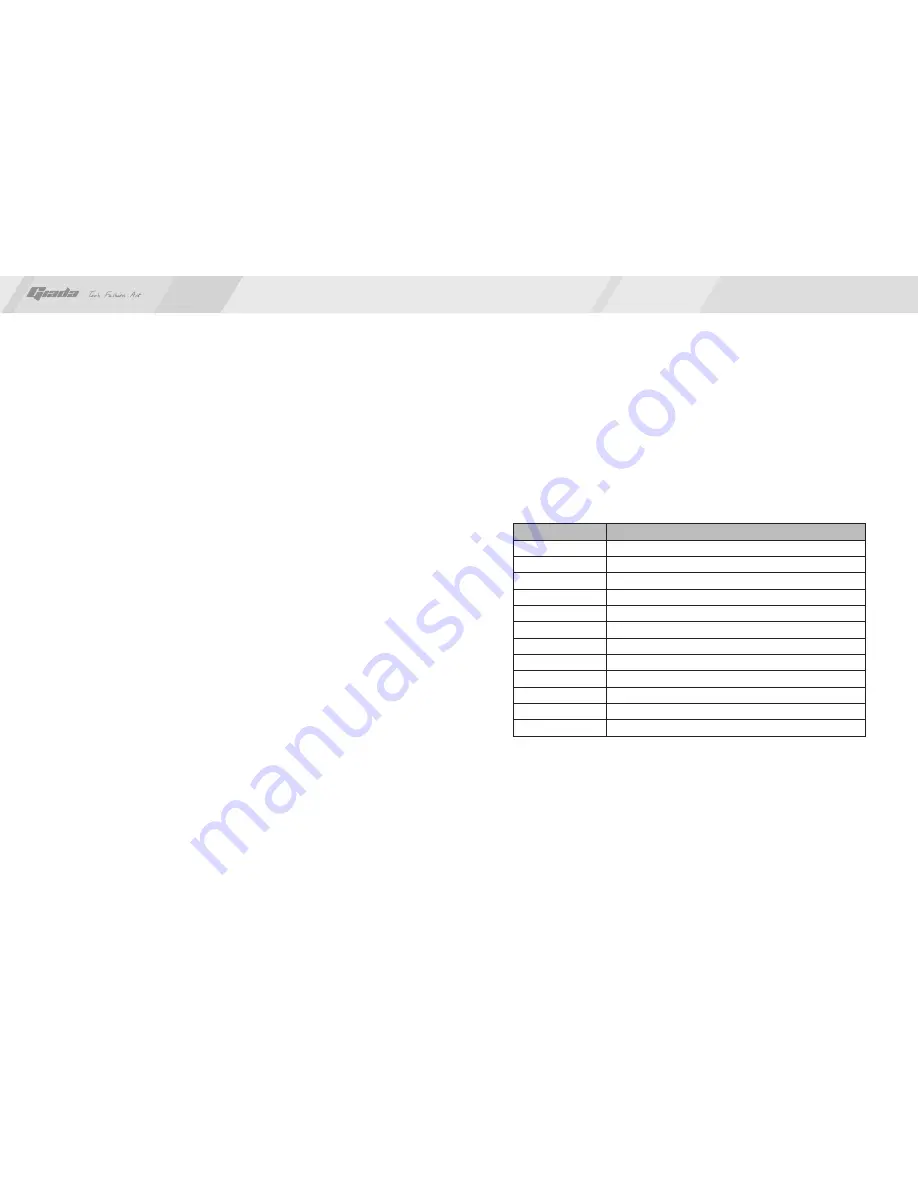
B. Function Keys definitions

Function

Move to the previous item 

Move to the next item

Move to the left item

Move to the right item

Exit the current interface

Change the setup state, or add the values

Change the setup state, or deduct the values

Display the information of the current setup

Load the set values of previous time

Load the safest values

Load the optimized values

Save the settings and exit the CMOS SETUP 

Key

↑ (Up key)

↓ (Down key)

← (Left key)

→ (Right key)

ESC 

Page Up

Page Down

F1

F7

F8

F9

F10

Summary of Contents for MI-H67

Page 1: ...www giadatech com User s Manual MI H67 Z68 All right reserved Version 002 Motherboard...

Page 2: ...F_USB2 4 5 F_AUDIO 4 6 ATX20P 4 7 F_PANEL 4 8 ATX 12V 4 9 F_ PANEL 5 Rear panel interface III BIOS setting 1 Main menu 2 Main Standard BIOS Setup 3 Advanced Advance BIOS Setup 3 1 CPU Configuration 3...

Page 3: ...tor It supports the 2nd generation Intel Core i5 processor and other Intel processors in the LGA1155 package Powered by the 2nd generation Intel Core processors MI H67 delivers a superb visual perform...

Page 4: ...The motherboard consists of a great number of ICs and other components These ICs might be damaged by the static charge Therefore the user must make the following preparations before installation Turn...

Page 5: ...8 10 13 12 14 15 16 17 19 21 20 1 WiFi aperture 2 2 x USB2 0 port 3 PS 2 Keyboard port 2 x USB2 0 port 4 DVI port top 5 HDMI port bottom 6 RJ45 port top 2 x USB3 0 bottom 7 5jack Audio port includes...

Page 6: ...oles on motherboard 2 Press in the holders to motherboard in proper order to ensure fan is close contact with the CPU 3 Finally plug the CPU fan power cable into the socket on the motherboard www giad...

Page 7: ...d pay attention the concave hole of golden finger should be aligned to the convex point of the slot 3 Finally insert the memory into the interface slot gently If no error occurs at the moment insert t...

Page 8: ...should notice that all sockets are marked with PIN1 The mark indicates the ex factory default values 4 1 SATA1 SATA2 SATA3 SATA4 Serial ATA flat cable sockets 2nd generation Serial ATA sockets offer a...

Page 9: ...ll make sure the fan is conforming PIN Pin PIN Definition Definition Definition 1 2 3 4 1 2 3 1 2 2 3 GND 12V SIGNAL PMW GND 12V SIGNAL Normal CLR_CMOS www giadatech com 4 4 CLR_CMOS CMOS pin The corr...

Page 10: ...the USB ports on the rear panel of the machine case are not enough the user can use the two sets of extension USB pins provided by this motherboard These ports support USB 2 0 devices The definitions...

Page 11: ...12V 12V Power receptacle This board has special 12V power receptacle for CPU For better and more stable processor power supply we suggest keeping the connection on this socket The definitions of the p...

Page 12: ...cables on the front end panel PIN 1 3 5 7 9 Definition HDLED GND RST GND NULL PIN 2 4 6 8 10 PLED VCC GND NULL PWBT Definition 5 Rear panel interface 1 Antenna Holes 2 USB2 0 port 3 PS 2 keyboard por...

Page 13: ...S Setup When the computer is started up BIOS will run the self detection Post program This program includes series of diagnosis fixed in BIOS When this program is executed the following information wi...

Page 14: ...unctions provided by BIOS such as specifications of PCIe facilities CPU HDD etc Power power management This item is used for setting ACPI advanced configuration and power management such as sleep mode...

Page 15: ...tualization Technology CPU C3 Report CPU C6 Report Package C State Limit Energy conservation mode setting Local x2APIC Factory long duration power limit This item shows CPU s power consumption and can...

Page 16: ...e to show all the I Os of the MB Serial Port 0 configuration 3 4 PC Health Fig 3 6 Fig 3 7 H W Health Function Through this item you can view the state of the system hardware You can view the speed of...

Page 17: ...ption The options and their definitions are as follows Fig 3 9 32 31 5 Chipset This item includes North bridge and South bridge configuration 5 1 North Bridge configuration Total Memory This item is u...

Page 18: ...rompt Timeout This item is use to set wait time of entering the OS Bootup NumLock State To set the state of Num Lock after start up Options are OFF and ON In other words this item can be used for sett...

Page 19: ...will be required to be entered only before the system goes to the set program of BIOS To delete the password press Enter in the popped up window that requires to enter the password Then information f...

Page 20: ...nstallation of the operating system you should then install the driver for the motherboard To this end put the disk into the CD ROM The interface as shown in Fig 4 1 will appear IV Software installati...

Page 21: ...as shown in Fig 4 3 will pop up Then you can click Next and wait till the driver is installed completely Fig 4 3 of Fig 4 2 a dialog box as shown in Fig 4 4 will pop up Then you can click Next and wai...

Page 22: ...iver for on board LAN chip After you click Install behind the Realtek 10 100 1000 LAN Driver in the Fig 4 5 Fig 4 6 Driver in the interface of Fig 4 2 complete the installation by following the indica...

Page 23: ...he default state of microphone is mute You need to turn it on manually as shown in Fig 4 8 and 4 9 Fig 4 8 Fig 4 9 2 HD AUDIO sound card setup For Windows XP SP3 The control panel of the audio adapter...

Page 24: ...ower right corner The initial interface will pop up as shown in Fig 4 10 and 4 11 For Windows Vista Fig 4 10 Click the right upper part of the control interface Advanced Setup for Device the interface...

Page 25: ...sponding front or rear mode and set the device as default In the above interface you can adjust the volume for recording and the playing volume for the MIC Fig 4 13 If you need to set the output of mu...

Page 26: ...lar installation If this equipment does cause harmful interference to radio or television reception which can be determined by turning the equipment off and on the user is encouraged to try to correct...

Reviews: