background image

7

GHP Group, Inc. 

6440 W. Howard St. • Niles, IL • 60714-3302

ONE YEAR LIMITED WARRANTY

If within one year from the date of original purchase, this item fails due to a defect in material or 
workmanship, we will replace or repair at our option, free of charge. To order parts or obtain warranty 
service, call 1-877-447-4768, 8:30 a.m. – 4:30 p.m. CST, Monday – Friday. This warranty does not 
cover defects resulting from improper or abnormal use, misuse, accident, or alteration. Failure to follow 
all instructions in the owner’s manual will also void this warranty. GHP Group, Inc. will not be liable for 
incidental or consequential damages. Some states do not allow the exclsion or limitation of incidental or 
consequential damages, so the above limitation or exclusion of incidental or consequential damages may 
not apply to you. This warranty gives you specific legal rights and you may also have other rights which 
vary from state to state.

Notice to the Customer

Our quality furniture is built keeping tradition in mind. Variations in actual wood color and finishes which may result 

from natural characteristics of the wood, such as grain patterns, mineral streaks and the like, are not considered

defects. As wood continues to move and age you may notice these slight differences in color, even on different 

parts of any individual unit. Sound knots and slight surface cracks are true personality of a quality piece of wood 

furniture.

There are several practices we reccomend so that you may maintain your new furniture in top condition. First of all, 

to maintain the finish, you should clean with a soft, slightly damp cloth and buff with a dry cloth. Secondly, wood

furniture should never be dragged across a floor. The added stress from dragging the unit may cause the dragged 

edge to splinter or it may cause some joints to loosen.

Please contact us for any questions or concerns you may have regarding your new piece of furniture.

ONE YEAR LIMITED WARRANTY

6440 W. Howard St.

Niles, IL 60714-3302

877-447-4768

Printed in China

Summary of Contents for PHIMD-2H

Page 1: ...______________________ 80 10 121 Rev 7 14 Questions problems missing parts Before returning to your retailer call our customer service department at 1 877 447 4768 8 30 a m 8 00 p m CST Monday Friday or email us at customerservice ghpgroupinc com Français p 15 HERITAGE INTERMEDIATE GAS FIREPLACE MANTEL Español p 8 ...

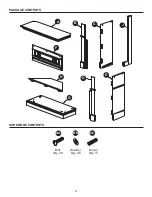
Page 2: ...2 PACKAGE CONTENTS HARDWARE CONTENTS Bolt Qty 28 Dowel Qty 17 Washer Qty 28 AA BB CC E D G F C B A J H ...

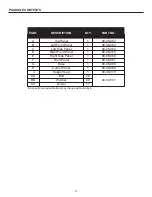
Page 3: ...B CC 1 1 1 1 1 1 1 1 1 28 28 17 Top Panel Left Front Panel Left Side Panel Right Front Panel Right Side Panel Front Panel Base Corner Panel Support Leg Bolt Washer Dowel 80 06 062 80 06 063 80 06 064 80 06 065 80 06 066 80 06 067 80 06 068 80 06 069 80 06 070 80 09 501 PART QTY DESCRIPTION PART NO ...

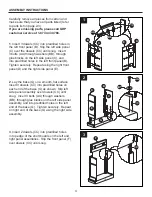
Page 4: ...g the right front panel D and the right side panel E 2 Lay the base G on a smooth flat surface Insert 3 dowels CC into predrilled holes on each end of the base G as shown Slip left side panel assembly over dowels CC until snug Insert 3 bolts AA through washers BB through glue blocks on the left side panel assembly and into predrilled holes in the left end of the base G Tighten securely Repeat on r...

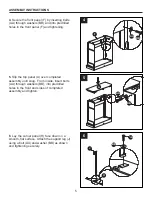
Page 5: ...r completed assembly until snug From inside insert bolts AA through washers BB into predrilled holes in the front and sides of completed assembly and tighten 6 Lay the corner panel H face down on a smooth flat surface Attach the support leg J using a bolt AA and washer BB as shown and tightening securely ASSEMBLY INSTRUCTIONS 5 H AA BB BB 4 BB J 6 AA A AA F ...

Page 6: ...drilled holes in the top edge and bottom edge of the back of assembly over dowels CC until snug and secure using bolts AA and washers BB 8 Set completed mantel in desired position against wall ASSEMBLY INSTRUCTIONS 8 7 BB AA CC H J ...

Page 7: ...from state to state Notice to the Customer Our quality furniture is built keeping tradition in mind Variations in actual wood color and finishes which may result from natural characteristics of the wood such as grain patterns mineral streaks and the like are not considered defects As wood continues to move and age you may notice these slight differences in color even on different parts of any indi...

Page 8: ..._________ 80 10 121 Rev 7 14 Preguntas problemas piezas faltantes Antes de volver a la tienda llame a nuestro departamento de servicio al cliente al 1 877 447 4768 de lunes a viernes de 8 30 a m a 4 30 p m hora central estándar o envíenos un correo electrónico a customerservice ghpgroupinc com HOGAR A GAS HERITAGE TAMAÑO STANDARD ...

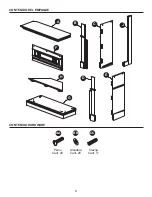
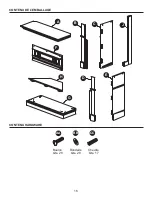
Page 9: ...9 CONTENIDO DEL EMPAQUE CONTENIDO HARDWARE Perno Cant 28 Clavija Cant 17 Arandela Cant 28 AA BB CC E D G F C B A J H ...

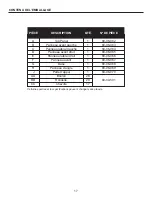
Page 10: ... 1 1 1 1 28 28 17 Top Panel Panel frontal izquierdo Panel lateral izquierdo Panel frontal derecho Panel lateral derecho Panel frontal Base Panel esquinero Pata de soporte Perno Arandela Clavija 80 06 062 80 06 063 80 06 064 80 06 065 80 06 066 80 06 067 80 06 068 80 06 069 80 06 070 80 09 501 PIEZA CANT DESCRIPCION NÚMERO DE PARTE ...

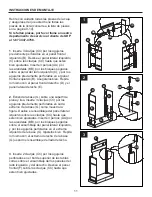
Page 11: ...l frontal derecho D y el panel lateral derecho E 2 Extienda la base G sobre una superficie plana y lisa Inserte 3 clavijas CC por los agujeros previamente perforados en cada extremo de la base G como muestra la figura Deslice el ensamblaje del panel lateral izquierdo sobre las clavijas CC hasta que esten bien ajustadas Inserte 3 pernos AA por las arandelas BB por los bloques pegados sobre el ensam...

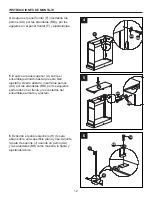
Page 12: ...aje armado hasta que este bien ajustado Desde adentro inserte los pernos AA por las arandelas BB por los agujeros perforados en el frente y los costados del ensamblaje armado y ajústelo 6 Extienda el panel esquinero H de cara abajo sobre una superficie plana y lisa Adjunte la pata de soporte J usando un perno AA y las arandelas BB como muestra la figura y ajustándola bien 5 H AA BB BB 4 BB J 6 AA ...

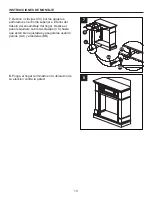
Page 13: ...n el borde superior e inferior del trasero del ensamblaje del hogar Deslice el panel esquinero sobre las clavijas CC hasta que esten bien ajustadas y asegúrelas usando pernos AA y arandelas BB 8 Ponga el hogar terminado en la ubicación de su elección contra la pared 8 7 BB AA CC H J ...

Page 14: ... se astille o que se afloje una unión Comuníquese con nostoros si tiene alguna pregunta o preocupación acerca de su nuevo mueble GARANTÍA LIMITADA DE UN AÑO Si un lapso de un año a partir de la fecha de compra original este artículo falla debido a un defecto en el material o la mano de obra lo reemplzaremos o repararemos sin cargos a nuestra discreción Para hacer un pedido de las piezas o para obt...

Page 15: ...________________ 80 10 121 Rev 7 14 Des questions des problèmes des pièces manquantes Avant de communiquer avec votre détaillant adressez vous au service à la clientèle au 877 447 4768 du lundi au vendredi de 8 h 30 à 16 h 30 HNC ou par courriel à customerservice ghpgroupinc com MANTEAU DU FOYER À GAZ HERITAGE FULL SIZE ...

Page 16: ...16 CONTENU DE L EMBALLAGE CONTENU HARDWARE Boulon Qte 28 Cheville Qte 17 Rondelle Qte 28 AA BB CC E D G F C B A J H ...

Page 17: ... 1 1 1 1 1 1 1 28 28 17 Top Panel Panneau avant gauche Panneau latéral gauche Panneau avant droit Panneau latéral droit Panneau avant Base Panneau d angle Patte d appui Boulon Rondelle Cheville 80 06 062 80 06 063 80 06 064 80 06 065 80 06 066 80 06 067 80 06 068 80 06 069 80 06 070 80 09 501 PIÈCE QTÉ DESCRIPTION Nº DE PIÈCE ...

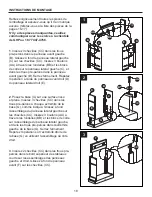
Page 18: ...ration à l aide du panneau avant droit D du panneau latéral droit E 2 Posez la base G sur une surface lisse et plane Insérez 3 chevilles CC dans les trous pré percés à chaque extrémité de la base G comme indiqué Glissez à fond l assemblage du panneau latéral gauche sur les chevilles CC Insérez 3 boulons AA à travers les rondelles BB et les blocs de colle sur l assemblage du panneau latéral gauche ...

Page 19: ...érieur A sur l assemblage terminé Dès l intérieur insérez les boulons AA à travers les rondelles BB dans les trous pré percés à l avant et sur les côtés de l assemblage terminé et serrez 6 Posez le panneau d angle H tourné vers le bas sur une surface lisse et plane Attachez comme indiqué la patte d appui J à l aide d un boulon AA et d une rondelle BB et serrez fermement 5 H AA BB BB 4 BB J 6 AA A ...

Page 20: ...ans les bords supérieur et inférieur de l arrière de l assemblage du foyer Glissez à fond l assemblage du panneau d angle sur les chevilles CC et serrez à l aide des boulons AA et des rondelles BB 8 Placez le manteau terminé contre le mur dans la position désirée 8 7 BB AA CC H J ...

Page 21: ...droits légaux spécifiques et vous pouvez aussi posséder d autres droits qui varient d État à État NOTE POUR LE CLIENT Nos muebles de qualité sont fabriqués selon la tradition Les différences dans la couleur du vois et du fini qui peuvent provenir des caractéristiques naturelles du bois comme le grain les veines du bois et l effet ne peuvent pas être considérées comme défauts Comme le bois travaill...

Reviews: