1. SETTING UP YOUR WIRELESS VEHICLE CONTROL UNIT BOARD*:
BEFORE CONTINUING MAKE SURE YOUR GATE IS CLOSED. TURN THE GATE OFF BY TURNING
THE SWITCH TO THE OFF POSITION ON THE BOTTOM OF THE CONTROL BOX.
*The following steps can be performed indoors BEFORE digging and burying the Sensor Probe.
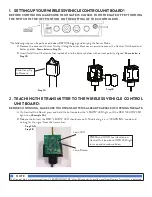
A. Remove the cover on Control Unit by sliding the outer black cover upward to access the Control Unit board and
battery holder.
Shown below in Step 1A.
B. Insert/Install two C batteries (not included) into the battery holder with correct polarity aligned.
Shown below in
Step 1B.
2. TEACHING THE TRANSMITTER TO THE WIRELESS VEHICLE CONTROL
UNIT BOARD:
BEFORE CONTINUING, MAKE SURE YOUR TRANSMITTER IS ALREADY CAPABLE OF OPENING THE GATE.
A. On Control Unit Board, press and hold the button below the “LEARN” LED light until the RED “LEARN” LED
light is on.
(Example 2A)
B. Release the button, the RED “LEARN” LED should remain ON indicating it is in “LEARNING” mode and
waiting for the signal from the transmitter.
NOTE
The Control Unit will automatically exit “LEARNING MODE” after 60 seconds if no valid signal from Remote Transmitter is detected.
PRESS and HOLD Learn button on
Control Unit board until RED LED light
turns on and remains solid on.
Step 1A
Step 1B
Step 2A &
Step 2B
Slide Cover Up
to Remove
Learn LED
Learn Button


