background image

www.ghibliwirbel.com 

Professional Cleaning Machines Since 1968

ENGLISH 

- 20

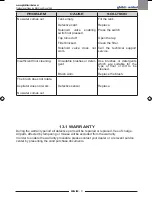
TROUBLESHOOTING

PROBLEM

CAUSE

SOLUTION

By pressing the button (45) 

” ithe display does not 

turn on.

Low battery.

Main fuse blown.
The battery’s plug is still lo-

cated in the charger’s outlet.

Check that the battery is 

charged.
Replace the main 5A or 80A fuse.
Place the plug correctly.

The brush does not rotate. 

Function card damaged.
Display card damaged.
Brush motor damaged.
Brush button not pressed.

Replace.
Replace.
Replace.
Press the relative button.

Aspirator does not work.

Function card damaged.
Display card damaged.
Intake motor damaged.
Aspirator button not pressed.
Recovery tank full.

Blocked suction filter.

Replace.
Replace.
Replace.
Press the button.
Empty, wash and clean the 

tank and the probes.
Clean the filter.

No chemical product comes 

out.

Function deactivated.
Empty tank.
Hose clogged.
Pump failure.
Flowmeter failure.
Control unit failure.

Activate the function.
Replace.
Clean the tubes.
Replace.
Replace.
Replace.

The machine does not dry 

well, leaving traces of water 

on the floor. 

Suction motor defective.
Aspiration tube blocked.

Dirty wiper.
Recovery tank full.
Dirty water filter clogged.
Squeegee rubber blades 

worn.

Replace the motor.
Check and if necessary 

clean the aspiration tube that 

connects the squeegee to 

the recovery tank.
Clean the wiper.
Empty the recovery tank. 
Clean the filter.
Replace or turn over the 

squeegee rubber blades.

PROBLEM

CAUSE

SOLUTION

No water comes out.

Tank empty.
Defective card.
Solenoid valve enabling 

switch not pressed.
Tap turned off.
Filter blocked.
Solenoid valve does not 

work.

Fill the tank.
Replace.
Press the switch.

Open the tap
Clean the filter.
Call the technical support 

service. 

Insufficient floor cleaning.

Unsuitable brushes or deter-

gent.

Brush worn.

Use brushes or detergents 

which are suitable for the 

type of floor or dirt to be 

cleaned.
Replace the brush.

The brush does not rotate. 

Aspirator does not work.

No water comes out.

Defective sensor.

Replace.

MAN_ROUND45TOUCHECO_ed_02-2018_49026000.indd   20

28/02/18   11:38

Summary of Contents for Round 45 Touch 45D55

Page 1: ...www ghibliwirbel com Professional Cleaning Machines Since 1968 EN Use and Maintenance 49 0260 00 ed 10 2018...

Page 2: ...www ghibliwirbel com Professional Cleaning Machines Since 1968 2 IP GVW Kg Year Art Mod Scrubber Dryer Battery mode V W Nr MADE IN ITALY Charging mode V Hz W 1 8 2 3 5 7 4 6...

Page 3: ...trieb Baujahr Artikelnummer Modell ES Fabricante Caracter sticas el ctricas N Matr cola Grado de protecci n Peso en orden de marcha A o de fabricaci n C digo del art culo Modelo PT Produtor Caracter s...

Page 4: ......

Page 5: ...www ghibliwirbel com Professional Cleaning Machines Since 1968 5 EN English ENGLISH 1 Translation of original instructions...

Page 6: ......

Page 7: ...in terms of ease of use and reliability over time We are aware that in order for a good product to stay that way over time it requires continuous updates aimed at meeting the expectations of those wh...

Page 8: ...agent tank optional EN 12 10 1 Operation EN 12 10 1 a Checks before use EN 11 10 1 b Preparing the machine and choosing the cycle EN 12 10 1 c Using the machine EN 13 10 1 d Adjusting the movement di...

Page 9: ...310mm 12 x2 Motor power number 500 Wx1 500 Wx1 450 Wx1 Motor speed 165 rpm 165 rpm 200 rpm Specific pressure 16 5 19 7 gr cm2 16 5 19 7 gr cm2 18 8 22 0 gr cm2 Carter weight 25 5 30 5 Kg 25 5 30 5 Kg...

Page 10: ...ubber wiper element 39 0110 00 39 0110 00 39 0110 00 Rear rubber wiper element 39 0111 00 39 0111 00 39 0111 00 Water loading tube 30 0024 00 30 0024 00 30 0024 00 Optional accessories 0 9 PPL strong...

Page 11: ...rier within 3 days of receipt Remove the bag 21 containing the ac cessories Cut the strap 22 Remove the wooden blocks 23 and 24 Lift the brush flange 9 by pressing down on the pedal 19 see relative pa...

Page 12: ...l enclosed with this document WARNING When the machine leaves the factory it is calibrated to operate with gel batteries If other types of batteries are installed see the paragraph Parameter setting T...

Page 13: ...the minimum traction speed is set Pressed and held while action on the touch sensor 20 the machine will move in reverse to the operator The display will show the following symbol R To move in reverse...

Page 14: ...creased once the maximum amount is reached the display will show the symbol pressing the button 51 again will deacti vate the function 52 Brush rotation enable button Button operation is enabled by pr...

Page 15: ...safe ty passwords for enabling it or disabling it please contact technical support If the pass word was enabled in order to enter the num bers follow the instructions on the display The password will...

Page 16: ...nd 47b then press the but ton 51 to confirm your selection GEL Gel battery AGM AGM battery WET ACID battery 7 1 c Brightness and contrast set ting Enter the parameter setting menu until the following...

Page 17: ...will disap pear and then you will see the symbol activating the normal operation Water dispensing presetting This appears on the display when select ing the button indicating that the wa ter dispensin...

Page 18: ...agent manufacturer 10 1 OPERATION Fig 1 9 10 1 a Checks before use Check that the exhaust tube 12 of the recovery tank is properly coupled and properly sealed Check that the connector 54 on the squee...

Page 19: ...0 Fig 1 to start the drive for models with NOTE Pay attention to particularly delicate floors do not use the machine while it s stopped and the brush rotation on For particularly dirty spots adjust th...

Page 20: ...e all the liquid on the floor then turn off the aspirator by pressing the but ton 50 Fig 9 Lift the squeegee 11 Fig 15 by lifting the lever 3 Fig 15 WARNING Always lift the wiper and the end piece aft...

Page 21: ...tion power stage over heating check absorption AL_16 Traction Power failure Traction power stage damaged Damaged traction power stage replace card AL_17 Traction Overcurrent Overcurrent on traction ou...

Page 22: ...the machine off and tanks empty 12 1 a Removable splash guard Fig 5 Remove the two pins 87 Lift the splash guard 9 to release it from the pins then stretch it slightly and re move it from the front OP...

Page 23: ...follows Disconnect the hose 13 from the squee gee 11 Loosen the knobs 32 and remove the squeegee 11 Wash the squeegee and in particular the rubber blades 60 and the inside of the aspiration connector...

Page 24: ...y water tank Fig 22 Remove the upper cover to access inside the recovery water tank Loosen the knob 80 and remove the fil ter 81 Wash the filter 81 with running water and replace it in the machine tig...

Page 25: ...anticlockwise to increase the incidence and in the other direction to de crease it 12 1 n Battery charger and digital instrument configuration Fig 25 WARNING The machine leaves production with a stan...

Page 26: ...aged Aspirator button not pressed Recovery tank full Blocked suction filter Replace Replace Replace Press the button Empty wash and clean the tank and the probes Clean the filter No chemical product c...

Page 27: ...ing Unsuitable brushes or deter gent Brush worn Use brushes or detergents which are suitable for the type of floor or dirt to be cleaned Replace the brush The brush does not rotate Aspirator does not...

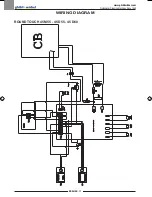
Page 28: ...www ghibliwirbel com Professional Cleaning Machines Since 1968 ENGLISH 22 WIRING DIAGRAM ROUND TOUCH 45 M55 45 D55 45 D60...

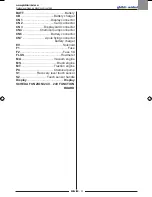
Page 29: ...r CN 3 Display card connector CN4 Chemical pump connector CN6 Battery connector CN7 2 pole flying connector battery charger EV Solenoid F1 Fuse F2 Fuse 5A FLUS Flowmeter MA Vacuum engine MS Brush engi...

Page 30: ...www ghibliwirbel com Professional Cleaning Machines Since 1968 ENGLISH 24...

Page 31: ......

Page 32: ...1968 DEALER Ghibli Wirbel S p A Via Circonvallazione 5 27020 Dorno PV Italia P 39 0382 848811 F 39 0382 84668 M info ghibliwirbel com www ghibliwirbel com 100 MADE IN ITALY A COMPANY GROUP OF RIELLO I...

Reviews: