DVD
Functions
EN
– 15 –
DVD
Hint
• Zooming function does not work while the disc menu is showing up.
• x4 zoom is not available on some discs.
• It may take several seconds to slide the zoomed picture.
• The picture may be distorted when you press
[PAUSE
k
] or [
h
]
repeatedly in the zoom mode.
• In the zoom mode, it automatically changes
x2(x4) to the
zoomed position guide.
Hint
• For DVDs, fast forward or reverse search speed is different depending
on the disc. Approximate speed is 1(x2), 2(x8), (x20), 4(x50), 5(x100).
• For Audio CDs approximate speed is 1(x2), 2(x8), (x0).
Paused and Step-by-Step Playback
DVD
Press
[PAUSE
F
] during playback.
To continue playback, press
[PLAY
B
].
DVD
The disc goes forward by one frame each time
[PAUSE
F
] is
pressed in the pause mode.
To continue playback, press
[PLAY
B
].
Fast Forward / Reverse Search
DVD
Press
[
h
] or [
g
] repeatedly during playback
to select the required forward or reverse speed.
To continue playback, press
[PLAY
B
].
To use [SKIP
j
/REV], [
i
SKIP/FWD] on this unit
Press and hold to change forward or reverse playback speed.
To continue playback, press
[PLAY
B
].
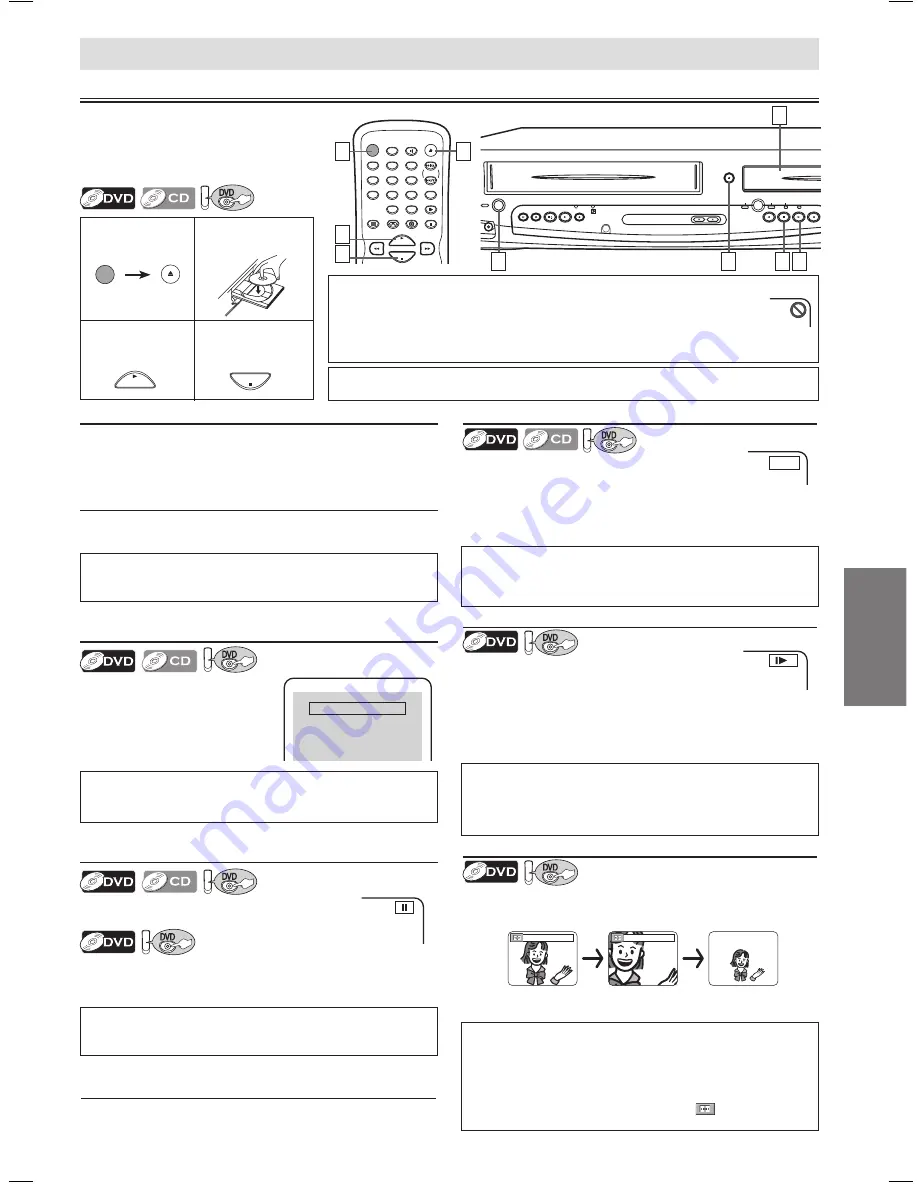
Playback
POWER
DISPLAY
VCR
DVD
PAUSE
SLOW
VCR/TV
SKIP/CH.
PLAY
STOP
REC/OTR
MENU
SETUP TOP MENU
MODE
ZOOM
SUBTITLE
T-SET
ANGLE
ENTER
RETURN
SEARCH
MODE
REPEAT
A-B
OPEN/CLOSE
/EJECT
SPEED
AUDIO
CLEAR/
C. RESET
1
2
3
4
5
6
7
8
9
0
+10
1
2
3
1
PLAY
STOP
DVD Functions
4
PLAY
STOP
POWER
OPEN/CLOSE
/EJECT
DVD menu
Some discs contain menus which allow you to customize
DVD playback. Press
[
K
/
L
/
s
/
B
] to select an item, then
press
[ENTER] (or [PLAY
B
]).
Calling up a Menu Screen during Playback
• Press
[MENU] to call up the DVD menu.
• Press
[TOP MENU] to call up the title menu.
Resume
DVD
Press
[STOP
C
] during playback.
Resume message will appear on
the TV screen.
Press
[PLAY
B
], playback will
resume from the point at which
playback was stopped.
Press 'PLAY' to play from here.
To play the beginning,
press 'STOP' first and then 'PLAY'.
Resume ON
Hint
• A “prohibited icon” may appear at the top-right on the TV screen when the operation
is prohibited by the disc or this unit.
• Some DVDs may be played from title 2 or due to specific programs.
•
During the playback of a two-layered disc, pictures may stop for a moment. This
happens while the 1st layer is being switched to the 2nd layer. This is not a malfunction.
Hint
• On DVDs, set “STILL MODE” to “FIELD” in the DISPLAY menu if
pictures in the pause mode are blurred. (Refer to pages 20-21.)
Hint
• Slow forward or reverse speed is different depending on the disc.
Approximate speed is 1(1/16), 2(1/8), (1/2).
• Set “STILL MODE” to “FIELD” in the DISPLAY menu if pictures in
the slow playback mode are blurred. (Refer to pages 20-21.)
Zoom
DVD
1) Press
[ZOOM] during playback.
2) Press
[ZOOM] repeatedly to select the required zoom
factor: x2, x4 or OFF.
x2
x4
) Press
[
K
/
L
/
s
/
B
] to slide the zoomed picture across the screen.
4) To exit zoom mode, press
[ZOOM] to select OFF.
Before: Turn on the TV, amplifier and any
other components which are connected
to this unit. Make sure the TV and audio
receiver (commercially available) are set
to the correct channel.
Insert a disc with
label facing up.
TIP:
You can change the on-screen language for DVD function in “PLAYER MENU” setting. (Refer to page 20.)
Slow Forward / Reverse
DVD
Press
[
h
] or [
g
] repeatedly in the pause
mode to select the required forward or reverse speed.
To continue playback, press
[PLAY
B
].
To use [SKIP
j
/REV], [
i
SKIP/FWD] on this unit
Press and hold in the pause mode to change forward or
reverse playback speed.
To continue playback, press
[PLAY
B
].
Hint
• To cancel resume, press
[STOP
C
] one more time in the stop mode.
• The resume information stays on even when the power is turned off.
Hint
• Menu operations may vary depending on the disc. Refer to the
manual accompanying the disc for details.
To start
playback
To stop
playback
To use [SKIP
j
/REV], [
i
SKIP/FWD] on this unit
Press once to skip a chapter or track to a desired point.
E
1
1
4
3
1
CHANNEL
STOP
REV
FWD
SKIP
H
G
SKIP
OUTPUT
DVD
DISC IN
OPEN/CLOSE
PLAY
STOP/EJECT PLAY
REC/OTR
VCR
POWER
F.FWD
REW
VIDEO
AUDIO
/
1
1
4 3
2
MJ840G_E8A0UD.indd 15
2006/02/15 1:21:5