background image

8

Actions in the event of an alarm

1.

 Proceed immediately to fresh air, outdoors or to an open window or door.

2.

 Call the fire brigade.

3.

 Do not re-enter the affected area, or remain at the open window/door.


4.

 Await the arrival of the fire brigade.


5.

 Fully ventilate all rooms.


6.

 If the danger is no longer present, the CO detector automatically resets and returns to 


    its normal state.

Displays and functions (fig. 7)

1.


Test/Silence 

button. This button is used to check the functionality or to silence the alarm.

2.

 Speaker opening. 

3.


POWER

 display (green LED signal). Signals that the device is ready for use with constant flashing at  

    30-second intervals.

4.


ERROR

 display (yellow LED signal). The error display shows malfunctions or warnings regarding 

    CO detection.

5.


ALARM

 display (red LED signal). If CO is detected, the red LED lights up.

Installation

Recommendation for maximum safety:

 Install one CO detector in each child‘s room and bedroom, in all 

rooms with gas heating, stoves/ovens or fireplaces as well as in the hallways on each floor and in the garage.

Minimum recommended level of protection:

 Install one CO detector in each hallway and in rooms with 

gas heating, stoves/ovens or fireplaces.

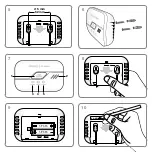
Installation position (figs. 1-4)

Install or place the alarm as centrally as possible on a clear surface and near to potential sources of danger 

(e.g. gas heaters). If installing on a wall, the minimum distance from the floor should be no less than 1.5 m, 

and the minimum distance from the ceiling should be no less than 0.2 m.

Installation and commissioning

1. 

The CO alarm can be operated in the following two varying manners:

Wall installation, or standing on a suitable base.

Follow the steps below in the specified order to install the alarm on the wall. Use a spirit level to mark the 

drill holes in a horizontal position. (Distance 52 mm — 

see fig. 5)

2.

 Drill the holes in the previously marked position using a suitable drill. (Drill diameter Ø 5 mm) Ensure that 

you do not damage any wires.

3.

 Push the wall plugs into the drill holes and screw in the two supplied screws until the screw heads are 

only protruding by approximately 5 mm. 

4. 

Open the battery compartment on the rear of the device by pressing on the hatched arrow marking and 

pushing the cover in the direction of the arrow 

(fig. 8)

.

5.

 Insert the two 1.5 AA batteries into the battery compartment, ensuring that the polarity is correct. 

The 

battery compartment has a safety mechanism:

 If batteries are not inserted, the battery compartment 

cover cannot be closed. As soon as the batteries are inserted correctly the device confirms this with a 

signal tone, and all three front LEDs briefly light up. The device is ready to use and initially switches to a 

calibration phase. During the first 30 seconds of the calibration phase, the green „

POWER

“ LED flashes 

briefly approximately every three seconds. After this, the device moves into the operating phase (the green 

POWER

“ LED lights up once every 30 seconds).

6.

 Enter the installation date on the supplied sticker as soon as possible 

(fig. 10)

7.

 The back case of the alarm can now be placed on the screws and clicked into place or set down in the 

desired position. Note the instructions in 

figs. 1-4

.

9

GB

FR

IT

PL

DE

SK

SL

CZ

Summary of Contents for FlammEx FMG 4313

Page 1: ...FMG 4313 04313 ...

Page 2: ...1 2 3 4 50 C 20 C ...

Page 3: ...9 10 5 6 7 8 3 4 5 2 1 xx xx 52 mm Ø 5 mm ...

Page 4: ...t möglich genaue Anleitungen zur richtigen Anordnung eines Detektors zu geben Symptome bei einer Kohlenmonoxid Vergiftung Schwache Anzeichen Mittelstarke Anzeichen Extreme Anzeichen Leichter Kopfschmerz Starker Kopfschmerz Bewusstlosigkeit Übelkeit Erbrechen Einschläfernd Verkrampfungen Ermüdung Verwirrung Herzrhythmusstörungen Hoher Pulsschlag Tod Wichtige Informationen Die Montage sollte durch e...

Page 5: ...ntage und Inbetriebnahme 1 Der Betrieb des CO Melders ist in den folgenden zwei Varianten möglich Wandmontage oder stehend auf einem geeignetem Untergrund Führen Sie die folgenden Schritte in der gegebenen Reihenfolge aus um den Melder an der Wand zu montieren Verwenden Sie eine Wasserwaage zum Markieren der Bohrlöcher in waagrechter Position Abstand 52 mm siehe Abb 5 2 Bohren Sie die Löcher mit e...

Page 6: ...rhalten bei Alarm 6 CO Alarm stumm schalten Während eines aktiven CO Alarms können Sie die akustische Signalisation durch betätigen der TEST SILCENCE Taste für 5 min stumm schalten Die rote ALARM LED blinkt in dieser Zeit weiterhin Falls nach Ablauf der Zeit der CO Gehalt immer noch über 45 ppm liegt ertönt auch das akustische Signalmuster wieder Hinweis Im Falle eines aktiven CO Alarms ist das er...

Page 7: ...ellen zurückgeben Batterien enthalten umwelt und gesundheitsschädliche Stoffe und müssen daher fachgerecht entsorgt werden Recycling Hinweise Dieses Gerät darf nicht mit dem unsortierten Hausmüll entsorgt werden Besitzer von Altgeräten sind gesetzlich dazu verpflichtet dieses Gerät fachgerecht zu entsorgen Informationen erhalten Sie von Ihrer Stadt bzw Gemeindeverwaltung Auslöseschwelle gemäß EN 5...

Page 8: ...round the room It is not possible to give precise instructions for the correct positioning of a detector Symptoms of carbon monoxide poisoning Minor indicators Moderate indicators Extreme indicators Mild headache Severe headache Unconsciousness Nausea vomiting Drowsiness Cramping Fatigue Confusion Irregular heart beat High pulse rate Death Important information The alarm should be installed by a c...

Page 9: ... 2 m Installation and commissioning 1 The CO alarm can be operated in the following two varying manners Wall installation or standing on a suitable base Follow the steps below in the specified order to install the alarm on the wall Use a spirit level to mark the drill holes in a horizontal position Distance 52 mm see fig 5 2 Drill the holes in the previously marked position using a suitable drill ...

Page 10: ... alarm 6 Mute CO alarm While the CO alarm is active you can mute the acoustic signals by pressing the TEST SILENCE button for five minutes The red ALARM LED continues to flash during this time If the CO content is still above 45 ppm after the time has elapsed the acoustic signal pattern sounds again Note In the event of an active CO alarm the first signal pattern is somewhat quieter 85 dB than tho...

Page 11: ...eries contain substances which are harmful to the environment and to human health and must therefore be disposed of correctly Recycling instructions This device must not be disposed of with unsorted household waste Owners are required by law to correctly dispose of used devices Contact your local town council for more information Trigger threshold in accordance with EN 50291 1 2010 A1 2012 11 Tech...

Page 12: ...e Symptômes mineurs Symptômes modérés Symptômes extrêmes Mal de tête léger Mal de tête fort Perte de connaissance Nausée vomissement Engourdissement Crampes Fatigue Confusion Troubles du rythme cardiaque Pouls accéléré Mort Informations importantes Le montage doit être réalisé par une personne compétente Un détecteur de CO ne se substitue en aucun cas à un détecteur de fumée ou d incendie Conçu po...

Page 13: ...le de 1 5 m avec le sol et de 0 20 m avec le plafond doit être respectée Montage et mise en service 1 Le détecteur de CO peut être utilisé de deux façons monté au mur ou posé sur une surface adaptée Pour un montage mural suivez les étapes ci dessous dans l ordre indiqué Utilisez un niveau à bulle pour marquer les trous de perçage en position horizontale distance 52 mm voir fig 5 2 Percez les trous...

Page 14: ...ent à tenir reportez vous au chapitre Comportement en cas d alarme 6 Activation de la fonction silence de l alarme CO lorsqu une alarme CO est active vous pouvez désactiver le signal sonore pendant 5 min en appuyant sur le bouton TEST SILENCE La LED rouge ALARM continue de clignoter pendant ce temps Une fois ce délai écoulé la séquence de signaux sonores reprend si la teneur en CO est toujours sup...

Page 15: ...ront repris gratuitement Les piles contiennent des substances dangereuses pour l environnement et la santé et doivent être recyclées selon la réglementation en vigueur Remarques concernant le recyclage Cet appareil ne doit en aucun cas être jeté avec les ordures ménagères Les propriétaires d équipements électriques ou électroniques usagés ont en effet l obligation légale de les déposer dans un cen...

Page 16: ...ntomi in caso di avvelenamento da monossido di carbonio Segni leggeri Segni medi Segni estremi Mal di testa leggero Mal di testa forte Perdita di conoscenza Malore vomito Sonnolenza Contrazioni Affaticamento Senso di smarrimento Disturbi nel ritmo cardiaco Battito accelerato Morte Informazioni importanti Il montaggio dovrebbe essere eseguito da una persona esperta Un rilevatore di CO non sostituis...

Page 17: ...riore a 1 5 m e 0 2 m dal soffitto Montaggio e messa in funzione 1 Il funzionamento del rilevatore di CO è possibile nelle due seguenti varianti Montaggio a parete o a sé stante su una base idonea Per montare il rilevatore a parete seguire gli step descritti nella sequenza indicata Utilizzare una livella a bolla d aria per segnare dove praticare i fori in posizione orizzontale Distanza 52 mm v fig...

Page 18: ...nziare l allarme CO Durante un allarme CO attivo è possibile silenziare il segnale acustico per 5 minuti premendo il tasto TEST SILENCE Il LED ALARM rosso continua a lampeggiare per tutto il periodo Se al termine di questo periodo il contenuto di CO è ancora sopra i 45 ppm anche il segnale acustico riprende Nota In caso di allarme CO attivo il primo tipo di segnale è un po più basso 85 dB rispetto...

Page 19: ...o Il presente dispositivo non deve essere smaltito come rifiuto domestico indifferenziato Chi possiede un vecchio dispositivo è vincolato per legge allo smaltimento conformemente alle normative in vigore Per ulteriori informazioni rivolgersi all amministrazione comunale Soglia di attivazione ai sensi della EN 50291 1 2010 A1 2012 Dati tecnici Denominazione del tipo FMG 4313 Tipo di apparecchio B F...

Page 20: ...ści sformułowania dokładnych instrukcji dotyczących właściwego umieszczenia detektora Objawy zatrucia tlenkiem węgla Słabe objawy Średnio silne objawy Skrajne objawy Lekki ból głowy Silny ból głowy Utrata przytomności Mdłości wymioty Senność Skurcze Zmęczenie Otumanienie Zaburzenia rytmu pracy serca Wysokie tętno Śmierć Ważne informacje Montaż może wykonywać tylko wykwalifikowana osoba Detektor CO...

Page 21: ...ódeł zagrożenia np piecyków gazowych Przy montażu ściennym odstęp minimalny powinien wynosić ponad 1 5 m od podłogi i ponad 0 2 m od sufitu Montaż i uruchomienie 1 Użytkowanie detektora CO jest możliwe w wymienionych dwóch wariantach Montaż ścienny lub ustawienie na odpowiednim podłożu Aby zamontować detektor na ścianie należy wykonać wymienione czynności w podanej kolejności Zastosować poziomnicę...

Page 22: ...nie CO w powietrzu w pomieszczeniu lub alarm jest wyłączony przez naciśnięcie przycisku TEST SILENCE Procedura alarmowa jest opisana w rozdziale Postępowanie w razie alarmu 6 Wyciszanie alarmu CO Podczas aktywnego alarmu CO można wyciszyć sygnalizację akustyczną na 5 minut poprzez naciśnięcie przycisku TEST SILENCE Czerwona dioda LED ALARM nadal miga Jeśli po upływie danego czasu zawartość CO ciąg...

Page 23: ...żytych baterii są ustawowo zobowiązani do ich zwrotu i mogą je zdać nieodpłatnie w punkcie sprzedaży Baterie zawierają substancje szkodliwe dla środowiska i dla zdrowia dlatego konieczna jest ich odpowiednia utylizacja Wskazówki dotyczące recyklingu Tego urządzenia nie wolno wyrzucać z niesegregowanymi odpadami domowymi Właściciele starych urządzeń są prawnie zobowiązani do zutylizowania urządzeni...

Page 24: ...možné poskytnúť presné návody na správne umiestnenie detektora Príznaky pri otrave oxidom uhoľnatým Slabé príznaky Stredne silné príznaky Extrémne príznaky Mierna bolesť hlavy Silná bolesť hlavy Bezvedomie Nevoľnosť Vracanie Ospalosť Kŕče Únava Zmätenosť Poruchy srdcového rytmu Vysoký pulz Smrť Dôležité informácie Montáž by mala vykonať kvalifikovaná osoba Detektor CO nie je náhradou za detektor d...

Page 25: ...enosť od podlahy predstavovať viac ako 1 5 m a od stropu viac ako 0 2 m Montáž a uvedenie do prevádzky 1 Prevádzka detektora CO je možná v nasledujúcich dvoch variantoch Montáž na stenu alebo na stojato na vhodnom podklade Ak chcete detektor namontovať na stenu vykonajte nasledujúce kroky v uvedenom poradí Použite vodováhu na vyznačenie vŕtacích otvorov vo vodorovnej polohe Vzdialenosť 52 mm pozri...

Page 26: ...ie poplachu CO Počas aktívneho poplachu CO môžete zvukovú signalizáciu na 5 min stlmiť stlačení tlačidla TEST SILCENCE Červená kontrolná žiarovka LED ALARM počas tohto časového intervalu ďalej bliká Pokiaľ má po uplynutí tohto času obsah CO ešte stále vyššiu hodnotu ako 45 ppm zaznie znovu aj akustický signálový vzor Upozornenie V prípade aktívneho poplachu CO je prvý signálový vzor trochu tichší ...

Page 27: ... zdraviu a preto sa musia likvidovať odborne Pokyny na recykláciu Tento prístroj sa nesmie likvidovať s netriedeným domovým odpadom Vlastníci použitých prístrojov sú zo zákona povinní tento prístroj odborne zlikvidovať Informácie vám poskytne mestská resp obecná správa Prah spustenia podľa EN 50291 1 2010 A1 2012 27 Technické údaje Typové označenie FMG 4313 Typ prístroja B Napájanie batériami 2 x ...

Page 28: ...ja umestitev v prostoru ni mogoče podati Simptomi zastrupitve z ogljikovim monoksidom Šibki simptomi Srednje močni simptomi Zelo močni simptomi Rahel glavobol Močan glavobol Izguba zavesti Slabost bruhanje Zaspanost Krči Utrujenost Zmedenost Motnje srčnega ritma Visok srčni utrip Smrt Pomembne informacije Namestitev mora izvesti strokovno usposobljena oseba Detektor CO ni nadomestilo za detektorje...

Page 29: ...be 1 Detektor CO lahko deluje na spodnja dva načina Namestitev na steno ali postavitev na ustrezno podlago Za namestitev detektorja na steno opravite spodnje korake v navedenem zaporedju Uporabite vodno tehtnico in označite luknji za vrtanje v vodoravnem položaju razmak 52 mm glejte sliko 5 2 Z ustreznim vrtalnikom zvrtajte luknji na prej označenih mestih Premer svedra Ø 5 mm Pazite da pri tem ne ...

Page 30: ...minut utišate in sicer s pritiskom tipke TEST SILENCE Preskus utišanje V tem času rdeči LED indikator ALARM utripa Če je po preteku tega časa vsebnost ogljikovega monoksida še vedno nad 45 ppm se ponovno vklopi zvočni signal po vzorcu Opomba ko je vklopljen alarm za ogljikov monoksid je prvi signalni vzorec nekoliko tišji 85 dB v primerjavi z drugimi ki mu sledijo 85 dB Vzdrževanje Zamenjava bater...

Page 31: ...odložiti med nerazvrščene gospodinjske odpadke Imetniki starih naprav so po zakonu dolžni naprave strokovno odstraniti Informacije o tem lahko pridobite pri mestni oz občinski upravni enoti Prag sprožitve v skladu s standardom EN 50291 1 2010 A1 2012 31 Tehnični podatki Oznaka tipa FMG 4313 naprava tipa B Delovanje z baterijami 2 x 1 5 V alkalne AA Mignon Energizer E91 Certifikat EN 50291 1 2010 A...

Page 32: ...znaky otravy oxidem uhelnatým Slabé příznaky Středně silné příznaky Extrémní příznaky Lehké bolesti hlavy Silné bolesti hlavy Bezvědomí Nevolnost zvracení Uspávající Křečovité stavy Únava Zmatenost Poruchy srdečního rytmu Velmi rychlý tep Smrt Důležité informace Montáž by měl provádět odborník Detektor CO nenahrazuje detektor kouře ohně nebo jiné požární hlásiče Tento detektor je určen pouze k pro...

Page 33: ...ektoru CO je možný v těchto dvou variantách Montáž na stěnu nebo postavení na vhodný podklad Chcete li namontovat detektor na stěnu proveďte následující kroky v uvedeném pořadí K označení otvorů v horizontální poloze použijte vodováhu Odstup 52 mm viz obr 5 2 Vhodným vrtákem vyvrtejte otvory v předem označené poloze Ø otvoru 5 mm Dejte pozor abyste nepoškodili vedení 3 Do otvorů zatlačte hmoždinky...

Page 34: ...l se spustí znovu Upozornění V případě aktivního alarmu CO je první signalizace trochu tišší 85 dB než všechny následující 85 dB Údržba Výměna baterií Baterie je zpravidla třeba vyměnit až po cca 7 letech Tento časový úsek se může měnit s ohledem na vlivy okolí Platí toto doporučení Baterie vyměňte okamžitě jakmile se ozve signalizace stavu nabití baterií ta je signalizována 2x krátkým pípnutím a ...

Page 35: ...idovat Informace obdržíte od městské nebo obecní správy Práh aktivace dle EN 50291 1 2010 A1 2012 35 Technické a optické změny jsou vyhrazeny bez předběžného upozornění GB FR IT PL DE SK SL CZ Technické údaje Typové označení FMG 4313 Typ zařízení B Bateriový provoz 2x 1 5 V alkalická AA Mignon Energizer E91 Certifikace EN 50291 1 2010 A1 2012 Hlasitost signálu cca 85 dB 1 m Skladovací přepravní te...

Page 36: ...36 ...

Page 37: ...37 ...

Page 38: ...Max 14 Ct Min aus dem deutschen Festnetz Mobil max 42 Ct Min International calls may vary GEV GmbH Heidehofweg 16 25499 Tangstedt Germany www gev de service gev de Hotline 49 0 180 59 58 555 BA01257902 ...

Reviews: