11
Safety Belt and Suspension Straps
As standard equipment the
Walker
aid has an individually
adjustable safety belt and two suspension straps for body weight
reduction and added patient security.
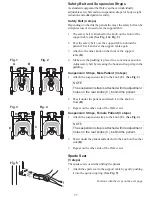
Safety Belt (4 steps)
Depending on what fits the patient the most, the safety belt can be
straight across or crossed over the support table.
1
The safety belt is attached to the knob on the front of the
support table
(A)
.
(See Fig. 1 & Fig. 2)
2
Pass the safety belt over the support table, behind the
patient’s back and over the support table again.
3
Attach to the other knob on the front of the support
table
(B)
.
4
Make sure the padding is placed in a convenient position.
Adjust safety belt by releasing the hook and loop strap in the
padding.
Suspension Straps, Male Patient (3 steps)
1
Attach the suspension strap to the knob
(C)
.
(See Fig. 3)
2
Pass it under the patient and attach it to the knob in
front
(D)
.
3
Repeat on the other side of the
Walker
aid.
Suspension Straps, Female Patient (3 steps)
1
Attach the suspension strap to the knob
(C)
.
(See Fig. 4)
2
Pass it under the patient and attach it to the knob on the other
side
(D)
.
3
Repeat on the other side of the
Walker
aid.
Spade Seat
(3 steps)
The spade seat is used when lifting the patient.
1
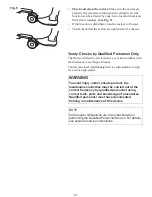
Attach the spade seat to the support table by gently pushing
it into the quick coupling.
(See Fig. 5)
Continue with the steps on the next page.
NOTE
The suspension strap is attached with its adjustment
holes on the rear knobs (C), behind the patient.
NOTE
The suspension strap is attached with its adjustment
holes on the rear knobs (C), behind the patient.
Fig. 1
A
B
Fig. 2
Fig. 3
Fig. 4
D
D
C
C
Fig. 5


