background image

Using Key Operator Settings

173

9

r

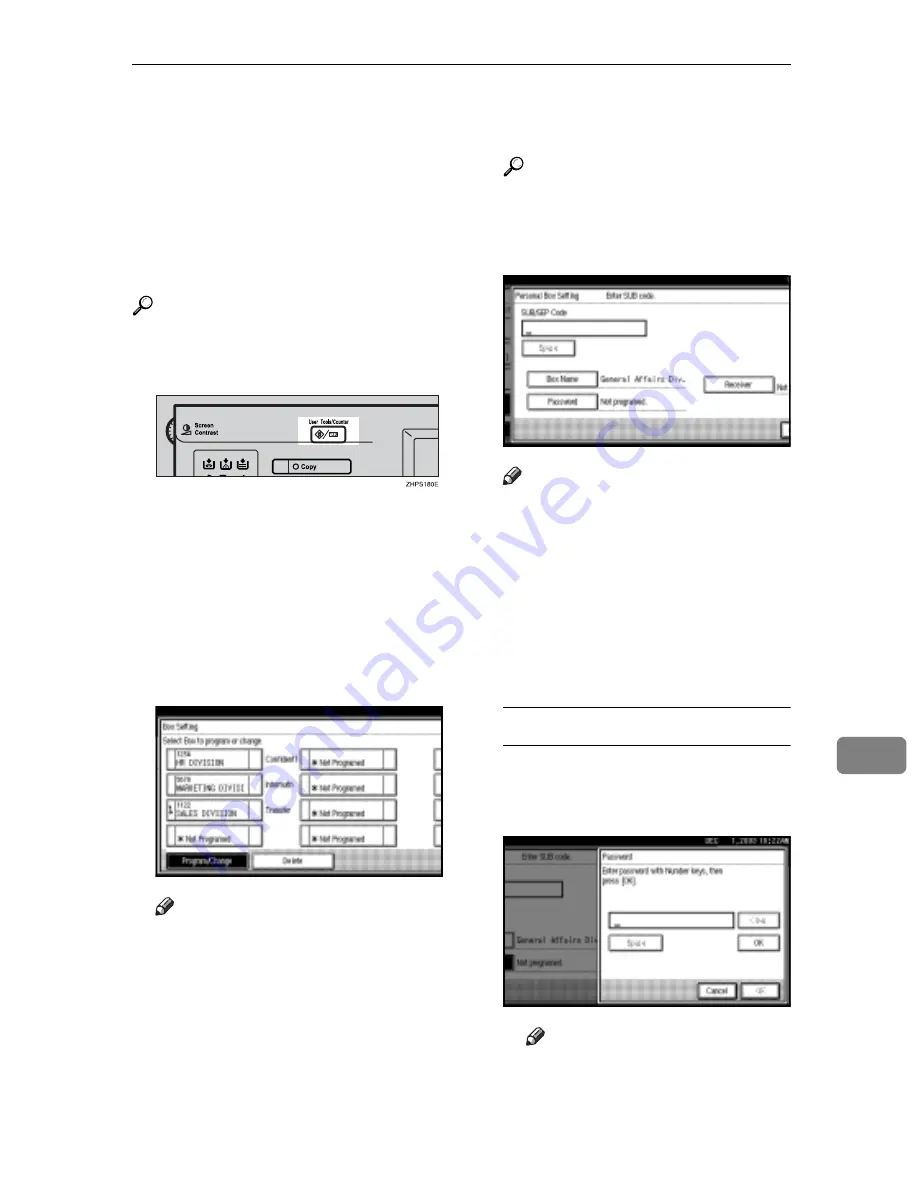
If the fax number or e-mail address
of a programmed receiver is delet-
ed using System Settings, the set-
ting for the receiver is cancelled
and a message is not delivered. If
the fax number or e-mail address of
a programmed receiver is changed,
a message is delivered to the new
fax number.

Reference

p.40 “Personal Boxes”

A

Press the 

{

User Tools/Counter

}

 key.

B

Press 

[

Facsimile Features

]

.

C

Press 

[

Key Operator Tools

]

.

D

Press 

[

Box Setting

]

.

E

Select a box to program.

When programming a new box,
press 

[

*Not Programed

]

.

Note

r

To change a box already pro-
grammed, press it and proceed
to step 

H

F

Press 

[

Personal Box

]

.

G

Enter a box name, and then press

[

OK

]

.

Reference

“Entering Text”, 

General Set-

tings Guide


H

Enter a SUB Code.

Note

r

To change the SUB Code, press

[

Clear

]

 or the 

{

Clear/Stop

}

 key, and

then try again. To change a Box
name, press 

[

Box Name

]

, and then

repeat the procedure from step 

G

I

Specify the settings you require.

If you do not want to program a pass-
word or receiver, proceed to step 

J

.

Programming a password

A

Press 

[

Password

]

.

B

Enter a password, and then
press 

[

OK

]

.

Note

r

If you make a mistake, press

[

Clear

]

 or the 

{

Clear/Stop

}

 key

before pressing 

[

OK

]

, and

then try again.

Summary of Contents for DSm635

Page 1: ...rom the Windows application then select LAN Fax as the printer and then specify a destination In addition to sending faxes LAN Fax Driver allows this machine to be used for printing out documents prep...

Page 2: ...and Windows NT 4 0 the in stallers for various drivers and utilities launch automatically as Auto Run pro grams when you insert the CD ROM If your operating system is Windows 2000 XP or Windows NT 4...

Page 3: ...pending on your operating system settings the installer may not launch automatically If it does not double click SET UP EXE in the CD ROM root directory to launch the installer C Select the interface...

Page 4: ...ws 95 98 Me Microsoft Windows 2000 XP Microsoft Windows NT 4 0 Display VGA 640 480 dots or more Limitation r All operations cannot be guaran teed depending on the system en vironment r When you use Wi...

Page 5: ...dows XP Professional select Printers and Faxes on the Start menu r With Windows XP Home Edi tion select Control Panel on the Start menu Next select Print ers and Other Hardware and then Printers and F...

Page 6: ...he LAN Fax dialog box appears Note r The setting method may differ depending on the application you are using In all cases select LAN Fax M3 for the printer D Specify the destination Use one of the fo...

Page 7: ...e destinations matching the selected parameters appear C Click the destination to high light it and then click Set as Destination The entered destination is add ed and displayed in the List of Destina...

Page 8: ...B Specify options you want to use v To send the fax document at a spe cific time Select the Sending at Specific Time check box and then speci fy a transmission time v To send with a user code Enter a...

Page 9: ...er User ID Status Number of pages Start time File No Reference For details see Help Printing and Saving You can print documents created us ing Windows applications You can also save documents in TIF f...

Page 10: ...The image file is saved in the specified folder Editing Address Book You can program and edit destina tions in the address list using the Ad dress Book For details see Help A On the Start menu point...

Page 11: ...et Monitor for Admin and edit it to reg ister in the LAN Fax s Address Book Reference For more information see Help on SmartNetMonitor for Admin Managing the facsimile functions using SmartNetMonitor...

Page 12: ...then click Cover Sheet Editor The dialog box of LAN Fax Cover Sheet Editor appears B Edit the cover sheet Note r For details about operations see Help C Click Save as on the File menu D Select a folde...

Page 13: ...communication error with a computer See p 159 User Parameters switch 20 bit 0 Message Causes and Solutions Cannot access the print er Click retry to send the data again Check the network connection C...

Page 14: ...for fax the report is not sent Note r You can select whether or not a LAN Fax Error Report is printed See p 159 User Parameters switch 20 bit 0 LAN Fax Result by E mail If you entered a user code in...

Page 15: ...face Board using a Web Browser Network Guide Viewing Printing andDeleting Received Fax Messages Using a Web Browser Use the following procedure to view and or print received fax messages using a Web...

Page 16: ...i page TIFF causes a downloading confirmation win dow to appear Note r The method for downloading differs depending on the select ed format For more informa tion see Help on the Web browser Printing f...

Page 17: ...check box be side the fax message to be delet ed Note r You can select the thumbnail display details display or icon display Click Thumbnails De tails or Icons E Click Delete F Click Delete File Note...

Page 18: ...B Code Own Name or Own Fax Number are saved in the delivery server inbox You can also set so that the re ceived messages are stored in the specified delivery server in box according to the used line f...

Page 19: ...ion Transfer Re quest two sided transmission en tering text reception confirmation settings and BCC transmission settings optional functions Program name up to 20 charac ters Note r The maximum number...

Page 20: ...tep E F Enter the program name and then press OK The standby display appears Note r If you make a mistake press Backspace or Delete All and then try again r You should register the pro gram name r To...

Page 21: ...ame and then press OK Note r Press Cancel to cancel the change and proceed to step F F Press Exit The standby display appears Deleting a Program A Make sure that the machine is in facsimile mode and t...

Page 22: ...e Facsimile key B Place the original Note r If you have no programmed destinations or scan settings as programs enter the fax number of the destination and select the scan settings you require C Press...

Page 23: ...ne might be lost if some kind of failure oc curs The manufacturer shall not be responsible for any damage that might result from the loss of data Note r Stored documents are not deleted even when ther...

Page 24: ...ormation of Stored Docu ments A Make sure that the machine is in facsimile mode and the standby display is shown If the standby display is not shown press the Facsimile key B Place the original and th...

Page 25: ...to switch between titles r To set an non programmed user name press Non pro grammed Name and then en ter the name User names entered by pressing Non pro grammed Name are not pro grammed into the user...

Page 26: ...ou have selected Store only proceed to step H H Press the Start key Changing Information of Stored Documents You can change the file name user name and password of stored docu ments To change a stored...

Page 27: ...user name and then press OK Note r Press the title keys to switch between titles r To set a non programmed user name press Non pro grammed Name and then en ter the name r User names entered by press i...

Page 28: ...te r You can program one of the Quick Operation keys with operations for this function Using the key allows you to omit steps A and B A Press Sub TX Mode B Press Select Stored File C Press Manage Dele...

Page 29: ...nt properties Properties Deleting documents Delete Copying documents to a computer Copy Printing documents Print from Document Server Exporting documents as files Ex port Document For more information...

Page 30: ...Simplifying the Operation 136 7...

Page 31: ...gs Adjustment Description Reference Default Transmission Mode and scan set tings When the power is turned on settings specified here are selected Memory Immediate Transmission Switch Text Size Priorit...

Page 32: ...antity See p 167 Reception File Print Qty Two Sided Print See p 97 Two Sided Printing Reception Reverse Printing See p 100 Reverse Order Printing Paper Tray See p 168 Paper Tray Specify Tray for Lines...

Page 33: ...the new settings The previous display appears Description Reference Program Change Delete Standard Mes sage Store Change Delete Auto Document Program Change Delete Scan Size Print Journal Transmissio...

Page 34: ...digits max imum using the number keys and select Partial or All Initial Settings to limit access When Partial is selected Only Key Operator Tools are protected with a Key Operator Code When All Initi...

Page 35: ...System Settings General Settings Guide A Press the User Tools Counter key The main menu display for default settings appears Note r With a Key Operator Code pro grammed changing the default causes th...

Page 36: ...e this function for selecting the title to be shown on the destination list Title 1 Title 2 Title 3 v Change Initial Mode Use this function to select whether contents registered in program No 1 are to...

Page 37: ...eration keys are shown on the menu immedi ately after the power is turned on The Quick Operation keys can be programmed with the following functions Journal TX File Status Transmission File Status Pri...

Page 38: ...l duplex unit Specify whether or not received fax messages are to be printed on both sides of paper ON OFF v RX Reverse Printing Reception Re verse Printing Specify whether or not received fax message...

Page 39: ...inted at the bottom of received fax messag es ON OFF E mail Settings v Internet Fax Setting You can select to display or not When you want to send an In ternet Fax set ON to display the icon ON OFF v...

Page 40: ...s that do not match the authorized address is discarded and an error message is returned to the SMTP server The authorized e mail address is compared with the addresses of e mail originators as illust...

Page 41: ...e Scan Size You can program change or cancel frequently used scan sizes p 152 Programming Chang ing and Deleting a Scan Size Print Journal Prints a Journal p 154 Printing the Journal Transmission Page...

Page 42: ...ram Memory Lock ID Registers an ID required for Memory Lock reception p 183 Programming a Memo ry Lock ID Select Dial Push Phone Selects a line type when you connect the machine to a G3 analog line No...

Page 43: ...res sec tion messages r Use the same procedure to pro gram and change your messages A Press the User Tools Counter key B Press Facsimile Features C Press Key Operator Tools D Press Program Change Dele...

Page 44: ...owing items in an Auto Document Originals 6 documents maximum when the optional fax function up grade unit is installed 18 docu ments maximum only one page per file Scan settings resolution original t...

Page 45: ...a file name and then press OK Reference Entering Text General Set tings Guide Proceed to step H F Place the original and then select any scan settings you require Note r You can also specify a scan s...

Page 46: ...e When you select a scan size to scan a non standard size original two cus tom sizes are available Program Size 1 and Program Size 2 Use these func tions to program a custom size in ad vance To change...

Page 47: ...displayed r If you make a mistake press Clear or the Clear Stop key and then try again r To cancel a scan size press Can cel G Select a vertical size and then press OK Note r A displayed vertical siz...

Page 48: ...tions transmissions performed by the machine You can print the Journal using the Informa tion menu See p 27 Printing the Journal Counters This function allows you to check the total number of pages tr...

Page 49: ...nction You can then switch the function on or off merely by pressing the Quick Operation key The function is on when the Quick Operation key has been highlight ed r If you want to change End Receiv er...

Page 50: ...the destination list and then press OK The receiver name is shown to the right of Receiver Note r Pressing to switch the des tination between fax number and e mail address G Press OK H Press the User...

Page 51: ...e enter the Memory Lock ID A user without the ID cannot print the message This prevents unautho rized users from seeing the message Preparation To use Memory Lock program the Memory Lock ID and then s...

Page 52: ...through the following procedure Note r If you turn ECM off you cannot use the following functions JBIG Transmission Super G3 Communication A Press the User Tools Counter key B Press Facsimile Feature...

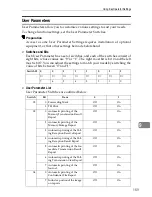
Page 53: ...he value of bits between 0 and 1 v User Parameter List User Parameter Switches are outlined below Switch 02 0 0 1 1 1 0 1 1 7 6 5 4 3 2 1 0 Switch Bit Item 0 1 02 0 Forwarding Mark Off On 3 TSI Print...

Page 54: ...ing from only specified senders Receiving all mes sages except those from specified senders 10 1 Combine two originals Off On 3 Pagereductionwhenprinting Off On 11 6 Local print when forwarding Off On...

Page 55: ...minutes 0011 3 minutes 0100 4 minutes 0101 5 minutes 0110 6 minutes 0111 7 minutes 1000 8 minutes 1001 9 minutes 1010 10 minutes 1011 11 minutes 1100 12 minutes 1101 13 minutes 1110 14 minutes 1111 15...

Page 56: ...tches be tween 1 and 0 Note r Repeat from step F to change another bit number for the same switch G Press OK Note r To cancel these settings press Cancel The display returns to that of step E H Repeat...

Page 57: ...gs for individual numbers as necessary using the Special Sender Registration function The following items can be pro grammed Special Senders Up to 30 A maxi mum of 50 when the optional fax function up...

Page 58: ...Sender function in Initial Set Up the settings will be the same as the Reception Settings See p 144 Re ception Settings Authorized Reception Use this function to limit incoming senders The machine onl...

Page 59: ...s Special Senders If you do not pro gram any Special Senders the ma chine prints the specified number of copies for all received documents Limitation r You cannot use multi copy print ing with Polling...

Page 60: ...Free Polling you cannot select the pa per tray Note r If the machine receives a message that has a different size from the paper in the specified tray the ma chine prints it after splitting it or min...

Page 61: ...to ON See p 144 Reception Settings Forwarding A Select Forwarding B Select ON or OFF If you select OFF proceed to step D Note r Selecting Same as basic set tings will result in the same setting made f...

Page 62: ...p 144 Reception Settings Memory Lock A Select Memory Lock B Select ON or OFF and then press OK Note r Selecting Same as basic set tings will result in the same setting made for Program Memory Lock ID...

Page 63: ...u can also specify the Bypass Tray Paper Size A Press the User Tools Counter key B Press Facsimile Features C Press Key Operator Tools D Press Program Special Sender E Press Initial Set Up F Select th...

Page 64: ...ation the machine will detect it as A3L r If you select Standard Size select a paper size displayed and then proceed to step G r If you select Custom Size proceed to step D C Select the size you want...

Page 65: ...er Tools Counter key B Press Facsimile Features C Press Key Operator Tools D Press Program Special Sender E Press Delete and then select the Special Sender you want to de lete F Press Delete Note r To...

Page 66: ...ng changing Personal Boxes This section describes how to pro gram Personal Boxes You can store the following items Box name required Up to 20 characters long SUB Code required Up to 20 characters long...

Page 67: ...en programming a new box press Not Programed Note r To change a box already pro grammed press it and proceed to step H F Press Personal Box G Enter a box name and then press OK Reference Entering Text...

Page 68: ...r A Press Receiver B Select a destination using the Quick Dial Table and then press OK J Press OK twice K Press Exit L Press the User Tools Counter key The standby display appears Deleting Personal Bo...

Page 69: ...0 characters long SEP Code required Up to 20 characters long and can be composed of digits 0 9 and spaces the first character can not be a space Password optional Up to 20 characters long and can be c...

Page 70: ...name press Box Name and then repeat the procedure from step G I Press Password Note r If you do not want to program a password proceed to step M J Enter a password and then press OK Note r If you mak...

Page 71: ...ile Features C Press Key Operator Tools D Press Box Setting E Press Delete and then select the box you want to delete With a programmed password A Enter a password using the number keys and then press...

Page 72: ...character can not be a space Password optional Up to 20 characters long and can be composed of digits 0 9 and spaces the first character can not be a space Note r When programming a pass word a mark i...

Page 73: ...t Programed Note r To change a box already pro grammed press it and then proceed to step F Press Transfer Box G Enter a Box name and then press OK Reference Entering Text General Set tings Guide H Ent...

Page 74: ...Clear or the Clear Stop key before pressing OK and then try again r If you want to change the password after pressing OK press Change and then per form from step B D Press OK J Press OK K Press Exit...

Page 75: ...that of step D r To cancel printing a list after pressing the Start key press Stop Printing The display re turns to that of step D F Press the User Tools Counter key The standby display appears Trans...

Page 76: ...print a Confidential Reception See p 36 Printing a Confidential Message Note r If you do not program a Confiden tial ID you cannot receive a Confi dential Transmission A Press the User Tools Counter k...

Page 77: ...n ID using the number keys and A to F and then press OK Note r A Polling ID can be any combi nation of digits 0 9 and letters A F except 0000 and FFFF r If you make a mistake press Clear or the Clear...

Page 78: ...C Press Key Operator Tools D Press Select Dial Push Phone E Press Push Button Phone or Dial Phone 10PPS to select the line and then press OK Reference p 193 Selecting the Line Type F Press the User To...

Page 79: ...he machine will start print ing and deleting saved documents with the oldest one r You can store received documents up to a total of approximately 320 pages or 2 240 when the optional expansion memory...

Page 80: ...rammed user code has been deleted using the Address Book Management function under System Settings you cannot view received and saved documents us ing a Web browser Select OFF in step E or reprogram a...

Page 81: ...ontents of the ma chine memory for example pro grammed numbers will not be lost However if power is lost for about one hour because the main power switch is turned off there is a power cut or the powe...

Page 82: ...shown on the display before you unplug the machine If a lower value is shown some data is currently present in memory r Right after a power failure the in ternal battery needs to be suffi ciently rech...

Page 83: ...ion cannot be sent the Error Report Mail is printed by the machine r If an error occurs when an e mail is received via SMTP the SMTP server sends an error e mail to the originator of the message Refer...

Page 84: ...Solving Operation Problems 190 10...

Page 85: ...dd ink to the cartridge by yourself Neglecting this can cause ink leakage r Be sure not to dirty your fingers with ink from the cartridge A Lift the ADF and then open the stamp cover B Pull out the ca...

Page 86: ...em See p 67 Initial Settings and Adjustments Facsimile Reference Basic Features r Make sure the connector is the correct type before you start v Where to connect the machine 1 G3 interface unit connec...

Page 87: ...You can connect the optional handset or an external telephone to the machine You can use it for telephone calls Note r Some external telephones may not be connected or may suffer reduced func tionalit...

Page 88: ...Appendix 194 11 v Adjusting the handset bell volume Adjust the handset ringer volume using the volume switch Ringer 1 3 2 6 9 5 8 0 4 7 ND1X00E1...

Page 89: ...ic Sender Program Transmission Result Box Expansion Memory 32MB DIMM This allows you to send fax messages at high resolution Super Fine This also allows you to receive fax messages at high resolution...

Page 90: ...Irregular size 304 432 mm 12 17 Maximum scanning size 297 1 200 mm 11 47 Print process Printing on standard paper using a laser Transmission speed G3 33 600 31 200 28 800 26 400 24 000 21 600 19 2 00...

Page 91: ...mail with a computer that has an e mail address E mail send functions Automatic conversion of sent documents to e mail format and e mail transmission Memory transmission only E mail receive functions...

Page 92: ...ize and scanned area v Exposure Glass v ADF Where original is set Acceptable original size Maximum number of sheets Paper thickness Exposure glass Up to A3 297 420 mm 11 17 279 432 mm 1 ADF one sided...

Page 93: ...riginal narrower than about 264 mm 10 4 is scanned as B4 JIS Originals up to 1 200 mm 47 2 in length can be scanned Refer to the table below for sizes the machine can detect when you place an original...

Page 94: ...W L from the ADF Immediate Transmission 297 1 200mm 11 47 W L from the ADF Note r During Immediate Transmission the length of the scanning range can be come narrower than 1 200 mm 47 depending on the...

Page 95: ...x 2 240 Approx 2 240 Total number of all documents 400 800 400 800 The number of pages per file 1 000 1 000 1 000 1 000 The number of pages for all files 1 000 1 000 3 000 3 000 The number of destina...

Page 96: ...he number of trans mission records the machine can store 200 1 000 2 200 1 000 2 The number of stored documents you can specify at one time 1 000 1 000 1 000 1 000 The number of stored documents you c...

Page 97: ...n 8 Counters 147 154 Cover sheet 113 D Default ID Free Polling Reception 13 Default ID Transmission 10 11 75 Deleting Information Box Messages 45 programmed destinations 117 Destination Adding 21 Chec...

Page 98: ...mission Functions 77 Multi copy 85 Multi copy Reception 98 Multi port 59 Multistep Transfer 90 O On Hook Dial 56 Optional Equipment 195 Originals 198 Output Tray 105 P Page Reduction 101 Page Separati...

Page 99: ...0 Simultaneous Broadcast 79 SMTP 94 SMTP reception 93 Special Senders 163 Special Senders to Treat Differently 163 Specifications 196 Stamp 72 Stamp Cartridge 191 Standard Messages 149 Deleting 149 Pr...

Page 100: ...206 MEMO...

Page 101: ...207 MEMO...

Page 102: ...208 EN USA B653 8657 MEMO...

Reviews: