background image

14

MANUTENZIONE - MAINTENANCE - ENTRETIEN - WARTUNG - 

MANUTENCIÓN - ОБСЛУЖИВАНИЕ - ΣΥΝΤΗΡΗΣΗ - 

保养

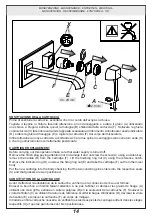
SOSTITUZIONE DELLA CARTUCCIA

Prima di sostituire la cartuccia, accertarsi che il raccordo dell’acqua sia chiuso. 

Togliere il tappino in finitura facendo attenzione a non danneggiarlo e svitare il grano (A) utilizzando 

una chiave a brugola, estrarre quindi la maniglia (B) sfilandola dalla cartuccia (F). Sollevare la ghiera 

copricartuccia (C) facendo leva tramite l’apposita scanalatura di riferimento. Allontanare l’anello indicatore 

(D), svitare la ghiera di fissaggio (E) e togliere la cartuccia (F) dal corpo del miscelatore. 

Infine introdurre la nuova cartuccia, accertandosi che le due spine di centraggio siano nella loro sede (X) 

e che le guarnizioni siano correttamente posizionate.

CARTRIDGE REPLACEMENT

Before carrying out this operation make sure that water supply is turned off. 

Remove the finish plug paying attention not to damage it and unscrew the screw (A) using an Allen key, 

remove the handle (B) from the cartridge (F). Lift the finishing ring nut (C) using the reference notch. 

Remove the indicator ring (D), unscrew the fixing ring nut (E) and take the cartridge (F) out from the mixer 

body. 

Put the new cartridge into the body checking that the two centering pins enters into the respective seats 

(X) and that gaskets are well positioned.

SUBSTITUTION DE LA CARTOUCHE

Avant d’effectuer la substitution de la cartouche, vérifier que la connexion de l’eau est fermée. 

Enlever le bouchon en finition faisant attention à ne pas l’abîmer et dévisser les grains de fixage (A) 

utilisant une clé à griffe, extraire en suite la poignée (B) en la soulevant de la cartouche (F). Soulever la 

virole de finition (C) en utilisant la rainure de référence. Quitter la bague d’indication (D), dévisser la virole 

de fixation (E) et enlever la cartouche (F) du corps de mitigeur. 

Introduire enfin la cartouche nouvelle, en vérifiant que les deux pivots de centrage entrent dans les sièges 

respectifs (X) et que les garnitures sont bien positionnées.

X

A

B

C

E

D

F

 2,5 mm

Ch. 28 mm

Summary of Contents for MIMI 44865

Page 1: ...a Vercelli Italy Phone 39 0163 454111 Facsimile 39 0163 459273 www gessi com gessi gessi it PROGRAMMA MISCELAZIONE BAGNO BATH MIXING PROGRAM PROGRAMME DU MITIGEUR POUR LA SALLE DE BAIN BAD MISCHUNGSPR...

Page 2: ......

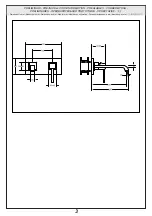
Page 3: ...3 PRELIMINARI PRE INSTALLATION INFORMATION PR ALABLES VORBEREITUNG PRELIMINARES Dimensioni in mm Measures in mm Dimensions en mm Ma im mm Medidas en mil metros mm...

Page 4: ...tubes A travers les tuyauteries qui ne sont pas bien rinc es ou travers l installation hydrique g n rale des corps trangers peuvent entrer dans le m langeur et ab mer les joints les joints anneau On...

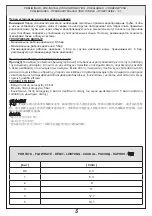
Page 5: ...IMINARI PRE INSTALLATION INFORMATION PR ALABLES VORBEREITUNG PRELIMINARES 0 5 5 3 5 0 5 bar 5 bar 3 bar 5 bar 0 5 5 3 5 PORTATA FLOW RATE D BIT LEISTUNG CAUDAL bar l min 0 5 4 5 1 6 3 2 9 3 11 4 12 7...

Page 6: ...6 PRELIMINARI PRE INSTALLATION INFORMATION PR ALABLES VORBEREITUNG PRELIMINARES A B C D E F G H M L...

Page 7: ...A Plaque de finition B Levier complet C Enceinte cartouche D Bouche de d bit E Rondelle de finition F Raccordement pour corps interne G Bague indicateur H Virole en finition L Plaque de fixation M Vis...

Page 8: ...8 INSTALLAZIONE INSTALLATION INSTALLATION INSTALLATION INSTALACI N Fig 3 Fig 1 Fig 4 Fig 2 3 mm 3 mm 3 mm...

Page 9: ...9 INSTALLAZIONE INSTALLATION INSTALLATION INSTALLATION INSTALACI N Fig 7 Fig 5 Fig 8 Fig 6 3 mm 3 mm 2 mm...

Page 10: ...0 INSTALLAZIONE INSTALLATION INSTALLATION INSTALLATION INSTALACI N Fig 11 Fig 9 Fig 12 Fig 10 Non in dotazione Not supplied Non fournie Nicht mitgelieferte Excluida del suministro GRASSO GREASE 2 5 mm...

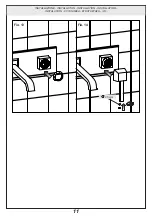
Page 11: ...11 INSTALLAZIONE INSTALLATION INSTALLATION INSTALLATION INSTALACI N Fig 13 Fig 14 2 5 mm...

Page 12: ...12 FUNZIONAMENTO WORKING FONCTIONNEMENT FUNKTIONST TIGKEIT FUNCIONAMIENTO Fig 15 Fig 16 OFF ON HOT MIX COLD...

Page 13: ...Complete lever 2 Cartridge fastening ring nut 3 Cartridge 4 Aerator Pi ces de rechange 1 Levier complet 2 Virole de fixation cartouche 3 Cartouche 4 Mousseur Ersatzteile 1 Bediengriff komplett 2 Vers...

Page 14: ...nd unscrew the screw A using an Allen key remove the handle B from the cartridge F Lift the finishing ring nut C using the reference notch Remove the indicator ring D unscrew the fixing ring nut E and...

Page 15: ...Schlie lich eine neue Kartusche einsetzen wobei man sich vergewissert dass sich die beiden Zentrierstifte in ihrem Sitz X befinden und das die Dichtungen korrekt positioniert sind SUSTITUCI N DEL CART...

Page 16: ...is damaged just replace it and assemble everything in the opposite sequence NETTOYAGE SUBSTITUTION DE L AERATEUR Avant d effectuer la substitution de la cartouche v rifier que la connexion de l eau es...

Page 17: ...cerrada En el caso de que la erogaci n no fuese fluida destornillen el aireador utilizando la llave incluida en el suministro y extr iganlo de su propio asiento Si el aireador resultara atascado es s...

Page 18: ...18 NOTE NOTES NOTES ANMERKUNG NOTAS...

Page 19: ......

Page 20: ...ET 42972 R0...

Reviews: