background image

2 - 14

M510C Series  Notebook PC

You can customize the pointing device to meet your personal needs.  For
example, if your are a left-hand user, you may want to swap the functions of the
two buttons.  In addition, you can change the size, shape, moving speed, and
other advanced features of the cursor on the screen.

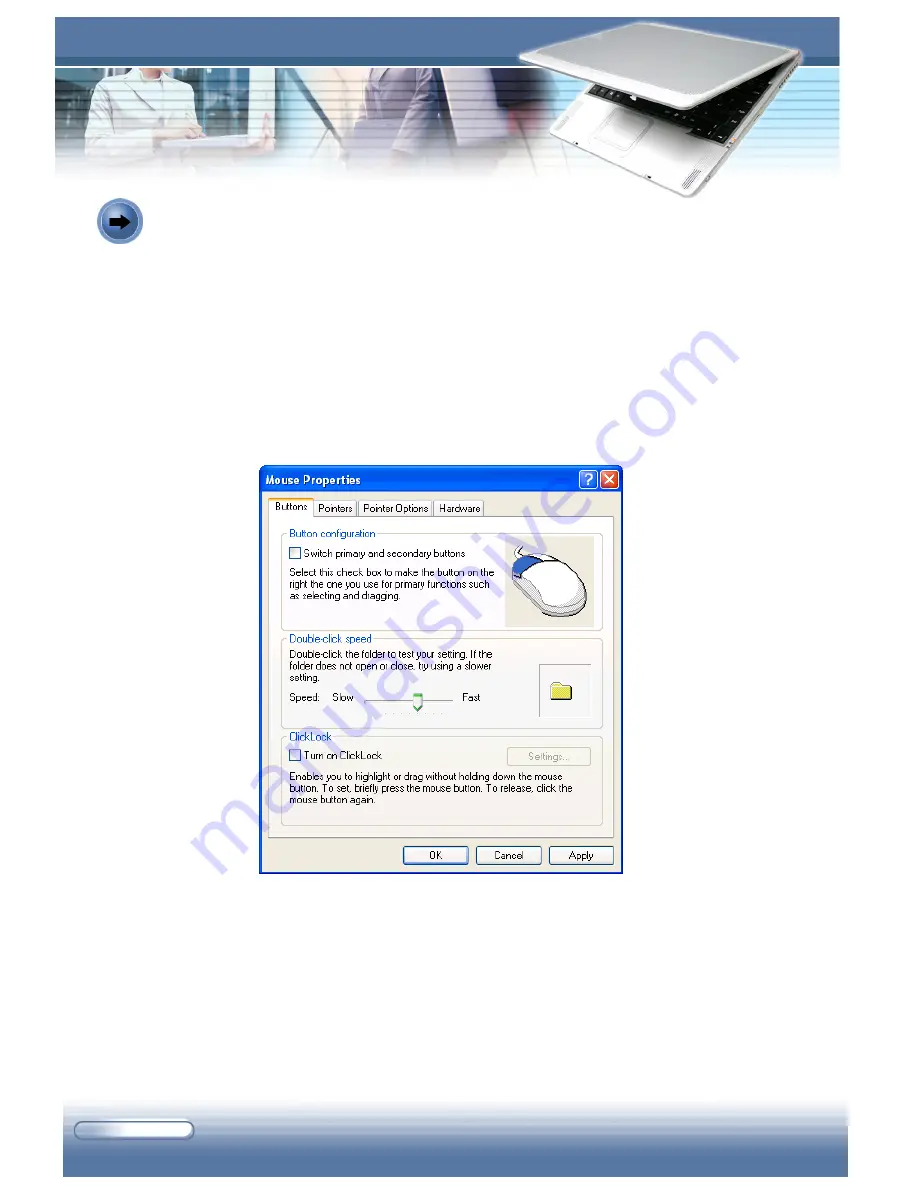
To configure the touchpad, you can use the standard Microsoft or IBM PS/2
driver in your Windows operating system.  The 

Mouse Properties

 in 

Control

Panel 

allows you to change the configuration.

Mouse Properties window

Configuring the Touchpad

Summary of Contents for M510C

Page 1: ...I M510C Notebook PC M510C Notebook PC M510C Notebook PC M510C Notebook PC M510C Notebook PC User s Guide User s Guide User s Guide User s Guide User s Guide G52 B1003X2...

Page 2: ...t off and on the user is encouraged to try to correct the interference by one or more of the following measures z Reorient or relocate the receiving antenna z Increase the separation between the equip...

Page 3: ...nnish VAROITUS Paristo voi r j ht jos se on virheellisesti asennettu Vaihda paristo ainoastaan valmistajan suosittelemaan tyyppiin H vit k ytetty paristo valmistajan ohjeiden mukaisesti French ATTENTI...

Page 4: ...e function other than a cordless type during an electrical storm There may be a remote risk of electric shock from lightning 6 Do not use the telephone function to report a gas leak in the vicinity of...

Page 5: ...ord before inserting any add on card or module 9 All cautions and warnings on the equipment should be noted 10 Never pour any liquid into the opening that could damage the equipment or cause an electr...

Page 6: ...ipment please ask your local vendor for help Trademarks All trademarks are the properties of their respective owners Microsoft is a registered trademark of Microsoft Corporation Windows 98 ME 2000 XP...

Page 7: ...ide View 1 7 z z z z z Rear View 1 8 z z z z z Bottom View 1 10 1 3 Preparing to Operate 1 12 z z z z z Connecting the Power 1 12 z z z z z Turning On Off the Notebook PC 1 14 2 1 Safety and Comfort T...

Page 8: ...on 2 20 z z z z z Powerful Video Controller 2 20 z z z z z Display Modes 2 21 z z z z z Configuring the Display Settings 2 22 2 8 Using the Audio Function 2 24 z z z z z Connecting Audio Devices 2 24...

Page 9: ...un BIOS Setup 5 2 z z z z z Control Keys 5 3 5 2 Main Menu 5 4 5 3 Advanced Menu 5 6 5 4 Security Menu 5 8 5 5 Peripheral Menu 5 11 5 6 Boot Menu 5 12 5 7 Exit Menu 5 14 6 1 Connecting the External De...

Page 10: ...r Computer 7 2 z z z z z Setting Up Password 7 3 z z z z z Using the Anti Virus Protection 7 4 7 2 Tips for Traveling 7 5 7 3 Taking Care of Your Computer 7 6 z z z z z Placing and Operating Your Comp...

Page 11: ...his chapter first provides a general introduction on your Notebook PC to let you know the hardware components well and start to work easily Why wait Read on to learn more about the powerful features a...

Page 12: ...keep the box and packing materials in case you need to ship the unit in the future The package should contain the following items One M510C Notebook PC One Software CD containing the drivers and util...

Page 13: ...e up to 480Mb s The USB standard allows you to connect up to 127 devices through the single interface including mouse keyboard printer hard disk drive digital camera and more IEEE 1394 Support IEEE 13...

Page 14: ...ection provides the multi views of your Notebook PC and briefly introduces the function of each component Press the Cover Button to open the top cover see page 1 6 and you can find the main operating...

Page 15: ...Lock glows Green to indicate the Caps Lock function is activated Scroll Lock glows Green to indicate the Scroll Lock function is activated Hard Disk In use blinks Green to indicate the computer is ac...

Page 16: ...mode Battery Status glows Green to indicate the battery is being charged with AC adapter connected glows Orange to indicate low battery power less than 5 blinks Orange to indicate the battery failed U...

Page 17: ...Type II PC card for expansion functions such as LAN WLAN card modem card memory card etc Optical Storage Device AslimCD ROM DVD ROM CD RW DVDCombo DVDDualdriveisavailable in the computer depending on...

Page 18: ...culation PowerConnector To connect the AC adapter and supply power for the computer S VideoConnector By using a Super VHS S Video cable this connector allows you to connect a television NTSC PAL syste...

Page 19: ...s that allows you to connect high end digital devices such as the DV digital video camera RJ 45 Connector The 100 10 Ethernet connector is used to connect a LAN cable for network connection RJ 11 Conn...

Page 20: ...1 10 M510C Series Notebook PC Bottom View Carefully put the computer upside down and you can find the core components of the computer...

Page 21: ...e memory size up to 2GB Please note that the memory installation replacement must be done by an authorized retailer HardDiskDriveCompartment This compartment contains a holder to secure the hard disk...

Page 22: ...the AC adapter is connected the battery is charged immediately ConnectingtheACPower 1 Unpack the package to find the AC adapter and power cord 2 Attach the power cord to the connector of the AC adapt...

Page 23: ...d then unplug the connector from the computer Remind you 1 The AC adapter included in the package is correct for your Notebook PC using other adapter model may damage the computer or other devices on...

Page 24: ...connected you are ready to use your computer OpeningtheTopCover First open the top cover by pressing the cover button on the right side of the computer and then lifting the top cover gently You can ti...

Page 25: ...perating system such as Microsoft Windows XP in this manual should start and you can start to work with your Notebook PC Remind you Power On Self Test The POST Power On Self Test is a software control...

Page 26: ...ys use the Shut Down command of the system to turn off the computer This is the normal operating procedure that can prevent the system problems 1 Click Start from the taskbar and then select the Turn...

Page 27: ...st and then turn off the computer Otherwise you may lose your data 2 Confirm that the Hard Disk In use LED is OFF before turning off the computer Also remember to remove any CD disk from the drive 3 G...

Page 28: ...1 18 MS XXXX Notebook...

Page 29: ...rating basics for your Notebook PC including the use of keyboard touchpad LCD panel hard disk drive and optical storage device It also includes the advanced features such as audio and communication fu...

Page 30: ...port your back comfortably Place your feet flat and naturally on the floor so that your knees and elbows have the proper position about 90 degree when operating Put your hands on the desk naturally to...

Page 31: ...keep the following tips in mind when operating Change your posture frequently Stretch and exercise you body regularly Remember to take breaks after working for a period of time Adjust the angle and p...

Page 32: ...s keyboard provides all the functions of a full sized 87 88 key keyboard and an additional Fn key for specific functions on the computer The use of the keyboard can be divided into four categories Ty...

Page 33: ...iter Keys Num Lock Press and hold the Fn key and then press this key to toggle the Num Lock on and off When this function is activated you can use the numeric keys that are embedded in the typewriter...

Page 34: ...Keys The Backspace key Ins and Del keys at the upper right corner are use for editing purpose Move the cursor left for one space Move the cursor right for one space Move the cursor up for one line Mov...

Page 35: ...ome specific software applications If so you may use the typewriter keys to input the numbers or connect an external numeric keypad This key is used to switch the typing mode between insert and overty...

Page 36: ...er left corner which is to be used with another key to perform the alternative function of a key This combination of keys can be called hot key in operating your Notebook PC which allows you to perfor...

Page 37: ...ernet to launch the web browser such as Internet Explorer to surf the Internet Wireless LAN to enable or disable the wireless LAN function of your computer User defined allows you to define a software...

Page 38: ...gram s icon appears in the Search Key window indicating that the program is defined to the button Click Close Now you can use it to launch the defined software application You can use the Search Key u...

Page 39: ...mputer by pointing the location of the cursor on the screen and making selection with its two buttons CursorMovementArea The pressure sensitive area of the touchpad allows you to place your finger on...

Page 40: ...edure called as point and click is the basics of operating your Notebook PC Unlike the traditional pointing device such as the mouse the whole touchpad can act as a left button so that your each tap o...

Page 41: ...d with soft dry cloth regularly to prevent the dust and liquids on it 3 When using the touchpad keep your fingers and the touchpad clean and dry for optimal performance Do not use excessive force when...

Page 42: ...s of the two buttons In addition you can change the size shape moving speed and other advanced features of the cursor on the screen To configure the touchpad you can use the standard Microsoft or IBM...

Page 43: ...plications The hard disk drive is a non removable storage device in your computer However you can upgrade it by replacing a lager capacity hard disk drive To do so please refer to Upgrading Your Syste...

Page 44: ...ormance of procedures other than those specified herein may result in hazardous radiation exposure 2 Do not touch the lens inside the drive CD ROM Drive allows you to read CD disks including audio CDs...

Page 45: ...the computer is turned on 2 Press the Eject Button on the drive s panel and the CD tray will slide out partially Then gently pull the tray out until fully extended 3 Place your CD in the tray with it...

Page 46: ...l slide out partially Then gently pull the tray out until fully extended 3 Hold the CD by its edge with your fingers and then lift it up from the tray 4 Push the tray back into the drive Removing the...

Page 47: ...rm that the computer is turned off 2 Insert a pointed object e g a straightened clip into the Emergency Eject Hole and the CD tray will slide out partially Then gently pull the tray out until fully ex...

Page 48: ...rated dual channel LVDS interface up to 85Hz per channel Integrated enhanced TV encoder with 10 bit DAC frequency Supports Dual independent displays LCD CRT LCD TV TV CRT Motion compensation and iDCT...

Page 49: ...0 600 60 72 75 80 60 1024 768 60 70 75 80 60 1280 1024 60 75 60 1400 1050 60 75 60 Mode CRT monitor only LCD Simulscan 640 480 8 16 32 bit color 8 16 32 bit color 8 16 32 bit color 800 600 8 16 32 bit...

Page 50: ...Resolution and Colors Quality 1 Click Start from the taskbar and select Control Panel to open the Control Panel window 2 In the Control Panel double click the Display item to open the Display Propert...

Page 51: ...n the Display Properties window 3 Click the Advanced button to bring up the following window that contains more settings 4 Under the Displays tab if you have connected the external display device such...

Page 52: ...uter The audio out jack allows you to connect the speakers and headphones the microphone jack allows you to connect the external microphone Remind you 1 You are strongly recommended to install the aud...

Page 53: ...not appear on the taskbar click Start and select Control Panel to open the Control Panel window In the Control Panel window selecttheSounds SpeechandAudioDevicesitem andthentheSounds and Audio Devices...

Page 54: ...1 26 MS XXXX Notebook...

Page 55: ...2 1 Your Notebook PC provides you with the useful software applications as well as the required drivers for the system Using the Software Applications...

Page 56: ...D but not from the Recovery CD that included in the package You want to install the drivers and software applications manually When do I Need the Software CD Insert the Software CD into your CD DVD RO...

Page 57: ...ndows operating system when purchased the required drivers should be installed in the system already If not you may need to install the drivers manually from the Software CD included in the package 2...

Page 58: ...Input a name 3 2 Advanced Feature Your Notebook PC provides you with a practical utility Search Key Click the Searchkey Utility item in the Autorun screen to install the program The Search Key utilit...

Page 59: ...3 5 3 The desired program s icon appears in the Search Key window indicating that the program is defined to the button Click Close...

Page 60: ...2 1 This chapter tells you how to manage the power effectively in order to maintain the longest battery life and increase the productivity when you are using the computer Power Management...

Page 61: ...mputer Also it can charge the battery pack when connected The AC adapter consists of two parts the adapter n and the power cord o The AC Adapter Your Notebook PC provides a universal AC adapter and a...

Page 62: ...anging from 0O C 32O F to 50O C 122O F If the temperature is higher than 60O C 140O F it will stop charging to protect the battery pack After the temperature is down to 50O C 122O F it resumes chargin...

Page 63: ...ion Properties window 4 Under theAdvanced tab check the Always show icon on the taskbar option and click OK Check this option Remind you 1 The charging time depends on the system mode When the compute...

Page 64: ...emove the battery pack 1 Confirm that the computer is turned off 2 Place the computer upside down gently 3 Locate the Battery Unlock Button on the bottom side of the computer 4 Press and hold the butt...

Page 65: ...into the compartment 2 Press down the battery pack until a click sound The battery pack will be locked automatically Remind you 1 Do not try to disassemble the battery pack 2 Please follow your local...

Page 66: ...ptimal system operation please set up the most appropriate configuration for your computer The following instructions describe the Power Options setup procedures 1 Click Start from the taskbar and the...

Page 67: ...and Critical battery alarm fields Once activated adjust the slide bar to set up the low or critical power level the default setting is 10 ClickAlarmActionwithinthe fields to set up the actions when t...

Page 68: ...F12 allows your computer to enter suspend mode immediately 2 When you are alarmed for the low battery power please save your data as soon as possible Also if available connect the AC adapter before y...

Page 69: ...rent and programs are saved to the hard disk drive Therefore you do not need to close the current applications when you are going to exit the operating system temporarily The next time you press the P...

Page 70: ...t you can customize the system performance to meet your needs Using Intel SpeedStep Technology Since Windows XP has the Intel SpeedStep technology driver built into the system the processor performanc...

Page 71: ...1 12 MS XXXX Notebook...

Page 72: ...uration of the computer To take full advantage of your computer and connected peripheral devices you should configure the system through BIOS Setup This chapter provides the information of BIOS Setup...

Page 73: ...to Use BIOS Setup To run the BIOS Setup Utility turn on the computer and press the Del key during the POST procedure If the message disappears before you respond and you still wish to enter Setup rest...

Page 74: ...title Move the cursor down to select one item under the menu title Increase the setting value or make changes Decrease the setting value or make changes 1 Open the selected item to change setting opt...

Page 75: ...the screen The Main menu displays the system information including the basic configuration 5 2 Main Menu AMIBIOS This item displays the BIOS version and ID Processor This item displays the informatio...

Page 76: ...Sat which is determined by BIOS read only Month The month from 01 January to 12 December Date The date from 01 to 31 Year The year can be adjusted by users Primary SecondaryIDEMaster The two items di...

Page 77: ...ng system that does not support or have any USB 1 1 2 0 driver installed such as DOS Set to Disabled only if you want to use any USB device other than the USB mouse Setting options Disabled Enabled an...

Page 78: ...tem always operates in a conserve power mode the processor works at 600MHz If you want optimize the processor set this item to Enabled so that the processor s speed will be controlled by the use of yo...

Page 79: ...system against unauthorized use Security Settings This field displays the status of security settings including Supervisor Pass word and User Password ChangeSupervisor UserPassword When you select th...

Page 80: ...item is used to specify the type of BIOS password protection that is implemented Settings are de scribed below Setup The password prompt appears only when end users try to run Setup Always A password...

Page 81: ...used to set the virus warning feature for IDE Hard Disk boot sector protection If the function is enabled and any attempt to write data into this area is made BIOS will display a warning message on s...

Page 82: ...ices Parallel Port Address This item is used to set the parallel port address Setting options Disabled 378 278 and 3BC ParallelPortMode This item allows you to select the operation mode for the onboar...

Page 83: ...o show the vendor logo on the boot up screen Set tings options Disabled and Enabled NetworkBootSupport This item allows you to enable or disable the network boot up function 1st 2nd Boot Device The tw...

Page 84: ...5 13 RTCPowerOnTimer When set to Enabled you can set the date and time at which the RTC real time clock alarm awakens the system from suspend mode...

Page 85: ...you have made and exit the utility DiscardChangesandExit Exit the utility without saving the changes you have made Discard Changes Abandon your changes and reload the previous configuration before run...

Page 86: ...can expand the capabilities of your Notebook PC and upgrade your system for your necessary This chapter introduces the installation of optional devices components for your Notebook PC Expanding and Up...

Page 87: ...es The I O input output ports on the rear panel of the computer allow you to connect peripheral devices For the information of these I O ports please refer to Quick Components Guide in Chapter 1 Conne...

Page 88: ...ystem Connecting the TV The S Video connector of your computer allows you to use a TV to display the computer images for your specific purpose such as enjoying your DVD movies To connect a TV you will...

Page 89: ...computer To connect the IEEE 1394 device simply connect the cable of the device to the IEEE 1394 port of your computer Connecting the Printer If your printer has a parallel interface you can then use...

Page 90: ...r rate up to 100Mbps The following diagram describes the basic connection in a network environment For more instructions or detailed steps on connecting to the LAN please ask your MIS staff or network...

Page 91: ...nection of modem For more instructions or detailed steps on dialing up through the modem please ask your MIS staff or Internet service provider ISP for help Connecting the Modem Remind you 1 To reduce...

Page 92: ...th a basic installation for the PC card including how to install and remove it For more information please refer to the manual of your PC card Installing the PC card 1 Locate the PC card slot on your...

Page 93: ...e interference or damage to the PC card 2 Before removing the PC card you should stop the device in Windows operating system RemovingthePCcard 1 Press the Eject Button to make it stretch out 2 Push th...

Page 94: ...theSafelyRemoveHardwaredialogbox Youcanseeallconnectedperipheral devices here If you want to remove any of the devices move the cursor to the device and then click Stop 6 2 Safely Remove Hardware Sele...

Page 95: ...the following ways 1 adding memory to a maximum of 2GB 2 replacing the hard disk drive 3 replacing the CPU Please NOTE that system upgrade should be done by an authorized retailer or service represen...

Page 96: ...e a trouble free operation and reduce the risk when working you should take good care of your computer This chapter provides the basic guidelines to protect your computer and critical data Caring Your...

Page 97: ...e computer in the public area you can secure your computer on the immovable object such as a desk by connecting a Kensington compatible lock 1 Loop the cable around the immovable object 2 Plug the loc...

Page 98: ...t password you can also set up the password in the operating system such as the login password and screen saver password Once the login password is set it will ask you to enter the user name and passw...

Page 99: ...wreak havoc within the computer whenever these executable programs execute The destructive portion of a virus can range from overwriting critical information stored on your hard disk s partition tabl...

Page 100: ...he fully charged Notebook PC to meetings for long time use If the meeting time is longer than 4 hours you are recommended to prepare a second battery pack or an AC adapter Store your Notebook PC in a...

Page 101: ...nt where the temperature is between 10O C 50O F and 35O C 95O F and the humidity not higher than 80 Place the computer on a flat solid and steady surface of objects DO NOT block the ventilator when op...

Page 102: ...essor or the brush Using the Battery Pack Battery Safety Tips Replacing or handling the battery incorrectly may present a risk of fire or explosion which could cause serious injury Only replace the ma...

Page 103: ...the Notebook PC Please NOTE that the following with respect to charging or changing the battery pack If a charged battery pack is not available save your work and close all running programs then shut...

Reviews: