background image

                                                                                    - 49 -                                                                               


SETUP 
 

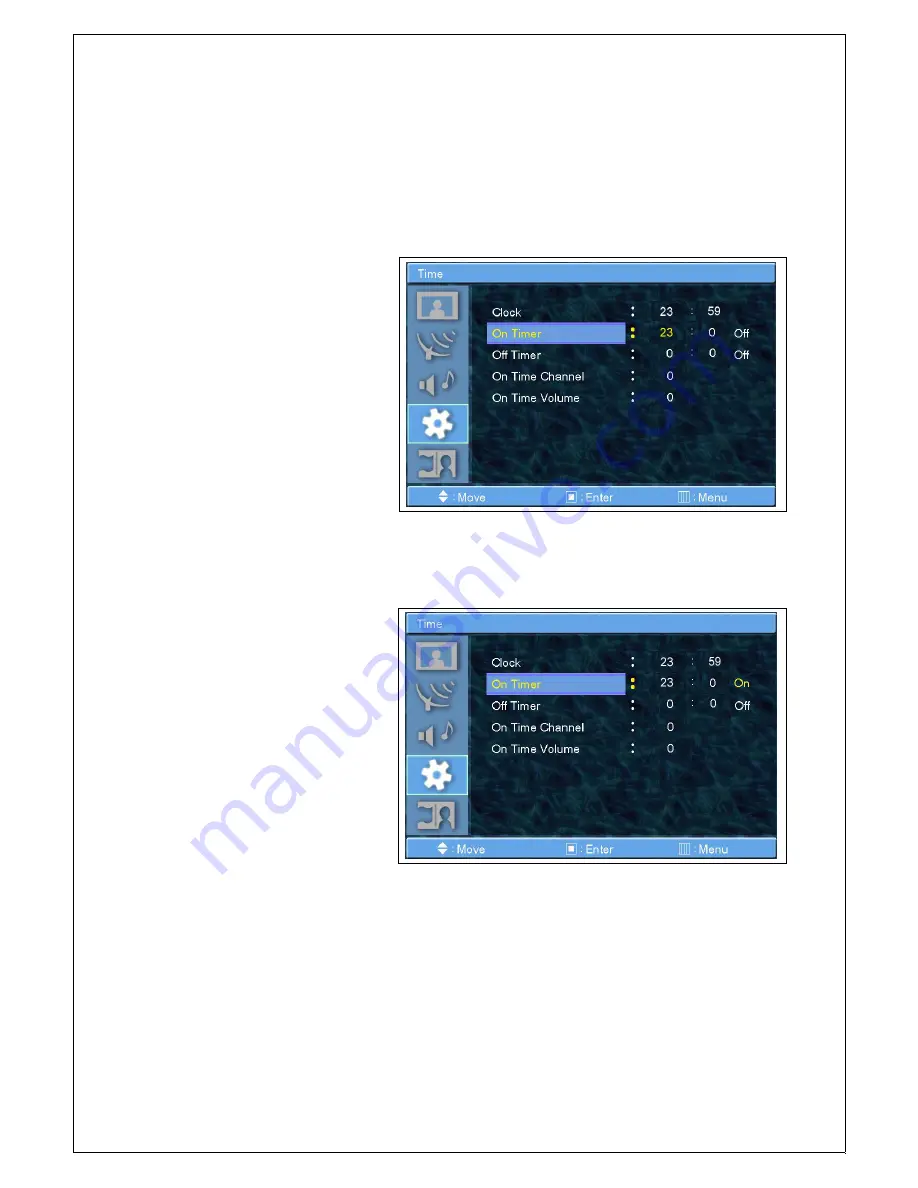
Time - On Timer


This PDP/LCD can be set to turn on automatically at specific time that you chose. 

Before using timer, you must set the PDP/LCD’s Time as described previously. 


1. 

Press  MENU/ENTER  button  to 

display the main OSD menu. 

2. 

Select  the  TIME  main  menu  with 

CH+/CH- button on the remote control. 

3. 

Press  MENU/ENTER  to  enter  the 

sub menu. 


4. 

Move the cursor by pressing VOL-, VOL+ button and adjust on time by CH+ and CH- button. 

(Notice: You can’t see the real time on this picture since this picture isn’t a real operating mode but a 
design mode. In a real mode, you can 
see the real clock time.) 


Summary of Contents for LEANTO

Page 1: ...1 Users Manual for LCD TV MODEL LEANTO board Analog TV tuner...

Page 2: ...ehler Textmarke nicht definiert JACKS on backside of PANEL 14 REMOTE CONTROL 16 Remote Control Picture 16 IR Remote controller Operations 17 KEY CONTROL ON THE CASE 19 Key Operations 19 Basic Operatio...

Page 3: ...al Store Search 35 Manual Store Store 36 Add Delete 37 Sort 38 Name 39 Fine Tune 40 TV SOUND 41 Mode 41 Volume 42 Balance 43 Equalizer 44 Auto Volume 45 Sound Mode 46 SETUP 47 Reset 47 Time Clock 48 T...

Page 4: ...4 PIP Picture In Picture 56 Input Source 57 Size 58 Position 59 Swap 60 Sound Select 61 PICTURE PC 62 Picture 62 Custom 63 Color Tone 64 Color Tone 65 Size 66 PC 67...

Page 5: ...5 SAFETY INSTRUCTIONS...

Page 6: ...6 SAFETY INSTRUCTIONS...

Page 7: ...7 SAFETY INSTRUCTIONS...

Page 8: ...8 SAFETY INSTRUCTIONS...

Page 9: ...9 SAFETY INSTRUCTIONS...

Page 10: ...10 SAFETY INSTRUCTIONS...

Page 11: ...11 ACCESSORIES 1 x Power Cord 1x User Manual 1 x Remote Control Handset 2 x Alkaline Batteries for Remote Control 1 x Stand 1 x Service Card...

Page 12: ...Stand Table User s Guide 1 Insert Stand Bars into the Stand Base as show below 2 a Screw Up 8x18 3 Insert a Stand Table as below 4 b Screw Up 4X30 5 c Screw Up 4 x 16 Stand Bar Stand Bar Stand Bar INS...

Page 13: ...13 Insert Stand in Stand Hole until it stopps Fit the screw SCREW...

Page 14: ...ry according to the type of machine so contact your product dealer 3 Component Connects a three separate component video signal form a component output jack of a DVD player or Set Top box Supports 480...

Page 15: ...t RCA Connect the device to an external amplifier or music center 8 PC Audio Input RCA Connect soundcard of a PC with the Plasma TV to transfer the sound if your PC is connected over DVI or D Sub 9 TV...

Page 16: ...CONTROL Remote Control Picture Remote Control Picture 11 8 13 18 19 21 20 16 23 25 40 3 28 5 4 30 31 29 35 41 1 10 17 26 22 24 2 6 27 33 32 34 40 39 38 37 36 9 14 15 12 Works only if the TV supports D...

Page 17: ...tandard Mode Displays picture standard when picture standard OSD is not activated Changes picture standard when picture standard OSD is activated 13 SSM Sound Standard Mode Displays sound standard whe...

Page 18: ...Yellow command 30 TTX HOLD Holds current TTX page 31 TTX REVEAL Reveals concealed information 32 TTX LIST FLOF Toggles LIST and FLOF mode 33 TTX Store Stores ROW24 page to non volatile memory in LIST...

Page 19: ...when source OSD activated Executes function by OSD help commands when main OSD activated Navigates previous menu when main OSD activated Down Key Decreases program number tune channel when no OSD acti...

Page 20: ...eady to use its features You can also use the Power key on the front panel Select Source Press Source button on the remote control Then you can see the source list menu shown as below Press CH CH butt...

Page 21: ...21 DTT source list Volume Control Press VOL VOL button on the remote control to adjust the volume level Press MUTE button on the remote control when you need to cut the sound temporarily...

Page 22: ...the main OSD menu First select Main menu item you need with CH CH button To select a main menu items just press VOL or MENU VIDEO button on the Remote Control 2 Sub Menu Each menu item has its own sub...

Page 23: ...Select the picture main menu 3 Press MENU ENTER to enter the sub menu 4 Select Picture mode and press MENU ENTER button to enter the sub menu Then the picture popup window appears 5 Select the Picture...

Page 24: ...NU ENTER to enter the sub menu 4 Select Custom and press MENU ENTER button to enter the sub menu Then the custom sub mode appears 5 You will see the picture setting bars Just Press BACK button on the...

Page 25: ...25...

Page 26: ...nu 3 Press MENU ENTER to enter the sub menu 4 Select Colour Tone and press MENU ENTER button to enter the sub menu Then the picture popup window appears 5 Select the Colour Tone with CH CH button and...

Page 27: ...u 2 Select the picture main menu 3 Press MENU ENTER to enter the sub menu 4 Select Size and press MENU ENTER button to enter the sub menu Then the picture popup window appears 5 Select the Size with C...

Page 28: ...enu 2 Select the Channel main menu 3 Press MENU ENTER to enter the sub menu 4 Select Country and press MENU ENTER button to enter the sub menu Then the picture popup window appears 5 Select the Size w...

Page 29: ...the remote control 3 Press MENU ENTER to enter the sub menu 4 Select Auto Store with VOL VOL button and press MENU ENTER button 5 Then you can see the tuning bar PDP LCD will execute auto program sear...

Page 30: ...Press MENU ENTER button to display the main OSD menu 2 Select the Channel main menu with CH CH button on the remote control 3 Press MENU ENTER to enter the sub menu 4 Select Manual Store and Press MEN...

Page 31: ...main menu with CH CH button on the remote control 3 Select the Manual Store menu with CH CH button on the remote control 4 Select the Prog menu with CH CH button on the remote control 5 Press MENU ENT...

Page 32: ...lect the Channel main menu with CH CH button on the remote control 3 Select the Manual Store menu with CH CH button on the remote control 4 Select the Colour System menu with CH CH button on the remot...

Page 33: ...lect the Channel main menu with CH CH button on the remote control 3 Select the Manual Store menu with CH CH button on the remote control 4 Select the Sound System menu with CH CH button on the remote...

Page 34: ...menu 2 Select the Channel main menu with CH CH button on the remote control 3 Select the Manual Store menu with CH CH button on the remote control 4 Select the channel menu with CH CH button on the r...

Page 35: ...D menu 2 Select the Channel main menu with CH CH button on the remote control 3 Select the Manual Store menu with CH CH button on the remote control 4 Select the Search menu with CH CH button on the r...

Page 36: ...nu with CH CH button on the remote control 3 Select the Manual Store menu with CH CH button on the remote control 4 Select the Store menu with CH CH button on the remote control 5 Press MENU ENTER to...

Page 37: ...r the sub menu Then you can see the favorite program list 6 You can select a program with CH CH button on the remote control TO EDIT THE LIST You can INSERT ERASE SKIP and REPLACE the programs in the...

Page 38: ...n see the sort program list notice You can t see the sort program list on this picture since this picture isn t a real operating mode but a design mode 6 You can select a program with CH CH button on...

Page 39: ...Press MENU ENTER to enter the sub menu Then you can see the sort program list 6 You can change a program Name if you want to change the name of the program TO CHANGE THE PROGRAM NAME IN THE LIST If yo...

Page 40: ...log Channels 1 Press MENU ENTER button to display the main OSD menu 2 Select the Channel main menu with CH CH button on the remote control 3 Press MENU ENTER to enter the sub menu 4 Select Fine Tune w...

Page 41: ...ection from the menu or you can select Custom which automatically recalls your personalized sound settings 1 Press MENU ENTER button to display the main OSD menu 2 Select the Sound main menu with CH C...

Page 42: ...Select the Sound main menu with CH CH button on the remote control 3 Press MENU ENTER to enter the sub menu 4 Select Volume and press MENU ENTER button to enter the sub menu Then you can see the Volum...

Page 43: ...R button to display the main OSD menu 2 Select the Sound main menu with CH CH button on the remote control 3 Press MENU ENTER to enter the sub menu 4 Select Balance and press MENU ENTER button to ente...

Page 44: ...n menu with CH CH button on the remote control 3 Press MENU ENTER to enter the sub menu 4 Select Equalizer and press MENU ENTER button to enter the sub menu Then you will see the Equalizer menu bars 5...

Page 45: ...elect the Sound main menu with CH CH button on the remote control 3 Press MENU ENTER to enter the sub menu 4 Select Auto Volume and press MENU ENTER button to enter the sub menu Then you will see the...

Page 46: ...Select the Sound main menu with CH CH button on the remote control 3 Press MENU ENTER to enter the sub menu 4 Select Sound mode and press MENU ENTER button to enter the sub menu Then you will see the...

Page 47: ...D menu 2 Select the Setup main menu with CH CH button on the remote control 3 Press MENU ENTER to enter the sub menu 4 Select Reset and press MENU ENTER button to enter the sub menu 5 If you want to r...

Page 48: ...etup main menu with CH CH button on the remote control 3 Press MENU ENTER to enter the sub menu 4 Select Time and press MENU ENTER button to enter the sub menu Then you will see the time menu 5 Select...

Page 49: ...TER button to display the main OSD menu 2 Select the TIME main menu with CH CH button on the remote control 3 Press MENU ENTER to enter the sub menu 4 Move the cursor by pressing VOL VOL button and ad...

Page 50: ...TER button to display the main OSD menu 2 Select the TIME main menu with CH CH button on the remote control 3 Press MENU ENTER to enter the sub menu 4 Move the cursor by pressing VOL VOL button and ad...

Page 51: ...ly when the Time is set and On Time is ON 1 Press MENU ENTER button to display the main OSD menu 2 Select the TIME main menu with CH CH button on the remote control 3 Press MENU ENTER to enter the sub...

Page 52: ...when the Time is set and On Time is ON 1 Press MENU ENTER button to display the main OSD menu 2 Select the TIME main menu with CH CH button on the remote control 3 Press MENU ENTER to enter the sub m...

Page 53: ...h 1 Press MENU ENTER button to display the main OSD menu 2 Select the Setup main menu with CH CH button on the remote control 3 Press MENU ENTER to enter the sub menu 4 Select Language and press MENU...

Page 54: ...Select the Setup main menu with CH CH button on the remote control 3 Press MENU ENTER to enter the sub menu 4 Select OSD Tone and press MENU ENTER button to enter the sub menu Then you will see the p...

Page 55: ...Select the Setup main menu with CH CH button on the remote control 3 Press MENU ENTER to enter the sub menu 4 Select Blue Screen and press MENU ENTER button to enter the sub menu Then you will see th...

Page 56: ...ress MENU ENTER button to display the main OSD menu 2 Select the PIP main menu with CH CH button on the remote control 3 Press MENU ENTER to enter the sub menu 4 Select PIP and press MENU ENTER button...

Page 57: ...TER button to display the main OSD menu 2 Select the PIP main menu with CH CH button on the remote control 3 Press MENU ENTER to enter the sub menu 4 Select Input Source and press MENU ENTER button to...

Page 58: ...Select the PIP main menu with CH CH button on the remote control 3 Press MENU ENTER to enter the sub menu 4 Select Size and press MENU ENTER button to enter the sub menu Then you will see the popup me...

Page 59: ...lect the PIP main menu with CH CH button on the remote control 3 Press MENU ENTER to enter the sub menu 4 Select Position and press MENU ENTER button to enter the sub menu Then you will see the popup...

Page 60: ...es at the same time 1 Press MENU ENTER button to display the main OSD menu 2 Select the PIP main menu with CH CH button on the remote control 3 Press MENU ENTER to enter the sub menu 4 Select Swap and...

Page 61: ...ources at the same time 1 Press MENU ENTER button to display the main OSD menu 2 Select the PIP main menu with CH CH button on the remote control 3 Press MENU ENTER to enter the sub menu 4 Select Soun...

Page 62: ...in OSD menu 2 Select the picture main menu 3 Press MENU ENTER to enter the sub menu 4 Select Picture mode and press MENU ENTER button to enter the sub menu Then the picture popup window appears 5 Sele...

Page 63: ...ure main menu 3 Press MENU ENTER to enter the sub menu 4 Select Custom and press MENU ENTER button to enter the sub menu Then the custom sub mode appears 5 You will see the picture setting bars You ca...

Page 64: ...main OSD menu 2 Select the picture main menu 3 Press MENU ENTER to enter the sub menu 4 Select Colour Tone and press MENU ENTER button to enter the sub menu Then the picture popup window appears 5 Se...

Page 65: ...Red Green and Blue Color Tone 1 Press MENU ENTER button to display the main OSD menu 2 Select the picture main menu 3 Press MENU ENTER to enter the sub menu 4 Select Red R and press MENU ENTER button...

Page 66: ...enu 2 Select the picture main menu 3 Press MENU ENTER to enter the sub menu 4 Select Size and press MENU ENTER button to enter the sub menu Then the picture popup window appears 5 Select the Size with...

Page 67: ...the main OSD menu 2 Select the picture main menu 3 Press MENU ENTER to enter the sub menu 4 Select PC and press MENU ENTER button to enter the sub menu Then you will see the sub menu of PC 5 Select t...

Page 68: ...menu 2 Select the picture main menu 3 Press MENU ENTER to enter the sub menu 4 Select Phase and press MENU ENTER button to enter the sub menu Then the setting bar appears 5 You can adjust each values...

Page 69: ...69...

Reviews: