background image

Overview Of Your New PDP

OWNER'S MANUAL

10

AUDIO INPUT

VIDEO INPUT

VIDEO OUTPUT

S-VIDEO INPUT

COMPUNENT VIDEO INPUT

ANALOG RGB INPUT

DIGITAL VIDEO INPUT

RCA Pin Jack

21 Pin Euro AV (SCART)

21 Pin Euro AV (SCART)

Mini Din 4 Pin

RCA Pin Jack

Mini D-Sub 15pin

DVI-D 24 pin

Connectors

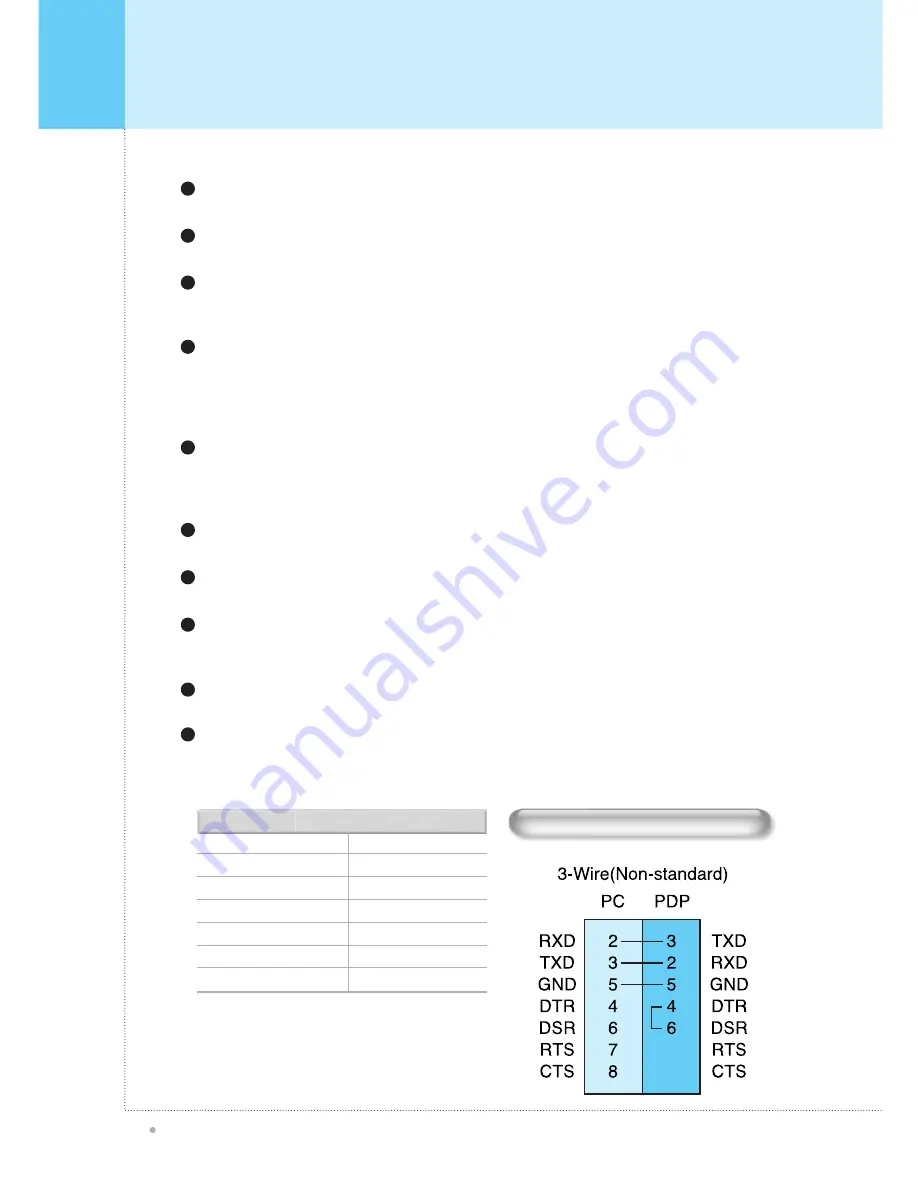
RS-232C Configurations

Only for Service do not use this connector!!!

RS-232C Jack

1

Connects a digital video signal from a DVI output jack of PC or Set Top box.

DVI INPUT JACK

2

Connects a video signal from a video output jack of PC. 
Cables connecting the PC vary according to the type of machine, so contact your product dealer.

RGB PC INPUT JACK ( D-SUB )

4

Connects a three separate component video signal from a component output jack of a 
DVD player or Set Top box.
Supports 480i/60Hz, 480p/60Hz, 576i/50Hz, 576p/50Hz, 720p/60Hz, 1080i/50Hz,1080i/60Hz signals.  
(i: interlace, p: progressive)

COMPONENT INPUT JACK 1, 2

5

- SCART 1: Half SCART (CVBS only input / output ).
- SCART 2: Full SCART (CVBS  & RGB input / output ).

Connects a SCART (eurocable) signal from a VCR, DVD player, or Set Top Box.

SCART ( EUROCONNECTOR) JACK 1, 2

7

Connects a S-Video video signals from a S-Video output jack of a S-VHS, VCR or DVD player.

S-VIDEO INPUT JACK

9

Output the signal of the current screen of the PDP. Connects to other TV or monitor.

COMPOSITE (RCA) OUTPUT JACK

10

Connects an AV composite video signal from a composite output terminal of a VCR or DVD player. 
Unavailable when a S-Video cable is put into the S-Video input jack.

COMPOSITE (RCA) INPUT JACK

11

Connects to an TV antenna cable.

ANT. IN (TV ANTENNA JACK)

12

Firmly insert the accessory power cord as far as it will go into the power input terminal.  
Firmly push the power cord plug as far as it will go into the power socket.

AC(POWER) INPUT JACK

13

• Cables connecting the PC vary according to

the type of machine, so consult your product
dealer. 
(If the cable is different to the picture, inquire
your PC service center)

Summary of Contents for GTV4200-V3

Page 1: ......

Page 2: ...lation 16 Wall Mount Installation optional 16 Table Stand Installation optional 20 Speaker Installation optional 22 Watching TV 24 Watching VCR 25 Watching DVD 26 Watching Set Top Box 27 Connecting th...

Page 3: ...ate the receiving antenna Increase the separation between the equipment and receiver Connect the equipment into an outlet on a circuit different from that to which the receiver is connected Consult th...

Page 4: ...prong The wide blade or the third prong is provided for your safety When the provided plug does not fit into your outlet consult an electrician for replacement of the obsolete outlet 10 Protect the po...

Page 5: ...tripod bracket table or floor where it can fall A falling Monitor can cause serious injury to a child or adult and serious damage to the appliance Use only with a cart stand tripod bracket or table r...

Page 6: ...stem during a lightning storm or when left unattended and unused for long periods of time This will prevent damage to the unit due to lightning and power line surges Protect the power cord Power suppl...

Page 7: ...rvice personnel Unplug the unit from the wall outlet and refer servicing to qualified service personnel under the following conditions when the power supply cord or plug is damaged if liquid has been...

Page 8: ...specified batteries This make cause damaged the Monitor or could give an electric shock Do not place anything containing liquid on top of the Monitor This may cause a fire or could give an electric s...

Page 9: ...change the VOLUME with keys VOL CH Turn the PDP on and off Power On Off Select the signal source from multiple input sources such as TV SCART 1 SCART 2 S Video AV Component1 Component2 PC and DVI INP...

Page 10: ...C DVI Audio Input D Sub PC For PC Set top box Component 1 2 For DVD Set top box Speakers To connect speakers 2CH Stereo only 8 ohm SCART 1 Euroconnector For VCR DVD Set top box SCART 2 Euroconnector F...

Page 11: ...essive COMPONENT INPUT JACK 1 2 5 SCART 1 Half SCART CVBS only input output SCART 2 Full SCART CVBS RGB input output Connects a SCART eurocable signal from a VCR DVD player or Set Top Box SCART EUROCO...

Page 12: ...Accessories OWNER S MANUAL 11 Remote Control Handset D sub 15 pin cable Power Cord Alkaline Batteries Owner s Manual RF Cable...

Page 13: ...Optional Extras OWNER S MANUAL 12 Table Stand type United Flexible Wall Mount Bracket Table Stand Type Separated Side Mount Speaker...

Page 14: ...PUT Display the input source list 7 Menu Set Display the main OSD menu Activate your choice in the OSD menu 8 Back Return to the previous OSD menu 9 PG Move to the upper programme 10 PG Move to the lo...

Page 15: ...current programme 9 SKIP Make the programme skipped 10 INSERT Add the current programme 11 REPLACE Replace the selected programme with the current programme See 34 page These keys are the colour keys...

Page 16: ...NUAL 15 Loading The Batteries Press on the cover and slide in the direction of the arrow 1 Load two AAA batteries taking care that the and ends face the correct direction 2 Close the cover until it cl...

Page 17: ...ional Installation The Monitor can be installed in various ways such as Wall Mounting type Table Stand type etc Install this monitor only in a location where adequate ventilation is available The moni...

Page 18: ...MONITOR BRACKET WALL MOUNTING BRACKET 2 1 Drill the 8 hole positions shown as left Using an 8mm drill appropriate for the material on the wall drill each hole to a depth of exceed 80mm 2 Clean each d...

Page 19: ...o people who are capable of lifting the weight of the monitor should do the following Carefully lift up the monitor and place it in position on the wall mounting bracket securely shown as by arrow Pus...

Page 20: ...Monitor Installation OWNER S MANUAL 19 Wall Mount Accessories ANCHOR 8EA SCREW 8EA BOLT 6EA M8 x 30L BOLT 6EA M4 x 6L...

Page 21: ...Monitor Installation OWNER S MANUAL 20 Table Stand mount minimum allowable clearances for adequate ventilation Table Stand Installation optional The Monitor can be installed on the desk as shown above...

Page 22: ...Monitor Installation OWNER S MANUAL 21 Installation...

Page 23: ...ure to connect the positive wire to the input and the negative wire to the input Connect left monitor input to left speaker and right monitor input to right speaker Any extra speaker wire length remai...

Page 24: ...Installation OWNER S MANUAL 23 9673 Speaker Accessories 4 Iron Plates Mount speakers to monitor 8 4x16 Long Bolts Attach iron plates to speakers 8 4x8 Short Bolts Attach iron plates to monitor 2 Speak...

Page 25: ...t TV on OSD 1 Use PG PG button or numeric button to change TV programme for your programme selection 2 Press Pre PG button on the remote control to tune the previous programme 3 Also you can tune to c...

Page 26: ...If you connect an S VHS VCR to the S VIDEO input socket you can get a better picture quality than normal video input AV Avoid having a fixed image remain on the screen for a long period of time Typica...

Page 27: ...g them If one of them is being displayed other ports are unavailable How to use Turn on the DVD player 1 Press INPUT button on the remote control of the PDP and select Component1 or Component2 2 480i...

Page 28: ...O O O O O O O PC O O O O O O O DVI O O O O O O O Supported Signals How to connect With SCART Eurocable Connect a SCART cable to the SCART jacks of the STB and the PDP With Component Connect a three s...

Page 29: ...guration Pin Configuration 1 2 3 4 5 6 7 8 9 10 11 12 13 14 15 Red R Green G Blue B Grounding Grounding DDC Red R Grounding Green G Grounding Blue B Grounding Reserved Sync Grounding Grounding Data DD...

Page 30: ...42 Native Resolution Horizontal Polarity is Positive Vertical Polarity is Negative 1366 x 768 50 Native Resolution Horizontal Polarity is Positive Vertical Polarity is Negative The PDP recognizes 640x...

Page 31: ...trol Then you can see the source list menu shown as below Select the source to watch with PG PG button on the remote control and press the Menu Set button Source list menu TV programme Selection Conne...

Page 32: ...ton To select a main menu items just press VOL or Menu Set button on the Remote Control 1 Sub Menu Each menu item has its own sub menu items to set 2 Sub Menu items A If there is no part the item has...

Page 33: ...ungary Ireland Italy Netherlands Norway Poland Sweden Turkey Switzerland East Europe Others Press Menu set button to display the main OSD menu 1 Select the TV Main menu 2 Press Menu Set to enter the s...

Page 34: ...PG button and press Menu Set button 4 Then you can see the tuning bar PDP will scan from channels to the current channel 5 Press Menu set button to display the main OSD menu 1 Select the TV main menu...

Page 35: ...when you press the FAVORITE button on the remote control the PDP display only the favorite channels you previously stored allowing you to quickly and easily find frequently wanted channels Edit Favori...

Page 36: ...ndow 2 After chosen channel moved into the center window press the DIGEST button again Then the digest windows will disappear 8 side windows are renewed clockwise Next memorized programme appears in t...

Page 37: ...t the picture main menu 2 Press Menu Set to enter the sub menu 3 Select Mode and press Menu Set to enter the sub menu Then the picture sub mode appear 4 Select the picture mode and press Menu Set butt...

Page 38: ...the item with VOL VOL button 3 To cancel all adjust select Recall and press Menu Set button To more detail description about these items refer to the next page 4 Press Menu Set button 2 You can chang...

Page 39: ...tness difference between bright part of the screen and dark part CONTRAST Dark Bright Decrease Increase Adjust brightness of the screen BRIGHTNESS Adjust deep and light color of the screen COLOR Less...

Page 40: ...ure and press Menu Set to enter the under menu Then the Picture Temperature under menu appear 4 Select the Temperature mode with PG PG button and press Menu Set button 5 Press BACK button to return 6...

Page 41: ...parts Then the cursor moves into the parts 4 Turn on or off Video NR function with PG PG button and press BACK button 5 Select the picture main menu item 2 Press Menu Set to enter the sub menu 3 This...

Page 42: ...nder menu Then the Screen Format under menu appear 4 Select the screen format you want and press Menu Set button 5 Press Menu Set to enter the picture menu 3 Select the picture main menu 2 Your PDP ha...

Page 43: ...hange 4 3 video Expands 4 3 video horizontally to fit the 16 9 screen and to minimize distortion sides are expanded more than center Zoom 1 Expands 16 9 mode screen vertically Zoom 2 Expands zoom 1 mo...

Page 44: ...Set button 4 Select the picture main menu with PG PG button 2 Select Geometry and press Menu Set to enter the under menu Then the picture Geometry under menu will appear 4 Press Menu Set to enter the...

Page 45: ...PICTURE PC OWNER S MANUAL 44 H POSITION V POSITION Mismatch Match Mismatch Match PHASE CLOCK...

Page 46: ...1 Select the SOUND main menu item with PG PG button 2 Press Menu Set to enter the sub menu 3 Select Spatial effect and press VOL button 4 Turn on or off Spatial effect function with PG PG button and p...

Page 47: ...Just press BACK button on the remote control You can adjust each values of equalizer but the changed values are stored as in USER mode 6 Your PDP has four automatic sound settings Standard Movie Music...

Page 48: ...tton on the remote control and adjust it with PG PG button 2 Press BACK or BACK button on the remote control to exit equalizer The result will be saved automatically 3 You can use the OSD menu to chan...

Page 49: ...sub menu appear 4 Select the MTS format with CH CH and press Menu Set button 5 Select sound signal format from the input source There are Mono Stereo NICAM and Bilingual sound formats MTS The availabl...

Page 50: ...Menu Set buttonto enter the sub menu 3 Select Translucent and press VOL button to enter the parts Then the cursor moves into the parts 4 Adjust with PG PG button and press EXIT button 5 Adjust the tra...

Page 51: ...rogrammes or sources at the same time And set up PIP size and position PIP Picture In Picture Select Size and press VOL button to enter the parts Then the cursor moves into the parts 1 Adjust size fun...

Page 52: ...sources of the main screen and the PIP window Picture Swap in PIP Picture In Picture TV SCART SCART 2 S Video Component1 Component2 PC DVI O O O O O O O O O X O O O O O O O O X O O O O O O O O X O O...

Page 53: ...u Set to enter the sub menu Then the PIP sub menu appear 1 In Sub Menu there are four positions Select the position with PG PG button on the remote control and press BACK button 2 Change the position...

Page 54: ...ess Menu Set to enter the sub menu 3 Select Advanced and press Menu Set to enter the Advanced menu Then the PIP sub menu appear 4 You can se up ID Burn Protect Blue Back Language and Child Lock in Adv...

Page 55: ...r 2 minute and after moving the set range image starts to go back to the original position Burn Protect in Advanced Select Burn Protect menu and press VOL button to enter the parts Then the cursor mov...

Page 56: ...in OSD Supported languages are English French German Spanish Italian Language in Advanced Select Child Lock and press VOL button to enter the parts Then the cursor moves into the parts 1 Turn the fun...

Page 57: ...t time and auto power on off Time Set Press Menu set button to display the main OSD menu 1 Select the TIME main menu with PG PG button on the remote control 2 Press Menu Set to enter the sub menu 3 Se...

Page 58: ...the channel when PDP power turn on automatically On Channel Available only when the Time is set and On Time is ON Press Menu set button to display the main OSD menu 1 Select the TIME main menu with P...

Page 59: ...Press Menu set button to display the main OSD menu 1 Select the TIME main menu with PG PG button on the remote control 2 Press Menu Set to enter the sub menu 3 Select Sleep with PG PG button on the r...

Page 60: ...ton to select the page you want to see TOP text The user guide displays four fields red green yellow and blue at the bottom of the screen The yellow field denotes the next group and the blue field den...

Page 61: ...O O X X X X X O O O X X X X X PIP TV SCART1 SCART2 S Video AV Componet1 Componet2 PC DVI Main Move key Move the position of PIP window Swap key Swap the sources of the main screen and PIP window Sour...

Page 62: ...mote control RS232C Control AC 110 240V 50 60Hz 380 Watt RF CATV PAL SECAM SCART X 2Port SCART1 HALF SCART2 FULL RCA X 2Port AV INPUT AV OUTPUT RCA X 2Port Y Pb Cb Pr Cr 480i 480p 576i 576p 720p 1080i...

Page 63: ...ol Remote control RS232C Control AC 110 240V 50 60Hz 580 Watt RF CATV PAL SECAM SCART X 2Port SCART1 HALF SCART2 FULL RCA X 2Port AV INPUT AV OUTPUT RCA X 2Port Y Pb Cb Pr Cr 480i 480p 576i 576p 720p...

Page 64: ...onitor s power cord was plugged in Press the VOLUME button Check the audio input signal Check to see if there is any object between the Plasma Display and the remote control causing obstruction Check...

Page 65: ...H J5e 7He J5 e 7H e J5f 7Hf f J5 7H J5e 7He J5 e 7H e J5f 7Hf f J5 7H J5e 7He J5 e 7H e J5f 7Hf f J5 7H J5e 7He J5 e 7H e J5f 7Hf f J5 7H J5e 7He J5 e 7H e J5f 7Hf f J5 7H J5e 7He J5 e 7H e J5f 7Hf f...

Reviews: