


After adding camera, refer to
5.2.2 Camera Setting
in the
GV-Recording
Server User Manual
to see how to customize camera settings such as
setting video attributes, recording policy and recording schedule.
Continued on the reverse
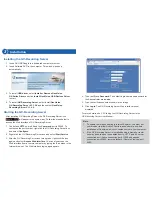
Starting Service
1. In the Service page, to be able to receive and record IP channels,
select
Start
for Recording Server.
2. To enable the video gateway to transmit video to clients, select
Start
for Video Gateway.
3. Click
Save
and click
Done
. The Camera Connection Information page
appears and shows the connection status of the camera added.
Note:
The GV-Recording Server is compatible with the following
third-party IP device brands:
Arecont Vision
,
AXIS
,
HikVision
,
Panasonic
,
Sony
,
VIVOTEK
and protocols:
ONVIF
,
PSIA
,
RTSP
. To
see the supported models for each brand, refer to the Supported IP
Camera List at http://www.geovision.com.tw/english/4_21.asp. To see
how to add IP devices using protocols, refer to
5.2.1 Install Camera
in
the
GV-Recording Server User Manual
.
5
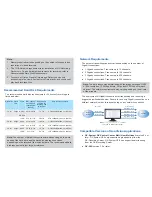
Active and Passive Mode
There are two ways to establish connection with IP video devices,
active
connection
where GV-Recording Server initiates the connection and
passive connection
where the GV-IP video device initiates the connection.
IP devices added with the Install Wizard introduced in section 3 is using
active connection.
GV-Compact DVR
GV-IP Camera
3-rd party Devices
GV-Recording Server
Active Connection
GV-Video Server
GV-Compact DVR
GV-IP Camera
GV-Recording Server
Passive Connection
GV-Video Server
Note:
1. Passive connection is only supported for GV-IP devices.
2. Two-way audio communication is only supported for GV-IP devices
through active connection.