GeoVision GV-Recording Server V1.1 Quick Start Manual Download Page 10

You can install MultiView from the Software DVD or download Multi View 

through the Web interface of GV-Recording Server. In the left menu, click 

Advanced Query

 and in the window that pops up, select 

Utility 

Download

. Click the 

Download

 button of 

DMMultiView

 to download the 

program.

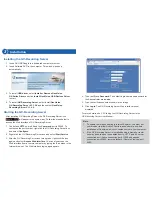
After installing the program, you need to log in the Multi View to access 

video streaming from the GV-Recording Server.

Connecting with the Multi View

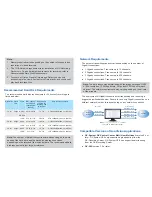
4.  Keep the default communication port of GV-Recording Server as 

11000, or modify to match the TCP/IP port on the GV-Recording 
Server. Click the 

Query

 button to attempt connection to the 

GV-Recording Server. When the connection is established, the camera 
options will be displayed in the 

Preview

 and 

Record

 drop-down lists.

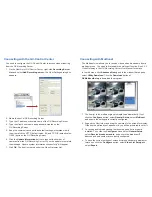
5.  Select one camera to be connected. The selections in the Preview and 

Record drop-down lists will be the same.

6. Click 

Apply

. The IP camera is added to the list.

7.  Click the listed camera, and select 

Display Position

 to map the IP 

camera to any channel on the GV-System. After the mapping is 
complete, the Status column will display “Connected”.

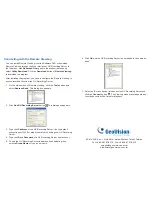
1.  In the login dialog box, click the 

Edit

 button.This dialog box appears.

8. Click 

OK

 to exit all open dialog boxes. The IP camera from the 

GV-Recording Server is now displayed at specified channel.

2. Select 

Video Gateway


/ Recording Server

 from the Device 

drop-down list. 

3.  Type IP address or domain name of the GV-Recording Server. 

4.  Keep the default VSS Port as 11000; otherwise modify it to match the 

TCP/IP port on the GV-Recording Server.

5. Click 

OK

 to return to the login page.

6.  Type the client’s username and password created on the 

GV-Recording Server. 

7.  Click 

OK

 to log in.

8.  The GV-Recording Server will be listed under the Host list. Drag and 

drop its IP cameras to the desired channels on the Multi View.

For more details, see 

Chapter 7.1 Connecting with GV-System

 in the 

GV-Recording Server User Manual

.

Summary of Contents for GV-Recording Server V1.1

Page 1: ...le supports connection with up to 128 IP channels GV Video Gateway dongle comes in two types internal and external dongles GV Recording Server dongle comes in internal type The following dongle option...

Page 2: ...or 1920 x 1080 resolution 30 fps and H 264 MPEG4 codec for each channel OR Receive up to 128 ch and transmit up to 300 ch with the image settings of 2048 x 1536 resolution 20 fps and H 264 codec for...

Page 3: ...rd drive required varies depending on the write speed of the hard drive and the hard disk size required varies depending on the recorded file size and bitrate The recommended hard disk requirement is...

Page 4: ...icon turns green right click the icon again and select Access Web Interface You can also access the Web interface from a remote computer by typing the IP address in the Internet browser The Web interf...

Page 5: ...to add a new storage folder in a different disk drive or select an existing storage folder 2 Use the default storage path or click the Add button to select a new storage path 3 In the Working Camera L...

Page 6: ...VIF PSIA RTSP To see the supported models for each brand refer to the Supported IP Camera List at http www geovision com tw english 4_21 asp To see how to add IP devices using protocols refer to 5 2 1...

Page 7: ...and password must match the settings configured on the GV Recording Server The default values for both login username and password are admin 6 Click Apply to start connection When the connection is es...

Page 8: ...list to select Supervisor or User 5 Type an e mail address for the account When you forget the password the password can be sent to your e mail account using the Forget Password link in the login pag...

Page 9: ...the GV Recording Server User Manual 1 On the main screen of GV System click the Configure button select System Configure select Camera Install and select IP Camera Install This dialog box appears 2 Cl...

Page 10: ...l be the same 6 Click Apply The IP camera is added to the list 7 Click the listed camera and select Display Position to map the IP camera to any channel on the GV System After the mapping is complete...

Page 11: ...lticast The Multicast view allows you to receive video and audio streams from a multicast group You need to first enable the multicast function See 5 3 5 Video Gateway in the GV Recording Server User...

Page 12: ...d the GV Recording Server to address book under a group select a Group Name or type a new name 6 Click OK and the GV Recording Server is now added to the address book You can install Remote ViewLog fr...

Reviews: