1
O
N
1
2
O
N
1
O
N
GV Video Capture Card
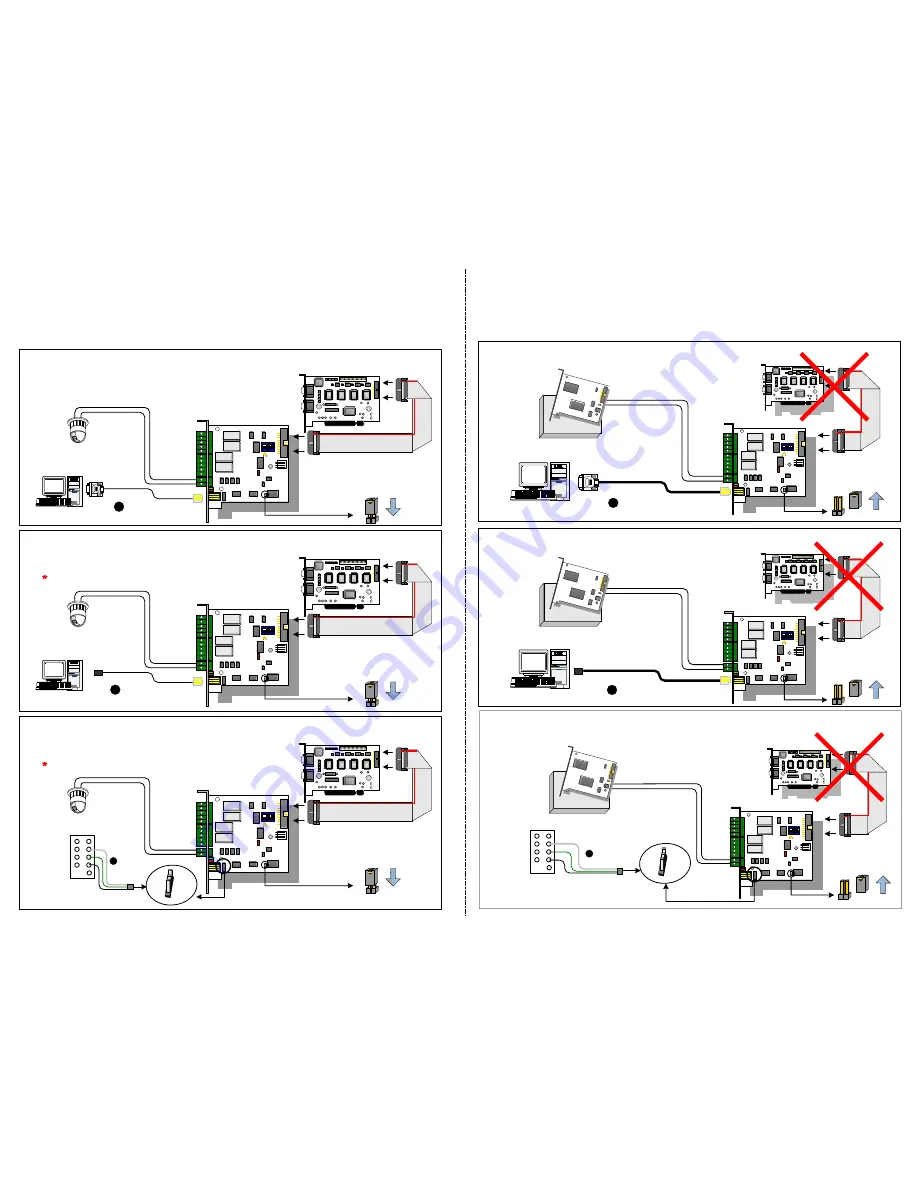
1. Connecting a RJ-11 to DB9 Cable to the PC's COM Port when
a RS-485 device is connected.
(Allowed for AC/DC Output Voltage)
Connections In NET/IO Card Mode
Connects to PC's COM Port
RJ-11 to DB9 Cable
3
RJ-11 to USB Cable
4
3-pin Internal
USB Cable
Connects to the USB
Connectors on the PC's
motherboard
1
O
N
1
2
O
N
1
O
N
DM
DP
GND
(white)
(green)
(black)
Connections In I/O Box Mode
With 2-pin header
Chaining together with
GV-NET/IO Box V3.1 /
GV-IO USB Box
GV Video Capture Card
PTZ Dome
RS-485+
RS-485-
Connects to PC's USB Port
1. Connecting a RJ-11 to DB9 Cable to the PC's COM Port
(Allowed for AC/DC Output Voltage)
1
O
N
1
2
O
N
1
O
N
Without
2-pin header
GV Video Capture Card
RS-485+
RS-485-
Connects to PC's COM Port
RJ-11 to DB9 Cable
3
Chaining together with
GV-NET/IO Box V3.1 /
GV-IO USB Box
1
O
N
1
2
O
N
1
O
N
GV Video Capture Card
RS-485+
RS-485-
RJ-11 to USB Cable
4
Connects to PC's USB Port
3. Connecting a 3-Pin Internal USB Cable to the USB Connectors on the PC's Motherboard
(Allowed for DC Output Voltage only)
3-pin Internal
USB Cable
VCC
DM
DP
GND
(white)
(green)
(black)
RS-485+
RS-485-
Chaining together with
GV-NET/IO Box V3.1 /
GV-IO USB Box
2. Connecting a RJ-11 to USB Cable to the PC's USB Port
(Allowed for DC Output Voltage only)
Without
2-pin header
Without
2-pin header
For the connections in the NET/IO Card Mode, please follow the instructions below:
1. It is required to connect the GV-NET/IO Card to GV Video Capture Card with the 20-pin Ribbon Cable.
2. If you want to connect the GV-NET/IO Card to the RS-485 devices, you have 3 ways of connections. See
the pictures below.
Connects to the USB Connectors on
the PC's motherboard
1
O
N
1
2
O
N
1
O
N
With 2-pin header
PTZ Dome
RS-485+
RS-485-
1
O
N
1
2
O
N
1
O
N
With 2-pin header
PTZ Dome
RS-485+
RS-485-
GV Video Capture Card
GV Video Capture Card
For the connections in the I/O Box Mode, please follow the instructions below:
1. It is not necessary to connect the GV-NET/IO Card to GV Video Capture Card.
2. Connect the GV-NET/IO Card to the PC by one of the following 3 ways. See the pictures below.
5
5
DM (D-)
DP (D+)
GND
(white)
(green)
(black)
VCC
DM (D-)
DP (D+)
GND
(white)
(green)
(black)
2. Connecting a RJ-11 to USB Cable to the PC's USB Port
when a RS-485 device is connected.
(Allowed for AC/DC Output Voltage)
Installation of USB driver is required.
3. Connecting a 3-Pin Internal USB Cable to the USB Connectors
on the PC's Motherboard when a RS-485 device is connected.
(Allowed for AC/DC Output Voltage)
Installation of USB driver is required.


