GeoVision GV-LPR CAM V2.0 Series Installation Manual Download Page 2

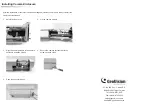
Installing Camera Module

Push the sun shield forward to align with 
the back of camera enclosure.

1.

Slightly lift the camera module and slide it 
out completely.

4.

2.

Pull out the camera module.

Sun Shield

Camera Enclosure Back

Camera Module

Completely slide the camera
module out

Loosen the set screws on the back of the 
camera enclosure.

3.

Loosen the screw cap on the left.

5.

Insert the video cable through the screw 
cap.

6.

Screw Cap

Attach the video cable to the BNC 
connector and plug it into the “VIDEO OUT” 
jack.

7.

Adjust the length of the video cable and 
then tightly screw the cap.

8.

Loosen the screw cap on the right, insert 
the power cable through the screw cap.

9.

Remove the terminal block. Plug black and 
white wires of the power cable to the 
terminal block. Reinsert the terminal block 
onto the camera. The white wire is required 
to connect to the positive pin (+) on the 
camera and the black wire to the negative 
pin (-).

10.

VIDEO OUT

Jack

Adjust the length of the cable and then 
tightly screw the cap (see Steps 8 for the 
pictures).

11.

Summary of Contents for GV-LPR CAM V2.0 Series

Page 1: ... and use of the GV LPR CAM List of Models AC Power Cable 110 125V 10A x 1 Power Adapter 100 240V 12V 5A x 1 Outdoor Mounting Bracket x 1 Models Packing List Model GV LPR CAM 20M EIA DC12V GV LPR CAM 20M CCIR DC12V IR Optimal Distance 20 m 65 61 ft 20 m 65 61 ft Video Format NTSC PAL Specifications Sensor Heater Resolution Construction Protection classification Temperature LED Quantity IR Distance ...

Page 2: ...w cap 6 Screw Cap Attach the video cable to the BNC connector and plug it into the VIDEO OUT jack 7 Adjust the length of the video cable and then tightly screw the cap 8 Loosen the screw cap on the right insert the power cable through the screw cap 9 Remove the terminal block Plug black and white wires of the power cable to the terminal block Reinsert the terminal block onto the camera The white w...

Page 3: ... 176 176 OFF OFF OFF OFF 1 English The GV LPR CAM is designed with 24 high efficient LEDs which you can adjust the brightness You can push up ON and down OFF the switches of SW2 SW3 and SW4 for LED brightness settings See the table below for 8 LED brightness setting values Note The factory default setting of SW1 is ON If you find the images of license plates captured in the day time or sufficient ...

Page 4: ... 1 Adjust the lens focus 2 Lift the camera module Align the camera module to the camera enclosure and slide it back 3 Secure the camera enclosure with the screws on both sides 4 Push the sun shield back 5 9F No 246 Sec 1 Neihu Rd Neihu District Taipei Taiwan Tel 886 2 8797 8377 Fax 886 2 8797 8335 sales geovision com tw http www geovision com tw ...

Reviews: