background image

GeoPro K2 Series Hardware Operation Instructions 

24 

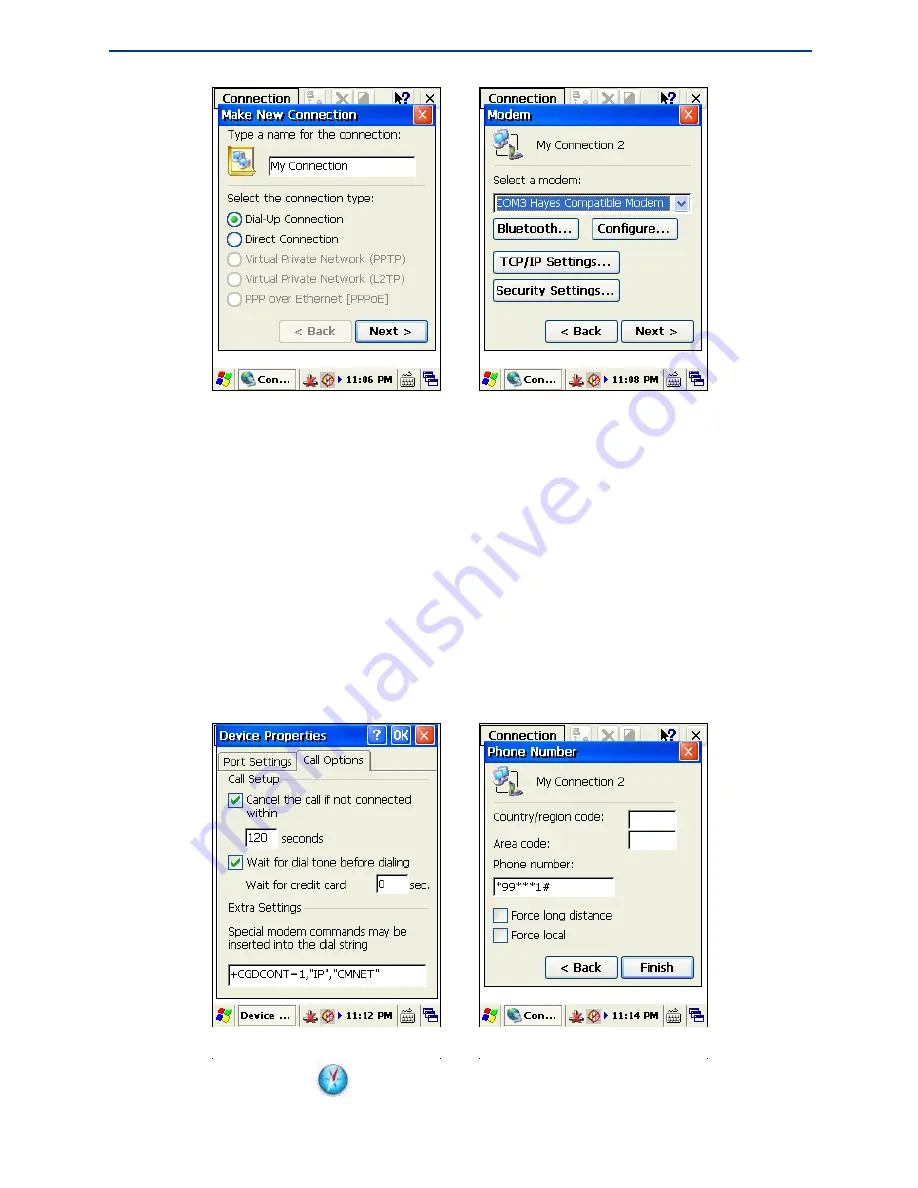
3. Select the matching device in the 

Modem

 dialog box, and tap the 

Configure

 button. Then

a Bluetooth authority request will appear in the other device. When the request is accepted 

by the other device, the 

Device Properties

 dialog box pops up. In the 

Call Options

 page, 

input the APN provided by GPRS providers in the 

Extra Settings

 edit box, as shown below 

left. 

4. Tap the 

OK

 button to return back to the 

Modem

 interface. Tap the 

Next

 button, The

Phone Number 

dialog box appears. Input the country code, local area code, phone number 

*99***1# (this “*99***1#” is just an example for Chinese APN “CMNET”. For more

exact information of different countries, please contact your local APN company), as shown 

below right .Then tap the 

Finish 

button. 

Using the Electronic Compass 

1. Find the 

Compass 

icon

in the

 Control Panel

 interface, as shown below left. 

2. Double tap the 

Compass 

icon, the compass interface appears, as shown below right.

Summary of Contents for GeoPro K2E

Page 1: ...GeoPro K2 Series Hardware Operating Instructions Geosun Spatial Technology Co Ltd...

Page 2: ...K2E and GeoPro K2G For GeoPac the embedded multi function GNSS data collecting processing software please refer to GeoPac User s Manual for more information Please read the instructions before start...

Page 3: ...g 16 Checking the Remaining Power 17 Power Saving Mode 17 Installing Micro SD Card 18 Installing SIM Card 19 Serial Port Settings 20 Bluetooth Settings 20 Bluetooth Settings 21 Bluetooth Dial up Conne...

Page 4: ...ii Interfaces 34 Power Performance 34 Application Function 35 Physics 35 Electric Specifications 35 Troubleshooting 36 Common Troubleshooting 37 ActiveSync Common Problems 38 Index 39 Contact Us 40...

Page 5: ...1 Overview GeoPro K2 Series Overview Innovative Technology Configuration Advantages Notice C H AP T E R 1...

Page 6: ...ge size image data up to 10GB and hundreds megabyte level vector data loading GeoPro K2 series with independent intellectual property offers high accuracy real time differential and kinematic survey f...

Page 7: ...poor satellite signals or in low speed or static status Intelligent Speech Technology Support intelligent judgement voice prompt status warning and etc Intuitive Digital Image The embedded digital ca...

Page 8: ...meters natural fall Industrial three proofing standard waterproof shockproof and dustproof High end Configuration 3 5 inches sunlight readable color touch screen The built in Micro SD card slot suppor...

Page 9: ...ce various electromagnetic interference to GNSS satellite signal please make sure no strong electromagnetic interference in 200m range around the observation site such as TV tower microwave station hi...

Page 10: ...6 GeoPro K2 Series Introductions Front View Back View Interfaces Standard Configuration List C H AP T E R 2...

Page 11: ...3 5 inches sunlight readable color touch screen Microphone Support on site audio collection for attribute annotation Power Press this button for 2 sec to turn on the handheld or 3 sec to turn off it...

Page 12: ...Ion Battery 3 7V 4200mAh Strap Hole hold the strap to prevent the handheld from slipping Note There may be no voice or the voice may be hoarse when the speaker gets water inside But this will not aff...

Page 13: ...r data transmission Debug Serial Port For the E boot writing by factory Power Interface For charging Micro SD Card Slot For installing Micro SD card supports massive storage expansion up to 32 GB Note...

Page 14: ...ation List Configuration Item Number Picture GeoPro K2 Series Handheld 1 Charger 1 Universal Adapter 1 USB Data Cable 1 Battery 2 Micro SD Card 2G Byte Flash 1 Touch Pen 2 Geosun GEO CD Containing all...

Page 15: ...r Off Stylus Property Settings Power Management Installing Micro SD Card Installing SIM Card Serial Port Settings Bluetooth Settings Using the Electronic Compass Restoring WinCE System Installing Unin...

Page 16: ...touch pen is in the pen slot at the back of the handheld Lightly pull the touch pen cap and take it out as shown below 2 To put back the touch pen let the cap toward the outside and then push it until...

Page 17: ...as shown right The startup process lasts for about 30 seconds please be patient 2 When the startup process is completed the desktop of WinCE system will be shown as right Power Off There are two ways...

Page 18: ...rol Panel dialog box to open Stylus Properties dialog box 3 Set up double tap speed Double tap the grid pattern to set double tap speed and double tap file icon to test the double tap setting in Doubl...

Page 19: ...3 To remove the battery pull up the plastic spring of the battery until you hear the sound of popup and then gently take out the battery Note The battery life will be reduced with temperature decreasi...

Page 20: ...ods and requirements Commonly there will be some power left in the battery before users start to use it Please firstly run out of all the power before first charging Please charge the handheld for 8 h...

Page 21: ...shown in Main battery area is as Good and 100 the battery is really fully charged Note This is because the charging voltage detected by WinCE is a little higher than the real battery voltage Constant...

Page 22: ...into the slot till the card is completely inside the slot and then close the plug 3 You can remove the Micro SD card by lightly pressing the card to make it half pop out automatically and then pull i...

Page 23: ...metal cover gently following the arrow direction of UNLOCK to open the metal cover and then insert the SIM card into the SIM card slot as shown below 3 Push the metal cover back gently following the...

Page 24: ...Bluetooth Settings Tap the Bluetooth Settings tag in the Communication Mode Settings dialog box the Bluetooth Settings interface appears as shown below left To use Bluetooth you need to tap the Power...

Page 25: ...oth Device Properties icon the Bluetooth Management interface pops up as shown below right Tap the Scan Device button the handheld begins to scan Bluetooth devices within 10 meters and show them in th...

Page 26: ...putting the matching password in the other device When the other device finished confirmation the symbol turns to which means the matching is successful as shown below left After successfully set up t...

Page 27: ...t the Trusted menu item and input the matching password 1 When the matching is successful double tap the icon item and select the Active menu item in the popped up menu Then the icon will turn to Now...

Page 28: ...ngs edit box as shown below left 4 Tap the OK button to return back to the Modem interface Tap the Next button The Phone Number dialog box appears Input the country code local area code phone number 9...

Page 29: ...ng the OK button and press the power button until the handheld turns on and the interface of Restoring the system please wait is shown as right This operation will restore all data and settings to the...

Page 30: ...chapter Connecting to PC 2 After Microsoft ActiveSync is connected to handheld as below 3 Click the Explore button of Microsoft ActiveSync to open K2 series resource browser Copy the latest version fi...

Page 31: ...and insert it into handheld Then by the above method you can also complete upgrading firmware Note If there are several versions of the firmware for the correct type of handheld the system will be up...

Page 32: ...30 Connecting to PC Installing Microsoft ActiveSync Hardware Connection Setup with PC Microsoft ActiveSync Automatic Connection Visiting GeoPro K2 Series Handheld C H AP T E R 4...

Page 33: ...download en details aspx id 15 After installing the Microsoft ActiveSync click the Start Program menu item find and run Microsoft ActiveSync In the pop up Connection Settings dialog box choose Allow...

Page 34: ...will be required Follow the tips to install the driver of WinCE Find the driver in the CD in the handheld goods package Visiting GeoPro K2 Series Handheld After first successful connection the Microso...

Page 35: ...33 Technical Parameters System Configuration GPS Performance Positioning Accuracy Interfaces Power Performance Application Function Physics Electric Specifications C H AP T E R 5...

Page 36: ...WAAS EGNOS MSAS GAGAN Antenna Built in high sensitivity anti interference GPS antenna Update rate 1Hz in default can support up to 5Hz as option First positioning time 26 sec typical cold start Positi...

Page 37: ...k Video Built in a 5 megapixel camera support on site image acquisition and annotation Audio Built in microphone and speaker support on site audio acquisition and annotation audio operation instructio...

Page 38: ...36 Troubleshooting Common Troubleshooting ActiveSync Common Problems C H AP T E R 6...

Page 39: ...dheld when the internal temperature is over 0 Can t recognize the storage card The storage card has not been inserted properly Carefully take out the card and then insert it into the card slot gently...

Page 40: ...ActiveSync is installed ActiveSync 4 5 and later version is compatible with GeoPro K2 series You can download the latest version from the Microsoft website at http www microsoft com download en detai...

Page 41: ...PC 31 Installing Micro SD Card 18 Installing Microsoft ActiveSync 31 Installing SIM Card 19 Integrated Handheld Design 4 Intelligent Speech Technology 3 Interfaces 9 34 Micro SD Card 9 Microprocessor...

Page 42: ...eely to contact us with any usage condition or advices about GeoPro K2 series we will reply to you as soon as possible Geosun Spatial Technology Instrument Co Ltd Add 3rd Floor Hongye Building Wuhan U...

Page 43: ...user s authority to operate the equipment This device complies with part 15 of the FCC Rules Operation is subject to the following two conditions 1 This device may not cause harmful interference and 2...

Reviews: