background image


Page 42/55 

© Geobrugg Gruppe, CH-8590 Romanshorn, Switzerland 

RXE-1000 / 17 

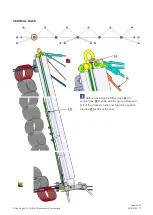
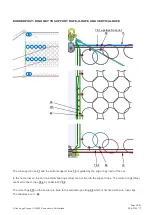
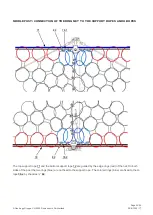
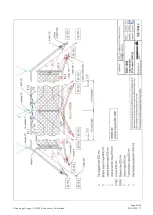
MIDDLE POST: CONNECTION OF THE RING NET TO THE SUPPORT ROPES AND U-ROPES 


The top support rope 

71

 and the bottom support rope 

72

 are guided by the edge rings (red) of the net. On both 

sides of the post the two rings (blue) are not fixed to the support rope. The colored rings (blue) are fixed to the U-

rope 

78.x


by shackles ½” 

82


71 

78.1 

82 

72 

82 

78.2 

Summary of Contents for RXE-1000

Page 1: ... class 3 1000 kJ Height 4 5m Testing certificate S 13 1 Federal office of environmental Switzerland Test institute Federal Research Institute WSL Birmensdorf Switzerland Date 08 10 2018 Edition 17 Geobrugg AG CH 8590 Romanshorn Product Manual RXE 1000 ROCKFALL BARRIER ...

Page 2: ...Page 2 55 Geobrugg AG CH 8590 Romanshorn Switzerland RXE 1000 17 ...

Page 3: ...Page 3 55 Geobrugg AG CH 8590 Romanshorn Switzerland RXE 1000 17 ...

Page 4: ...uide Staking out Assembly details ISO 9001 certificate This document does not claim to be exhaustive Before starting an installation it must be ensured that the copy of the product manual is up to date It is designed for general standard applications and does not take into account any project specific parameters Geobrugg cannot be held liable for any additional costs which may arise in spe cial ca...

Page 5: ... which is a member of IQNet The quality manual specifies in full the way in which the individual system components basic material commercial products and end products are checked extensively to eliminate poor quality You can find the corresponding certificates in the appendix III FUNCTIONAL EFFICIENCY OF THE BARRIER SYSTEMS The functional efficiency of the system is based on one to one rockfall te...

Page 6: ...s natural disasters inadequate dimensioning or failure to use standard components systems and original parts but also through corrosion caused by environmental pollu tion or other man made factors as well as other external influences In contrast to the one to one rockfall tests which indeed test an extreme load case but still only demonstrate a standardized situation in the field the layout and de...

Page 7: ...G ON THE TERRAIN 12 5 STAKING OUT GEOMETRY 14 6 ROPE ANCHOR PLACEMENT 18 7 ANCHORING THE BASE PLATE 19 8 PREPARATION OF THE NETS AND POSTS 21 9 CRANE AND HELICOPTER INSTALLATION 27 10 INSTALLING THE SUPERSTRUCTURE 28 11 ASSEMBLY DETAILS 33 12 SUPPORT ROPE SEPARATION WITH INTERMEDIATE SUSPENSION 46 13 SPECIAL SOLUTION ADDITIONAL TO THE STANDRAD 50 14 FINAL INSPECTION 51 ...

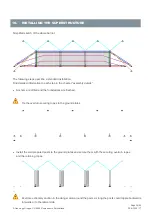
Page 8: ...wnslope 1 HAZARD STATEMENT QUALIFICATION OF THE GROUP LEADER The management of installation may only be done by a qualified group leader CABLES WITH PRETENSION Cables are under tension During installation and pretensioning of the cables make sure that there are no persons in the danger zone RELEASING OF PARTS WITH PRETENSION Releasing or cutting of components with pretension should be avoided Shou...

Page 9: ...400 Nm see tightening torque required for wire rope clips and base plate fastening nuts Open ended wrench for base plate fastening nuts Felco C16 or C112 wire rope cutter or similar 12 mm cutting capacity Cutting Off wheel or hammer wire cutter 28 mm cutting capacity pincers flat nose pliers 2 mm galvanized wire strands or wire Angle spirit level Roll of adhesive tape Rope clamp small 8 16 mm larg...

Page 10: ...ly next to the thimble For loops without a thimble the length h between the first wire rope clip and the point of load incidence must minimally be 15 time the nominal diameter of the rope In unloaded condition the length h of the loop should be not less than the double of the loop width h 2 The clamping brackets U brackets must always be fitted to the unstressed end of the rope the clamping jaws s...

Page 11: ... 90 180 27 22 7 8 4 150 330 32 A visible contusion of the wire ropes positively indicates that the wire rope clips have been tightened to the required tightening torque Undamaged wire rope clips could be reused Especially the threads and clamping jaw have to be checked Wire rope clips always have to be installed and used with the required tensioning torque After the first load application the tigh...

Page 12: ...cted Lining Basically the barrier line is to be planned so that it runs as straight as possible and horizontally Irregular lines and lowering terrain and terrain curvatures between the posts are to avoid or compensate if possible Foundation The base plate support of the foundation must be laid against the terrain in such a way that the lower bottom support rope remains close to the ground The base...

Page 13: ...of the length of the mesh h difference in height between two neighboring posts Tab 2 Post distance 6 8 m 8 10 m 10 12 m h 0 50 m 1 00 m 1 50 m No adjustment necessary h 0 50 m 1 00 m 1 50 m Net must be adjusted If the height difference is greater than in Tab 2 you must contact Geobrugg to enable the correct length of nets to be determined h h x x n ...

Page 14: ... to the terrain Depending on the terrain the standard staking cannot be kept To ensure the proper functioning of the barrier of ten small adjustments in cross section or length of the nets ropes posts are sufficient If Geobrugg is informed of the discrepancies can be found a customized solution together 1 Rope anchor Lateral anchor 2 Upslope change in direction Downslope anchor rope 3 Intermediate...

Page 15: ...4 00 6 00 1 30 6 80 2 00 4 50 6 75 1 45 7 60 2 25 5 00 7 50 1 65 8 50 2 50 6 00 9 00 2 00 10 20 3 00 1 In a ground slope of less than 30 the distance between post and retaing rope anchor is modified lengths h barrier height x post spacing anchor positions A top support rope B bottom support rope C lateral rope D retaining rope E U rope H transmission rope 1 Tab 3 0 29 d e D Length d see Tab 3 e se...

Page 16: ... rope has a rope diameter of d 18 mm INTERMEDIATE ROPE SUSPENSION e T x 2 5 y 15 1 x 2 x 2 Length e see Tab 3 x post distance y angle of direction change Anchor point T downslope anchor rope Z intermediate anchor Length a see Tab 3 c see Tab 3 y change in direction Anchor position Z intermediate suspension y D Zwischenabspannung If the barrier line changes upslope more than 15 an intermediate anch...

Page 17: ...on is more than 25 a support rope separation is to install in addition to the intermediate suspension DOWNSLOPE CHANGE IN DIRECTION For a downslope change in direction of more than 30 an additional retaining rope D is mounted on the post head three ropes instead of two The maximum angle for a downslope change in direction is 40 c a a Z B E H B E H Z 30 y 40 d D D 4 Length d see Tab 3 Anchor positi...

Page 18: ...y be made with respect to the stakeout such as length of the retaining ropes angle between retaining rope and post inclination of the ground plate etc The anchor holes are drilled in the pulling direction with a minimum angle of 15 to the horizontal 75 15 35 D T ß Ω 0 30 15 32 17 34 19 36 21 38 23 40 25 42 27 44 29 45 30 The angle must be between 60 85 The angle between slope and post is 75 as sta...

Page 19: ...base plate 29 Mortar the anchor 05 in the loose ground 110 Fill in the concrete foundation 111 Tighten the fastening nuts 10 to approx 30 kN pretensioning force CONCRETE Can be used for all types of soil and rock Dig a hole for the concrete foundation 111 Drill the rear anchoring 07 the project engineer calculates the lengths of the anchors Prepare the concrete foundation 111 the concrete foundati...

Page 20: ...fully hardened Tightening torque of the fastening nut for an anchor pretensioning force of approx 30 kN Swiss GEWI NG 25 Swiss GEWI NG 28 Tightening torque 300 Nm 400 Nm Table 6 You must use mortar that is resistant to both frost and de icing salt Reinforcement 12 mm steel diameter 150 mm apart A mounting pattern can be supplied on request Please ensure the anchors have sufficient contact with the...

Page 21: ...numbered from left to right from the downslope S The net bundles are installed to the right of the posts as standard X In the event of significant height differences it is easier to pull the net down from the higher post to the lower post If specified in the order instructions Geobrugg will supply the bundles according to the customer s re quest ...

Page 22: ... m Marking the different rows for barrier height h 3 m Row No 1 6 12 17 Marking the different rows for barrier height h 4 m Row No 1 8 14 21 Marking the different rows for barrier height h 4 5 m Row No 1 8 16 23 Marking the different rows for barrier height h 5 m Row No 1 9 17 25 Marking the different rows for barrier height h 6 m Row No 1 11 19 29 h 5 m h 6 m ...

Page 23: ...U rope and 5 released rings which are not fixed with the transmission ropes Blue colored rings of middle nets 2 rings on the top and bottom are shackled to the U rope In case of divided field nets only one side is colored in blue The 2 blue colored main rings are fixed to the intermediate ring at delivery b The 5 blue colored rings and the red colored rings are bundled at delivery 1 2 N 2 N 3 N 1 ...

Page 24: ...th the transmission ropes and top support rope Blue colored rings of middle nets 2 rings on the top and bottom are shackled to the U rope In case of divided field nets only one side is colored in blue a The 2 blue colored main rings are fixed to the intermediate ring at delivery b The 5 blue colored rings and the red colored rings are bundled at delivery c The 5 blue colored main rings on the top ...

Page 25: ... PREPARATION OF THE POSTS 33 1 Stk Running wheel 35 1 Stk clevis 37 1 Stk sleeve 40 1 Stk ROCCO 7 3 300 53 1 Stk 6kt bolt M30x180 55 2 Stk 6kt nut M30 66 2 Stk Retaining rope 67 1 Stk Lateral rope 85 2 Stk Shackle 7 8 86 1 Stk Shackle 1 66 86 85 37 35 67 33 53 55 40 ...

Page 26: ...1 The mounting bracket 203 is inserted in the appropriate height between the climbing iron and the post The net panel is placed on the mounting bracket and securely fixed with straps 202 The top strap is attached to the second row 205 so that in a subsequent assembly step the two upper ring panel be turned away from the support rope to pass through the rings and the running wheel 201 205 203 204 2...

Page 27: ... 8590 Romanshorn Switzerland RXE 1000 17 9 CRANE AND HELICOPTER INSTALLATION Fix the net panels with straps 207 flight safely Use the middle post head shackle1 86 to lift the assembly Never use the climbing steps 208 208 207 86 ...

Page 28: ...tion to each step in the chapter assembly details Anchors are drilled and the foundations are finished Fix the overturn securing ropes to the ground plates Install the well prepared posts to the ground plates and secure them with the securing overturn ropes and the retaining ropes Exercise extremely caution in the danger area around the posts as long the posts could topple backwards forwards or to...

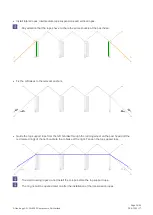
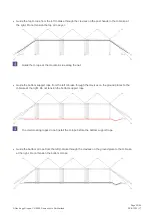
Page 29: ...ost head Fix the U Brakes to the relevant anchors Guide the top support rope from the left U brake through the running wheel on the post head and the red colored rings of the net bundle to the U brake at the right Tension the top support rope To avoid crossing ropes do not install the U rope before the top support rope The ring net will be opened later on after the installation of the transmission...

Page 30: ...ope at the mountain side along the net Guide the bottom support rope from the left U brake through the clevises on the ground plates to the U brake at the right Do not tension the bottom support rope To avoid crossing ropes do not install the U rope before the bottom support rope Guide the bottom U rope from the left U brake through the clevises on the ground plate to the U brake at the right Do n...

Page 31: ...U brake at the right Do not tension the transmission ropes Cut the belts of the ring net bundles and fix the border rings of the first net to the left vertical rope Open the net panels connect them to each other and fix the border rings of the last net to the vertical rope at the right During opening the net panels the transmission ropes will be lifted to its final height ...

Page 32: ... Gruppe CH 8590 Romanshorn Switzerland RXE 1000 17 Tension the top U rope bottom support rope bottom U rope and transmission ropes Shackle colored rings to U rope Attach the secondary mesh to the ring net at mountain side ...

Page 33: ...nd the posts as long the posts could topple backwards forwards or to the lateral side Long posts with preassembled net tend to lateral tip over Lateral guy ropes during installation prevent this Overturn securing rope 68 mount for secure mounting of the posts 68 83 64 65 64 2 pcs 6kt nut M22 65 1 pcs washer M22 68 1 pcs Overturn securing rope 83 1 pcs Shackle 5 8 ...

Page 34: ...2 pcs 6kt bolt M30x180 55 4 pcs 6kt nut M30 56 1 pcs 6kt bolt M20x110 57 2 pcs Washer M20 58 1 pcs 6kt nut M20 67 1 pcs Lateral rope 69 1 pcs Verical rope 71 1 pcs Top support rope 78 1 1 pcs Top U Rope 78 2 1 pcs Bottom U rope 85 4 pcs Shackle 7 8 86 1 pcs Shackle 1 95 3 pcs Wire rope clips 5 8 69 95 78 2 39 85 35 37 33 53 55 56 57 58 66 86 67 85 71 78 1 35 37 33 53 55 ...

Page 35: ...omanshorn Switzerland RXE 1000 17 VERTICAL ROPE Before tensioning the lateral rope 67 the vertical rope 69 shackle with the ground plate and bolt of the shackle on the post head then position the loop 211at half of the post 69 67 211 ...

Page 36: ...39 1 pcs Bottom support rope 53 2 pcs 6kt bolt M30x180 55 4 pcs 6kt nut M30 56 1 pcs 6kt bolt M20x110 57 2 pcs washer M20 58 1 pcs 6kt nut M20 66 2 pcs Retaining rope 71 1 pcs Top support rope 78 1 1 pcs Top U rope 78 2 1 pcs Bottom U rope 83 1 pcs Shackle 5 8 85 3 pcs Shackle 7 8 66 85 53 55 35 37 33 78 1 71 83 53 55 35 37 33 78 2 39 56 57 58 ...

Page 37: ... RETAINING ROPE ON THE ROPE ANCHOR LATERAL ROPE ON THE ROPE ANCHOR 01 1 pcs spirale rope anchor 66 1 pcs upslope anchor rope 96 4 pcs wire rope clip 7 8 96 66 01 01 1 pcs spirale rope anchor 67 1 pcs lateral rope 95 3 pcs wire rope clip 5 8 per rope 67 95 01 67 95 01 ...

Page 38: ...OP TRANSMISSION ROPE AT ROPE ANCHOR 01 1 pcs spirale rope anchor 50 1 pcs U Brake U 300 K1620 71 1 pcs top support rope 73 1 1 pcs top transmission rope 78 1 1 pcs top U Rope 86 4 pcs shackle 1 95 3 pcs wire rope clip 5 8 97 4 pcs wire rope clip 7 8 50 73 1 71 78 1 86 01 50 73 1 71 78 1 86 01 86 97 97 95 ...

Page 39: ...RANSMISSION ROPE AT ANCHOR 01 1 pcs spirale rope anchor 50 1 pcs U Brake U 300 K1620 72 1 pcs bottom support rope 73 2 1 pcs bottom transmission rope 78 2 1 pcs bottom U Rope 86 4 pcs shackle1 95 3 pcs wire rope clip 5 8 97 4 pcs wire rope clip 7 8 86 50 72 78 2 73 2 86 01 86 50 78 2 73 2 86 01 72 97 97 95 ...

Page 40: ...72 is guided by the edge rings red of the net In the net corner on top and on bottom two rings blue are not fixed to the support rope The colored rings blue are fixed to the U rope 78 x by shackles1 2 82 The main rings 215 on the border are fixed to the vertical rope string 69 which is not fixed with wire rope clips The shackles are 82 71 82 78 1 upslope from net 215 72 82 78 2 82 69 ...

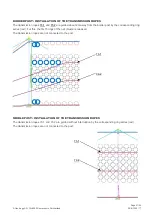
Page 41: ...y from the border post by the corresponding ring series red For this the first 5 rings of the net blue are released The transmission ropes are not connected to the post MIDDLE POST INSTALLATION OF THE TRANSMISSION ROPES The transmission ropes 73 1 and 73 2 are guided without interruption by the corresponding ring series red The transmission ropes are not connected to the post 73 1 73 2 ...

Page 42: ...G NET TO THE SUPPORT ROPES AND U ROPES The top support rope 71 and the bottom support rope 72 are guided by the edge rings red of the net On both sides of the post the two rings blue are not fixed to the support rope The colored rings blue are fixed to the U rope 78 x by shackles 82 71 78 1 82 72 82 78 2 ...

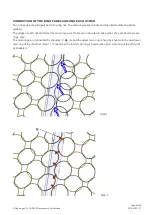
Page 43: ...termediate ring series yellow The edges of each net are formed by main ring rows If nets are connected to each other they are fixed by main rings only The main rings are connected by shackles 82 means the upper main ring is fixed by shackle to the next lower main ring of the other net step 1 In next step the lower main ring is fixed to the upper main ring of the other net by shackle Step 1 Step 2 ...

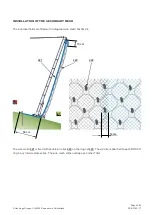
Page 44: ...DARY MESH The individual fields are fitted with a diagonal wire mesh 50x50x2 4 The wire mesh 221 is fixed with double wire ties 222 on the ring net 220 The wire tie is attached to each ROCCO ring in any intermediate series The wire mesh strips overlap each other 10cm 222 10 cm 220 221 15 cm 50 cm ...

Page 45: ...AG CH 8590 Romanshorn Switzerland RXE 1000 17 01 1 pcs Spiral rope anchor 79 1 pcs Downslope anchor rope 85 1 pcs Shackle7 8 95 3 pcs Wire rope clip 5 8 85 79 95 01 95 79 01 85 INTERMEDIATE ROPE SUSPENSION DOWNSLOPE ANCHOR ...

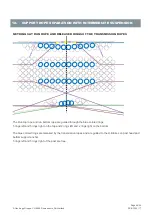
Page 46: ...E TRANSMISSION ROPES The Run top rope and run bottom rope are guided through the blue colored rings 5 rings left and 5 rings right on the top and 2 rings left and 2 rings right on the bottom The blue colored rings are released by the transmission ropes and are guided to the U Brakes on post head and bottom support anchor 5 rings left and 5 rings right of the post are free ...

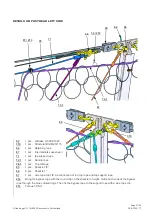
Page 47: ...ope 74 1 1 pcs Runtop rope 78 1 1 pcs Top U Rope 85 1 pcs Shackle 7 8 86 6 pcs Shackle 1 97 1 pcs wire rope clip 7 8 as conncetion of run top rope and top support rope 212 Bring the bypass rope with the round clip on the shackle in height Guide both ends of the bypass rope through the blue colored rings Then fix the bypass rope to the support rope with a wire rope clip 213 Torque 50 Nm 310 85 86 9...

Page 48: ...p support rope 74 1 1 pcs Runtop rope 78 1 1 pcs Top U Rope 86 4 pcs Shackle 1 97 1 pcs Wire rope clip NG22 as connection of run top rope and top support rope 212 Bring the bypass rope with the round clip on the shackle in height Guide both ends of the bypass rope through the blue colored rings Then fix the bypass rope to the support rope with a wire rope clip 213 Torque 50 Nm 85 67 74 1 73 1 50 3...

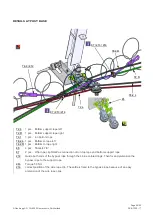
Page 49: ...2 L 1 pcs Bottom U rope left 78 2 R 1 pcs Bottom U rope right 85 4 pcs Shackle 7 8 97 2 pcs Wire rope clip NG22 as connection of run top rope and bottom support rope 212 Guide both ends of the bypass rope through the 4 blue colored rings Then fix and pretension the bypass rope to the support rope 213 Torque 50 Nm 214 correct position of the wire rope clip The sattle is fixed to the bypass rope bec...

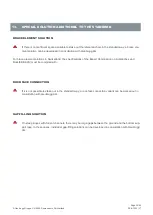
Page 50: ...ce element solutions in Switzerland the specifications of the Expert Commission on Avalanches and Rockfall EKLS must be complied with ROCK FACE CONNECTION If it is not possible to stake out in the standard way a rock face connection variant can be worked out in consultation with Geobrugg AG GAP FILLING SOLUTION On steep slopes with torrent channels there may be large gaps between the ground and th...

Page 51: ...ts installed correctly c Have the correct number of rings been left free on the left and right of the posts d Is the net correctly fastened to the support ropes U ropes e Have the correct number of wire rope clips been attached to the ends of the rope f Are the wire rope clips installed correctly g Has the correct torque been applied to the wire rope clips h Are the nets connected correctly i Are ...

Page 52: ...Page 52 55 Geobrugg Gruppe CH 8590 Romanshorn Switzerland RXE 1000 17 ...

Page 53: ...Page 53 55 Geobrugg AG CH 8590 Romanshorn Switzerland RXE 1000 17 ...

Page 54: ...Page 54 55 Geobrugg Gruppe CH 8590 Romanshorn Switzerland RXE 1000 17 ...

Page 55: ...Page 55 55 Geobrugg AG CH 8590 Romanshorn Switzerland RXE 1000 17 EXTRACT FROM THE FOEN TEST CERTIFICATE NO 13 1 ...

Reviews: