05
Roller Instruction in GRBL Firmware
·
What you need
1. USB Type-B Cable
2. Genmistu LC-40 Rotary Roller Module
3. Firmware
4. LaserGRBL/LightBurn
·
Firmware Flashing
1. Connect the machine to the power supply and insert the USB
cable.
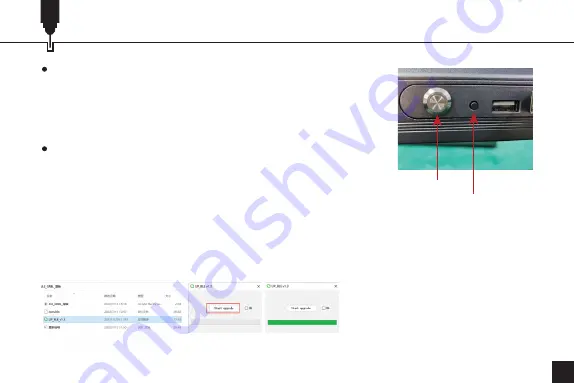
2. Press the repeat engraving button on the back of the machine for
3 seconds, then press the power button to enter the reboot mode.
Open Up_ble_v1.3.exe (Figure 1) and click Start upgrade (Figure 2), the program will flash the
firmware automatically.
3. The firmware upgrade takes about one minute, wait for the progress bar reaches to the end, then
shut down your laser engraver and power it back on. (Figure 3)
Power Button
Repeat Engraving
Figure 1
Figure 2
Figure 3
Summary of Contents for Jinsoku LC-40
Page 3: ...01 01 Front View 03 Right View 02 Top View 04 Side View Product Structure...
Page 19: ...17 Roller Instruction in GRBL Firmware 2 12 Click Start to start engraving...
Page 37: ...35 01 03 02 04...
Page 38: ...36 USB...
Page 39: ...37 PC 370mm 14 57in 390mm 15 39in 1 2 3 PC 4 5...
Page 40: ...38 370mm 14 57in 390mm 15 39in 1 2 3 4 5...
Page 42: ...40 GRBL LaserGRBL 1 LaserGRBL https lasergrbl com 2 1 COM Grbl 1 1f for help Laser Ready 6 5 6...
Page 43: ...41 GRBL 2 2 Grbl Grbl 1 2 7 8 1 8 2...
Page 44: ...42 GRBL 2 3 2 4 LaserGRBL 9 1 9 2 10 lines mm 10 X 5 0 Y 5 0 11 9 1 10 11 9 2...
Page 45: ...43 GRBL 2 5 Framing 12 2 6 Start 12 13...
Page 46: ...44 GRBL 15 16 LightBurn Lightburn USB Type B https lightburnsoftware com 2 1 15 16 2 2...
Page 47: ...45 GRBL 17 18 2 3 LightBurn 17 2 4 Next 18...
Page 48: ...46 GRBL 19 20 2 5 OK 19 2 6 OK LightBurn 20...
Page 49: ...47 GRBL 2 7 Edit Device Settings 21 2 8 GCode 22 21 22...
Page 50: ...48 GRBL 2 9 Start GCode G91 G01Y 5F500 OK Start Gcode...
Page 51: ...49 GRBL 2 10 LightBurn...
Page 52: ...50 GRBL 2 11...
Page 53: ...51 GRBL 2 12...


