08
Roller Instruction in GRBL Firmware
2.3 Connect the Rotary Roller Module with the laser engraver, and focus the engraving material.
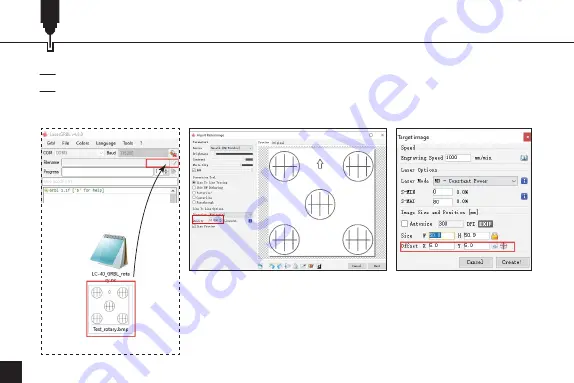
2.4 Open a picture in LaserGRBL, (Figure 9-1 & Figure 9-2), and you can adjust the related settings.
Make sure the Quality≥10 lines/mm (Figure 10), and the Offset settings in the next page should be
X≥5.0, Y=5.0 (Figure 11).
Figure 9-1
Figure 10
Figure 11
Figure 9-2
Summary of Contents for Jinsoku LC-40
Page 3: ...01 01 Front View 03 Right View 02 Top View 04 Side View Product Structure...
Page 19: ...17 Roller Instruction in GRBL Firmware 2 12 Click Start to start engraving...
Page 37: ...35 01 03 02 04...
Page 38: ...36 USB...
Page 39: ...37 PC 370mm 14 57in 390mm 15 39in 1 2 3 PC 4 5...
Page 40: ...38 370mm 14 57in 390mm 15 39in 1 2 3 4 5...
Page 42: ...40 GRBL LaserGRBL 1 LaserGRBL https lasergrbl com 2 1 COM Grbl 1 1f for help Laser Ready 6 5 6...
Page 43: ...41 GRBL 2 2 Grbl Grbl 1 2 7 8 1 8 2...
Page 44: ...42 GRBL 2 3 2 4 LaserGRBL 9 1 9 2 10 lines mm 10 X 5 0 Y 5 0 11 9 1 10 11 9 2...
Page 45: ...43 GRBL 2 5 Framing 12 2 6 Start 12 13...
Page 46: ...44 GRBL 15 16 LightBurn Lightburn USB Type B https lightburnsoftware com 2 1 15 16 2 2...
Page 47: ...45 GRBL 17 18 2 3 LightBurn 17 2 4 Next 18...
Page 48: ...46 GRBL 19 20 2 5 OK 19 2 6 OK LightBurn 20...
Page 49: ...47 GRBL 2 7 Edit Device Settings 21 2 8 GCode 22 21 22...
Page 50: ...48 GRBL 2 9 Start GCode G91 G01Y 5F500 OK Start Gcode...
Page 51: ...49 GRBL 2 10 LightBurn...
Page 52: ...50 GRBL 2 11...
Page 53: ...51 GRBL 2 12...


