English
- 1 -
Hardware Installation
1.
Your computer should be off. Now connect the gaming mouse to any USB port of your PC (it takes a few
seconds for your mouse to be properly installed).
2.
Turn on your computer.
Do not use the optical/laser mouse on a desk which is made of glass or mirror.
Software Installation
1.
Make sure the gaming mouse is connected to the computer.
2.
Put the setup CD into the CD-ROM.
3.
Follow the on screen instructions to complete the software installation.
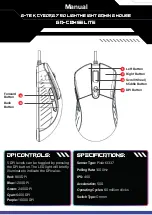
Button Assignment
1.
Previous Page:
Default is previous page for Internet
browsing.
2.
Left Button:
Provides traditional mouse functions such as
click, double click or drag.
3.
Magic Roller/Middle button:
Press the “Magic Roller” to
surf the Internet and Windows documents.
4.
Right Button:
You can assign this button to frequently used
keyboard and mouse functions.
5.
Next Page:
Default as next page for Internet browsing.
You can assign any of the above buttons to any macro key
using the UI. See below.
6.
DPI adjustment:
Default is 1500 dpi. DPI in
500/1000/1500/2000 for different needs in the battle field.
X-G510 User Interface
1.
Assignment Button:
Assign a preset macro key to each defined button.
2.
Manage Macro:
Edit your own mouse function into one Macro key with delay time when needed.
3.
Advance Setting:
Adjust the mouse performance for Mouse Click, Double Click Speed, Scroll Speed,
Polling Rate and DPI setting.
4.
Light Option:
Adjust the Intensive and Pulsation light patterns.
HELP
Press
to find out how to use the user interface and the details of each function.
Summary of Contents for X-G510
Page 32: ......