background image

Hardware Installation

1.

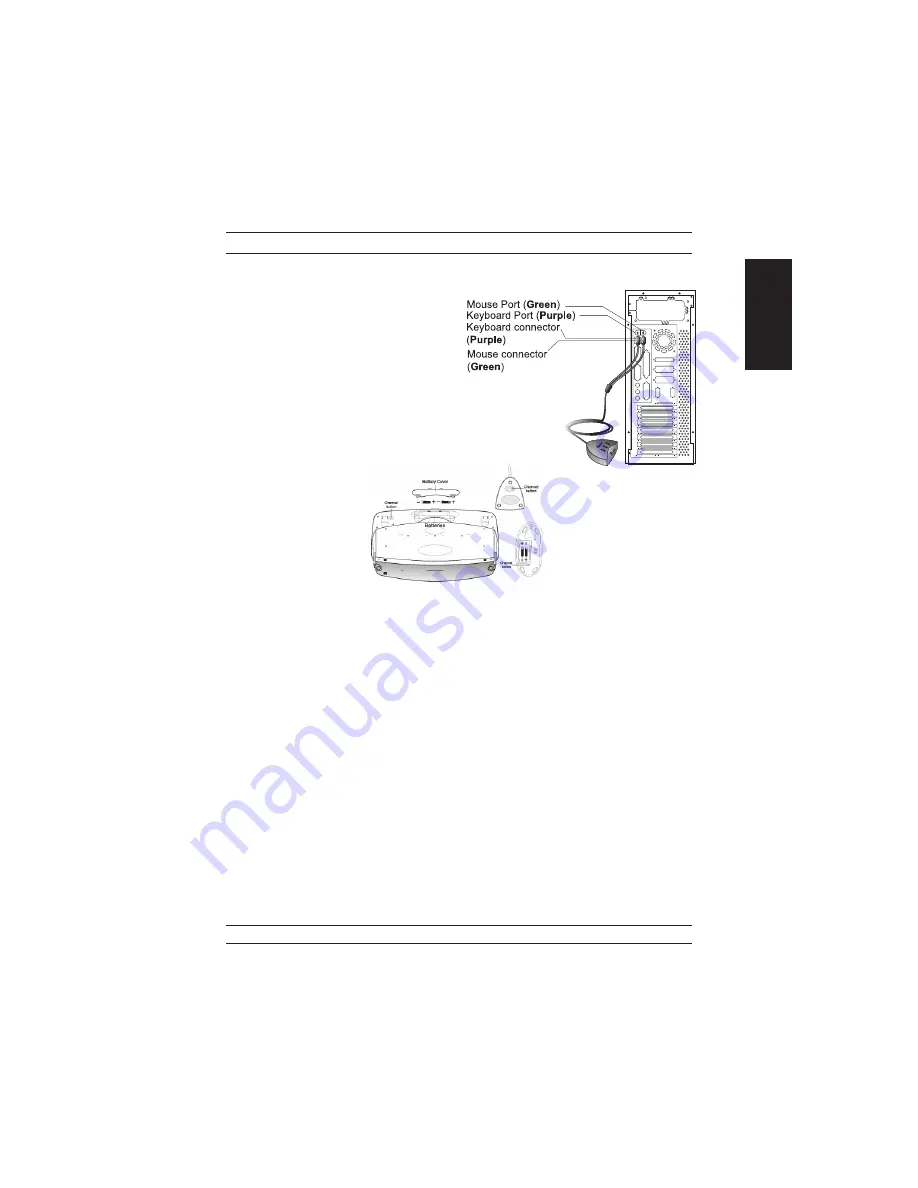
Connect the receiver’s green mouse

connector to the computer’s 6-pin

PS/2 mouse port. Connect the receiv-

er’s purple keyboard connector to

the computer’s 6-pin PS/2 keyboard

port.

2.

Install two AA batteries in the mouse

and two AA batteries in the key-

board.

3.

Turn on your computer.

4.

After you open Windows, please press the button under the receiver first (RB)

and then press the button under the mouse (MB) and keyboard (KB) for ID

channel setting. You only have six seconds to press the receiver, the channel

button on the keyboard (KB), then the receiver button again and the channel

button on the mouse (MB). So you press RB, KB, RB, MB to set the channel

setting.

Warning:

1.

When you use Wireless Tw Optical on a desk that is made of metal, try

using a pad or reduce the receiving distance.

2.

Before the first installation is completed (channel setting ready), the keyboard

will not work in DOS.

3.

The Wireless Tw Optical channel provides 256 ID-codes, and it auto-

matically selects the ID # for your keyboard and mouse. You can only set up one

Tw Optical at a time. But if you have additional Tw Optical

sets in an area of 10 square meters, more interference may occur between the re-

ceiver and your keyboard and mouse.

4.

If you feel the mouse does not move smooth as usual or the keyboard does not

work when typing, then the batteries have lost their charge, so please replace

them.

Also, the wireless icon will be blinking “red” when there is a battery-

low situation. You should set up the channel every time you replace the bat-

terires.

1

ENGLISH

Summary of Contents for TWINTOUCH PLUS OPTICAL

Page 1: ... When you use Wireless TwinTouch Optical on a desk that is made of metal try using a pad or reduce the receiving distance 2 Before the first installation is completed channel setting ready the keyboard will not work in DOS 3 The Wireless TwinTouch Optical channel provides 256 ID codes and it auto matically selects the ID for your keyboard and mouse You can only set up one TwinTouch Optical at a ti...

Page 2: ... and keyboard is connected to the computer 2 Put the Setup disk or CD into the disk drive 3 Follow the instructions on the screen to finish the software installation Factory Setting 1 Mouse Button Assignments The Button Assignment feature lets you work in a more efficient way because you can assign the most frequently used commands in Windows to the mouse buttons Magic Roller Press the Magic Rolle...

Page 3: ...mail Open mail folder 8 Back See last page when viewing the Internet 9 www Open browser in Netscape or IE 10 Forward Go to next page when viewing the Internet 11 Sleep Turn system into wake up mode MouseMate Software Features Browsing Speed You can adjust the browsing speed when you surf the Internet or Windows documents Browsing Direction Move the Magic Roller forward and the screen will browse t...

Page 4: ...d Auto scrolling features It s similar to Microsoft s IntelliM ouse Genius Mode Supports all applications that use scrollbars including Of fice with zoom Auto panning and scrolling functions About Click here to open the Genius Homepage www genius net com tw Orientation This function lets you set the angle when you move the mouse upward It gives you a more comfortable angle when holding the mouse T...

Page 5: ...use just one hand to Zoom In Out set the right button to be the Ctrl function press the right button and move the Magic Roller forward or backward to enlarge or decrease the document window Auto Panning You can set this function in the Button Assignment menu Move the mouse and the document moves in the direction you just moved Uninstall the Software Follow these instructions to remove the software...

Reviews: