background image

E

E

N

N

G

G

L

L

I

I

S

S

H

H


1

1

1. Package Contents


Your Twin Wheel FFB package comes with the following 

items: 

z


Twin Wheel FFB *1 

z


Twin Wheel FFB Pedal *1 

z


Driver CD *1   

z


Mounting clamp *1(Y typed) 

z


AC Adapter * 1 

z


User's Guide *1


2. System Requirements 
For PC 

z


IBM PC Pentium 166MHz compatibles or higher 

z


Available USB port 

z


CD/DVD-ROM Drive for driver installation 

z


Microsoft Windows XP/ME/2000/98 

For PlayStation   

z


PlayStation 2 / PS One / PlayStation


3. Setting-up your Twin Wheel FFB 

Please follow these steps below to install your Twin Wheel. There are two ways to firmly 

position the Twin Wheel on the table. 

1.  Use four strong suction cups under the bottom of the wheel’s chassis

so you can firmly 

position the wheel by just pushing it down hard on the table. 

2.  You can attach the ’Y-typed’’ mounting clamp to the edge of the table through two hidden 

holes on the front panel of the wheel’s chassis. 

If necessary

  you can use both methods to position the wheel firmly to make sure that the 

wheel will not come loose while game playing. 

4. Installation 
A. Installation for PC system 

1.  Make sure your computer on. 

2.  Insert the driver’s disc into the CD-ROM drive

and the setup program will start automatically. If not

start the setup program 

manually by selecting 

Start/Run

 and type in “

E:\setup

” (where “E” represents the location of the CD-ROM drive), then 

press the Enter key. 

3.  Follow the instructions on the screen to finish the driver installation. 

4.  After the installation is completed

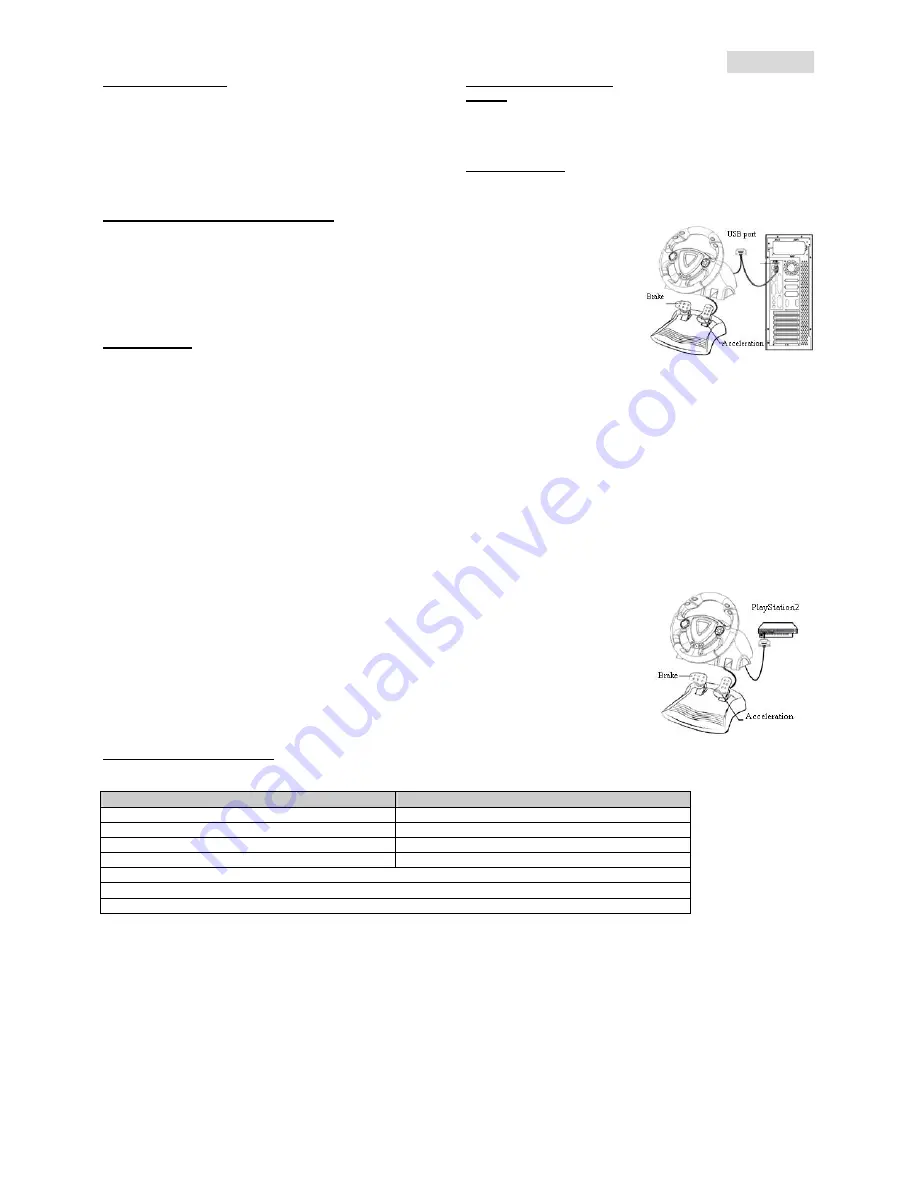
  you can plug the USB connector of the cable to the USB port on your computer. 


Note: If you connect it to a USB Hub, power it on after connection, because it needs at least 500mA to operate the vibration 
function. 

5.  Connect the AC Adapter power with the steering wheel chassis. At this moment the wheel will turn right and left for 

regulation and testing

do not touch the wheel.


6. Click 

Start / Setting / Control Panel

 and double click on “

Game controller

” or “

Gaming Options

” icon. 

7. 

Make sure the wheelbase is positioned firmly and place the pedals on the floor in a convenient-to-reach location. 

Note: Do not place the pedals on an easy-to-slip surface 

8.  Plug the pedal’s connector to the steering wheel. 

9.  You can calibrate and test your game controller in the “

Game controller

” or “

Gaming Options

” screen. 

10.  When you finish the calibration and test

  you can play any game. 

Important: 

1.  The driver will work with the DirectX 7.0a or newer version in PC system. Check the 

DirectX version on your system

and upgrade if necessary. 

2.  The vibration effect occurs according to the game software. 

B. Installation for PlayStation2 and PlayStation 

1.  Make sure you turn your game controller on. 

2.  Plug the PlayStation’s standard interface cable to the PlayStation. 

3.  When you finish the connection

you can play the game now. 

4.  The game controller’s function is according to the game software you are using. 

Important: 

The force feedback effect is for PC only

and power feedback for PS2 or PS. 

5. Operating and function 
A. Basic button function setting


There are 12 function buttons built in to the Twin Wheel FFB and each has different function depending on your game software.   

PC 

PlayStation 

Eight ways D-Pad 

Eight ways D-Pad 

Button 1, 2, 3, 4 

Χ

,

,

,


Button 5, 6, 7, 8, 11, 12 

L1, L2, L3, R1, R2, R3 

Button 9, 10 

Select, Start 

Program button 
Analog/Digital/ Car (only for PS2) Mode switching button 
LED indicator Red (Analog Mode) / Green (Digital Mode) / Orange (Car Mode) 

B. Programming setting 

In some games, the foot pedal will not be activated automatically. If you want to use the pedal instead of other analog function 

buttons on the Twin Wheel FFB, please follow these steps below: 

1. Press Program button and the LED light will be lit. 

2. Then push down one of the pedals (should push down to above 10 degrees), at the same time, press one of the Analog 

buttons that you wish to set up. (

Χ

, , 

L1, L2, L3, R1, R2, R3) 

3. Then press Program button again to complete the set up. 

4. Use the above steps to set up the other pedal

  just like the wheel. 

5. If you want to terminate the program functions

  unplug the wheel’s cable and re-plug it to the PS2 console

  and the program 

function will be reset. 

Note:


Program function only can be activated under Digital & Analog modes. Under Car mode, the program function will not be 

activated.


Summary of Contents for TWIN WHEEL FFB

Page 1: ...Table of Contents English 1 Русский 2 Deutsch 3 Français 4 Italiano 5 ESPAÑOL 6 Português 7 Brasil 8 Nederlands 9 Česky 10 Magyar 11 Polski 12 Srpski 13 Ελληνικά 14 Română 15 Türkçe 16 ﻋﺮﺑﻲ 17 ...

Page 2: ...als on the floor in a convenient to reach location Note Do not place the pedals on an easy to slip surface 8 Plug the pedal s connector to the steering wheel 9 You can calibrate and test your game controller in the Game controller or Gaming Options screen 10 When you finish the calibration and test you can play any game Important 1 The driver will work with the DirectX 7 0a or newer version in PC ...

Page 3: ...ия руля расположите педали на полу Примечание Не устанавливайте педали на скользкой поверхности 8 Подключите разъем педалей к рулю 9 Экран Игровые устройства позволяет откалибровать и протестировать игровое устройство 10 Закончив калибровку и тестирование можно начинать игру Важно 1 Для работы драйвера в компьютерной системе необходимо наличие DirectX 7 0a или более новой версии Проверьте версию D...

Page 4: ...bsttest Berühren Sie das Lenkrad nicht Klicken Sie auf Start Systemsteuerung und doppelklicken Sie auf das Gamecontroller Symbol 6 Das Lenkradgehäuse muss sicher am Tisch befestigt sein Legen Sie den Pedalenträger auf den Fußboden so dass er leicht zu erreichen ist Hinweis Stellen Sie den Pedalenträger nicht auf eine rutschige Fläche 7 Stecken Sie den Stecker des Pedalenträgers in das Lenkradgehäu...

Page 5: ...surez vous que la base du volant est fermement en place et que le pédalier se trouve au sol facilement accessible Note ne placez pas le pédalier sur une surface glissante 8 Insérez le connecteur des pédales dans le volant 9 Vous pouvez maintenant calibrer et tester votre volant depuis l écran Contrôleur de jeu ou Options de jeu 10 Une fois la calibration et les tests terminés vous êtes fin prêt à ...

Page 6: ...ns 7 Accertarsi che la base del volante sia fissata saldamente e installare la pedaliera sul pavimento in una posizione facile da raggiungere Nota Non posizionare la pedaliera su una superficie scivolosa 8 Inserire nel volante il connettore della pedaliera 9 È possibile calibrare e sottoporre a test il game controller usando la schermata Game controller o Gaming Options 10 Al termine del test e de...

Page 7: ...ón Panel de control y haga doble clic en el icono de Mando del juego o Opciones de juego 7 Asegúrese de que la base del volante esté bien colocada y ponga los pedales en el suelo en una ubicación que le resulte fácil de alcanzar Nota No coloque los pedales en una superficie resbaladiza 8 Conecte el conector del pedal al volante 9 Puede calibrar y probar el mando en la pantalla Mando del juego o Op...

Page 8: ...ões Painel de controlo e clique duas vezes no ícone Controladores de jogos ou Opções de jogos 8 Certifique se que a base do volante está posicionada firmemente e coloque os pedais no chão num local de fácil acesso Nota Não coloque os pedais numa superfície escorregadia 9 Ligue o conector dos pedais ao volante 10 Pode calibrar e testar o seu controlador de jogos no ecrã Controladores de jogos ou Op...

Page 9: ...Panel Iniciar Ajustando Painel de Controle no ícone Game controller ou Gaming Options 7 Assegure se de que a base do volante esteja firmemente posicionada e coloque os pedais no chão num local de fácil alcance Nota Não coloque os pedais numa superfície escorregadia 8 Conecte o conector do pedal no volante 9 Você pode calibrar e testar seus game controller na tela Game controller ou Gaming Options ...

Page 10: ...6 Klok op Start Instellingen Configuratiescherm en dubbelklik op het pictogram Spelbesturing of Spelbesturing 7 Zorg er voor dat de stuurwielvoet stevig is geïnstalleerd en plaats de pedalen op de vloer in een voor u comfortabele positie Opmerking plaats de pedalen niet op een glad oppervlak 8 Stop de connector van de pedaal in het stuurwiel 9 U kunt uw game controller kalibreren en testen op het ...

Page 11: ... Herní zařízení nebo Možnosti herního zařízení 7 Podstavec volantu musí být pevně připevněn a pedály musí být umístěny na podlaze v pohodlně dostupné poloze Poznámka Neumísťujte pedály na kluzký povrch 8 Připojte konektor pedálů k volantu 9 V části Herní zařízení nebo Možnosti herního zařízení můžete kalibrovat a testovat toto herní zařízení 10 Po dokončení kalibrace a testování můžete začít hrát ...

Page 12: ...7 Győződjön meg róla hogy a kormány talpa megfelelően van rögzítve majd helyezze a pedálokat a padlóra egy könnyen elérhető helyre Megjegyzés Ne helyezze a pedálokat csúszós felületre 8 Csatlakoztassa a pedál vezetékét a kormánykerékhez 9 Beállíthatja és tesztelheti a játékvezérlőt a képernyő Játékvezérlő vagy Játékbeállítások részében 10 Miután befejezte a beállítást és tesztelést akár egyből ki ...

Page 13: ... kliknąć na ikonę Kontroler gier lub Opcje gier 7 Należy się upewnić że podstawa kierownicy została mocno osadzona i umieścić pedały na podłodze w miejscu dogodnym do sięgania do nich Uwaga Nie umieszczać pedałów na śliskich powierzchniach 8 Wetknąć złącze pedałów do kierownicy 9 Użytkownik może skalibrować i przetestować kontroler gry za pomocą ekranu Kontroler gier lub Opcje gier 10 Po zakończen...

Page 14: ...Panel i dva puta kliknite na ikonicu Game controller ili Gaming Options 7 Proverite da li je osnova volana čvrsto postavljena na sto i postavite pedale na pod u položaj koji možete lako dosegnuti Napomena Ne postavljajte pedale na klizavu površinu 8 Priključite konektor sa pedala u kućište volana 9 Svoj upravljač možete podesiti i isprobati otvaranjem prozora Game controller ili Gaming Options 10 ...

Page 15: ...ν τοποθετείτε τα πεντάλ σε ολισθηρή επιφάνεια 8 Συνδέστε το σύνδεσμο του πεντάλ στο πηδάλιο 9 Μπορείτε να ρυθμίσετε και να δοκιμάσετε τον ελεγκτή παιχνιδιών στην οθόνη Game controller Ελεγκτής παιχνιδιών ή Gaming Options Δυνατότητες παιχνιδιών 10 Όταν τελειώσετε με τις ρυθμίσεις και τη δοκιμή θα μπορείτε να παίξετε οποιοδήποτε παιχνίδι Σημαντικό 1 Το πρόγραμμα οδήγησης θα λειτουργήσει με DirectX 7...

Page 16: ...ming Options Opţiuni jocuri 7 Asiguraţi vă că baza volanului este bine fixată şi amplasaţi pedalele pe podea astfel încât să fie uşor accesibile Notă Nu amplasaţi pedalele pe suprafeţe lunecoase 8 Conectaţi conectorul pedalelor la volan 9 Puteţi calibra şi testa dispozitivul de control al jocului în ecranul Game controller Dispozitiv de control joc sau Gaming Options Opţiuni jocuri 10 După ce term...

Page 17: ...simgesini çift tıklayınız 7 Direksiyon tabanının sıkıca sabitlenmiş olduğundan ve pedalların zeminde ulaşılması uygun olan bir konuma yerleştirilmiş olduğundan emin olunuz Not Pedalları kaygan bir zemin üzerine yerleştirmeyiniz 8 Pedalın konektörünü direksiyona takınız 9 Game controller veya Gaming Options ekranında oyun konsolunuzu kalibre ve test edebilirsiniz 10 Kalibrasyon ve ve testi bitirdiğ...

Page 18: ...ﺪة ﺗﺜﺒﻴﺖ ﻣﻦ ﺄآﺪ ﻣ ﻼﺣﻈﺔ ﻣﻨﺰﻟﻖ ﺳﻄﺢ أي ﻓﻮق اﻟﺪواﺳﺎت ﺗﻀﻊ ﻻ 8 ﻗ ﺑﻌﺠﻠ اﻟﺪواﺳﺔ ﻣﻮﺻﻞ ﺑﺘﻮﺻﻴﻞ ﻢ اﻟﺘﻮﺟﻴﻪ ﺔ 9 ﺷﺎﺷﺔ ﺧﻼل ﻣﻦ واﺧﺘﺒﺎرهﺎ ﻟﺪﻳﻚ اﻷﻟﻌﺎب ﻓﻲ اﻟﺘﺤﻜﻢ وﺣﺪة ﻣﻌﺎﻳﺮة ﻳﻤﻜﻨﻚ G Ga am me e c co on nt tr ro ol ll le er r اﻷﻟﻌﺎب ﻓﻲ اﻟﺘﺤﻜﻢ وﺣﺪة اﻷﻟﻌﺎب ﻓﻲ اﻟﺘﺤﻜﻢ وﺣﺪة أو أو Gaming Options اﻷﻟﻌﺎب ﺧﻴﺎرات اﻷﻟﻌﺎب ﺧﻴﺎرات 10 ﻋ اﻷﻟﻌﺎب ﻣﻦ ﻟﻌﺒﺔ أﻳﺔ ﺗﺸﻐﻴﻞ ﻳﻤﻜﻨﻚ واﻻﺧﺘﺒﺎر اﻟﻤﻌﺎﻳﺮة ﻋﻤﻠﻴﺔ ﻣﻦ اﻻﻧﺘﻬﺎء ﻨﺪ ه ﺎم 1 ﻳ ﻌﻤﻞ اﻟﺘﺸﻐﻴ ﺑﺮﻧﺎﻣﺞ ﻞ ...

Reviews: