background image

 English  

-12-


To prevent damaging of an SD/SDHC memory 

card, be sure to turn off the power when 

inserting or removing the SD/SDHC memory 

card. If inserting or removing the SD/SDHC 

memory card with the power on, the camera will 

automatically turn off. 


Be careful not to drop the batteries when 

opening or closing the battery cover.


Turning the Power On/Off 

Load the batteries and insert an SD/SDHC 
memory card before starting. 
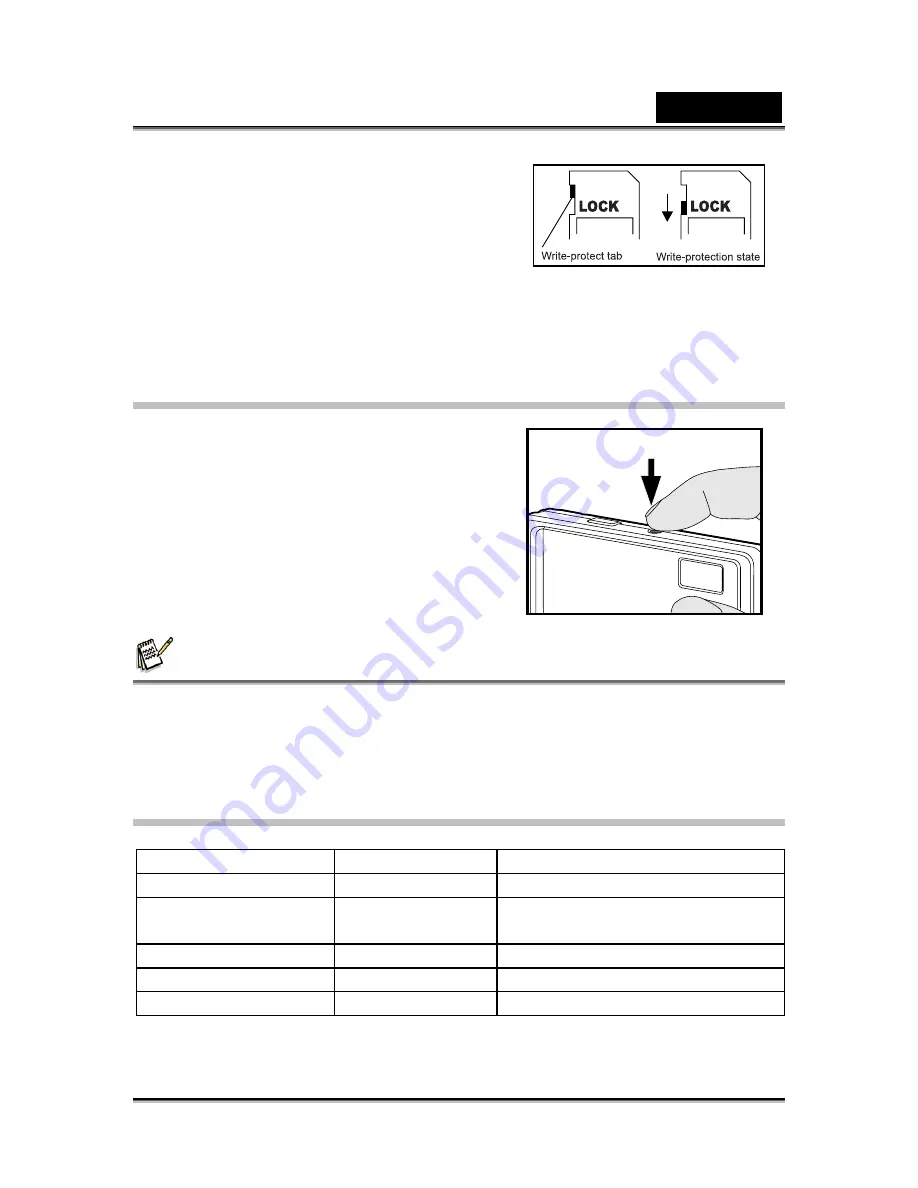
 

Press the 

POWER 

button until the 

digital still camera turns on. 


To turn the power off, press the 

POWER 

button again.


 NOTE 


The power is turned off automatically when the camera has not been operated for a fixed 
period of time. To resume the operation condition, turn the power on again. Refer to 
section “Auto Off” in the Setup Menu for further details.


LED Indicators and Self-timer Indicators


Indicators State  Description/Activity 

LED indicator


Solid green 

The digital camera is powering up.

LED indicator


Solid green 

The digital camera is ready to 
record images (or movies). 

LED indicator


Blinking green 

Reading/Writing files. 

LED indicator


Blinking green 

Charging the flash.


Self-timer indicator


Blinking red 

The self-timer function is activated.


Summary of Contents for P5143

Page 1: ...nd found to comply with the limits for Class B digital devices pursuant to Part 15 of the FCC rules These limits are designed to provide reasonable protection against harmful interference in a residen...

Page 2: ...vary between retailers especially with accessories such as batteries memory cards cables carrying cases pouches and language support Occasionally a retailer will specify a unique product color appear...

Page 3: ...ng or leaking Do not fire the flash close to anyone s eyes This might cause damage to the person s eyesight Do not subject the LCD monitor to impact This might damage the glass on the screen or cause...

Page 4: ...ten the battery life and reduce camera performance The battery may feel warm when using the camera for an extended period of time or using the flash continuously This is normal and not a malfunction T...

Page 5: ...__________________________ 14 SETTING THE FOCUS ________________________________________________ 14 USING THE SCENE MODE _____________________________________________ 15 ADJUSTING THE EXPOSURE EV COMP...

Page 6: ...___________________________________ 29 Slide Show _____________________________________________________ 29 DPOF _________________________________________________________ 29 Protect____________________...

Page 7: ...Other features provided by the camera include the following True 5 0 Mega Pixel CMOS Maximum 10 0 mega pixels 2 5 LTPS LCD monitor 4X Digital zoom Supports SD SDHC card SDHC card up to 4GB PictBridge...

Page 8: ...de Macro mode 5 Lens 6 Beep 7 USB connector 8 Self timer LED Rear View 1 LCD monitor 2 Status LED 3 OK button Digital Zoom button 4 Strap holder 5 4 way control button Up button MENU Menu button Right...

Page 9: ...attery power No battery power 4 Storage media Internal memory no card SD SDHC memory card 5 Image size resolution 10m 3648 x 2736 FW Interpolation 8m 3264 x 2448 FW interpolation 5m 2560 x 1920 3m 204...

Page 10: ...cus setting Playback mode still image playback 1 Playback mode 2 Battery condition 3 Storage media 4 File number 5 Folder number 6 Protect icon 7 DPOF icon Playback mode Video playback 1 Playback mode...

Page 11: ...ory 13 5MB available for image storage but you can load an SD SDHC memory card SDHC memory card up to 4GB to expand the camera s memory capacity Be sure to format the memory card with this camera befo...

Page 12: ...s on To turn the power off press the POWER button again NOTE The power is turned off automatically when the camera has not been operated for a fixed period of time To resume the operation condition tu...

Page 13: ...yed 4 Select the displayed language with the buttons and press the OK button The setting will be stored Formatting the Memory Card or Internal Memory This utility formats the internal memory or memory...

Page 14: ...eature however the more the image is magnified the grainer the image may become To capture a zoomed image 1 Press the Power button to turn the power on 2 To activate the digital zoom press the OK butt...

Page 15: ...shoot action Sports Select this mode to photograph fast moving subjects Night Select this mode to capture dark scenes such as night views Portrait Select this mode to capture an image that makes the p...

Page 16: ...ompensation value from 2 0EV to 2 0EV then press the OK button 4 To exit from the menu press the button Effective Subjects and Set Values positive compensation negative compensation Backlight correcti...

Page 17: ...ash Off Use this mode when capturing images using indoor lighting for stages and indoor competitions and when the subject is too far away for the flash to be effective Setting the Self timer The self...

Page 18: ...98 198 370 741 1485 Standard 6 39 80 162 326 608 1219 2440 8M Economy 10 61 125 252 507 947 1897 3796 Fine 4 28 57 117 235 440 883 1767 Standard 8 46 95 193 388 724 1451 2904 5M Economy 13 73 149 301...

Page 19: ...he write speed of your SD SDHC memory card is not fast enough for recording video clips in the currently selected size the video recording will stop In this case select a video size lower than the cur...

Page 20: ...ck Time Player usage refer to the Quick Time on line help for more information Possible recording time sec video clip The table below indicates the approximate duration of recording time depending on...

Page 21: ...actor is displayed on the LCD monitor 4 To view different portion of the images press the button to adjust the display area NOTE An icon is displayed with the video data The magnification factors rang...

Page 22: ...he buttons and press the OK button The slideshow starts 5 To stop the slide show during playback press the OK button The image is displayed on screen when you press the OK button NOTE The Auto Off fun...

Page 23: ...age where you want to remove the image protection 1 Press the button 2 Select the protected image that you want to unlock with the buttons 3 Press the MENU button 4 Select Protect with the buttons fro...

Page 24: ...th the buttons 3 Press the MENU button 4 Select DPOF with the buttons and press the OK button The DPOF setting screen is displayed 7 Select Single or All with the buttons and press the OK button Singl...

Page 25: ...the last image All Erases all of the images except for the protected images Select Select the image you want to erase in thumbnail mode 5 Select Execute with the buttons and press the OK button To not...

Page 26: ...desired setting with the buttons and press the OK button 5 To exit from the menu press the button Size This sets the size of the image that will be captured 10m 10MP 3648 x 2736 pixels FW interpolatio...

Page 27: ...ty of lighting conditions and permits images to be captured that approach the conditions that are seen by the human eye Blank Auto Daylight Cloudy Tungsten Fluorescent ISO This sets the sensitivity fo...

Page 28: ...ecording video clips 1 Press the MODE button to set the camera mode to 2 Press the MENU button 3 Select the desired option item with the buttons and press the OK button to enter its respective menu 4...

Page 29: ...etting with the buttons and press the OK button 5 To exit from the menu press the button Delete Refer to Erasing Images for further details Copy to Card Allows you to copy your files from the camera s...

Page 30: ...th the buttons and press the OK button 5 To exit from the menu press the button Format Refer to Formatting the Memory Card or Internal Memory for further details Beep This sets whether or not to mute...

Page 31: ...he digital still camera directly to the PictBridge compatible printer without using a computer Connecting the camera to the printer 1 Connect one end of the USB cable to your camera 2 Connect the othe...

Page 32: ...If you select Select in the previous step the figure shown on the right hand side will appear Select the image that you want to print with the buttons Select the Print Num up to 99 with the buttons Af...

Page 33: ...mera 3 Select PC using the buttons and press the OK button 4 From the Windows desktop double click on My Computer 5 Look for a new removable disk icon This removable disk is actually the memory or mem...

Page 34: ...e intuitive thumbnail library automatically organizes updates and sorts files for the most natural way to browse your multimedia collection To install software 1 Insert the CD ROM that came with the c...

Page 35: ...Speakers or headphones Network or Internet connection NOTE Video conferencing or video editing software is not included with the digital still camera This mode does not work with Mac Install the Web c...

Page 36: ...ayback Shutter Speed 1 1 1000 sec Exposure Auto Manual 2 0 2 0 EV in 1 3 EV steps ISO Auto 100 200 White Balance Auto Manual Daylight Cloudy Tungsten Fluorescent LCD monitor 2 5 LTPS LCD 154K pixels F...

Page 37: ...shutter button all the way down The internal memory or memory card does not have any free capacity Insert a new memory card or delete unwanted files The flash is charging Wait until the status LED tu...

Reviews: