background image

 English  


64 

4.3.3


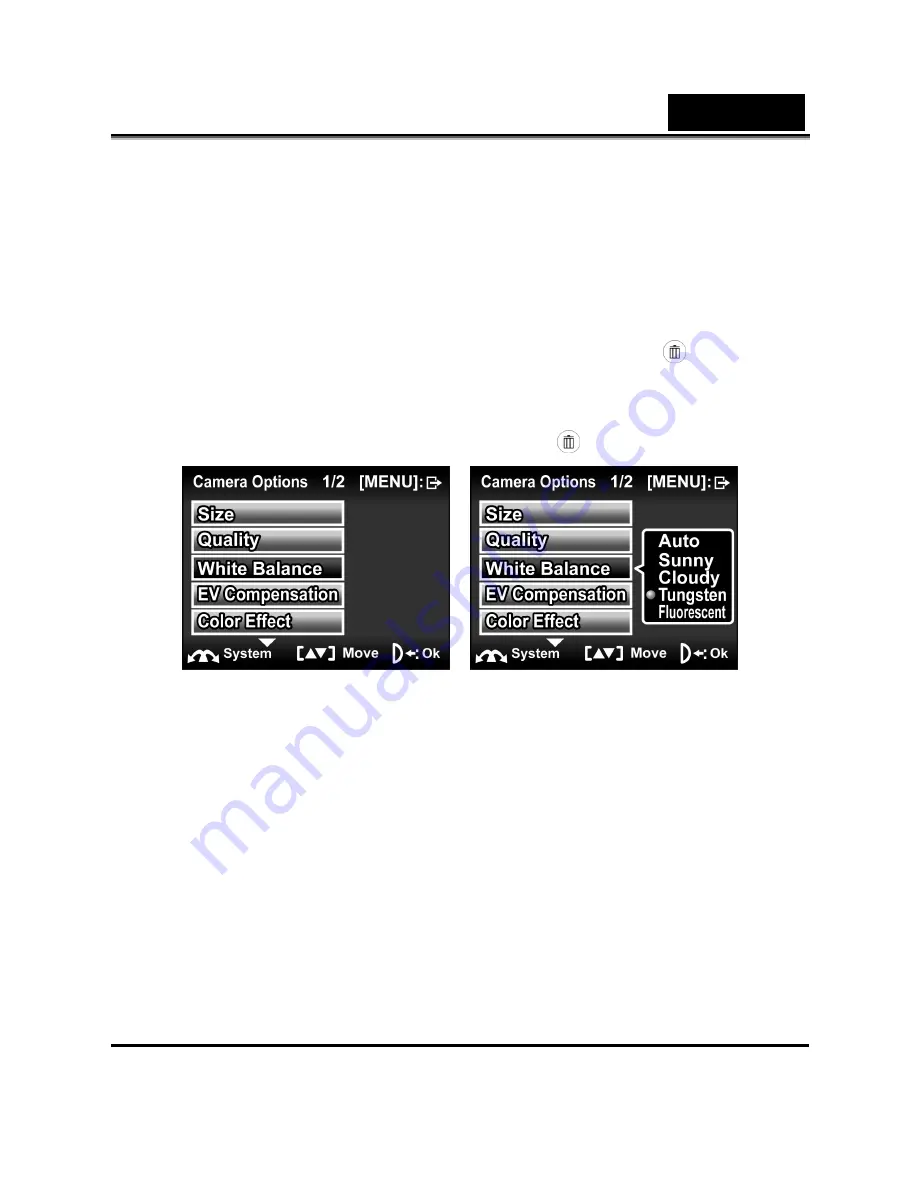
White balance 

Use this option to correct color difference due to lighting conditions.   

1.


Turn the camera on and ensure it is in 

Photo

 mode. 

2.


Press the 

MENU

 button and use the 

Up/Down

 arrow keys to 

highlight the 

White Balance

 option. Press the 

OK


 button to 

display the submenu. 

3.


Use the 

Up/Down

 arrow keys to select 

auto

sunny

cloudy

tungsten

, or 

fluorescent

. Press the 

OK


  button to confirm. 


4.


Press the 

MENU

 button again to exit the menu. 

Summary of Contents for G-Shot DV815z

Page 1: ...English User s Manual...

Page 2: ...T This device complies with Part 15 of the FCC Rules Operation is subject to the following two conditions 1 This device may not cause harmful interference and 2 This device must accept any interferenc...

Page 3: ...the manual If such changes or modifications should be made you could be required to stop operation of the equipment Product Information 1 Product design and specifications are subject to change witho...

Page 4: ...store of purchase If the camera has fallen or its case has been damaged turn the power OFF and remove the battery Continued use in this state might cause fire or electric shock Consult the store of pu...

Page 5: ...lass on the screen or cause the internal fluid to leak If the internal fluid enters your eyes or comes into contact with your body or clothes rinse with fresh water If the internal fluid has entered y...

Page 6: ...ce When you are using the new rechargeable battery or rechargeable battery that has not been used for an extended period of time the battery that passed the expiry date is an exception might affect th...

Page 7: ...impaired Always keep the battery terminals in a clean state Risk of explosion if battery is replaced by an incorrect type Dispose of used batteries according to the instructions We recommend the batte...

Page 8: ...4 Right view 15 1 3 5 Bottom view 16 1 3 6 LCD display 16 1 3 7 About the LEDs 19 2 Getting started 20 2 1 Inserting an SD card 20 2 2 Inserting the batteries 21 2 3 Charging the battery 22 2 4 Turni...

Page 9: ...ing music files 31 2 10 1 To playback a music file 31 2 11 Connecting to a computer 32 2 12 Connecting to a TV 32 3 Using the camera 33 3 1 Video mode 33 3 1 1 Video mode icons 33 3 1 2 Help informati...

Page 10: ...47 3 5 2 Playback mode icons 48 3 5 3 Thumbnail mode 49 3 6 USB mode 49 3 7 Storage device mode 49 4 Using the menus 50 4 1 Video menu 50 4 1 1 Video Size 50 4 1 2 Video Quality 51 4 1 3 White balance...

Page 11: ...adjustment EV 65 4 3 5 Color effect 66 4 3 6 Self timer 67 4 3 7 Drive mode 68 4 3 8 Date stamp 69 4 3 9 Night mode 70 4 4 Photo Playback menu 71 4 4 1 Delete all 71 4 4 2 Unlock all 72 4 4 3 Slide sh...

Page 12: ...4 6 6 Language 82 4 6 7 TV 83 4 6 8 Power saving 84 4 6 9 LCD brightness 85 5 Installing software and drivers 86 5 1 Drivers 86 5 1 1 Mass Storage 86 5 2 Presto Video Works 6 87 5 3 Presto Mr Photo 3...

Page 13: ...ing system Intel Pentium III 500MHz CPU or higher At least 256 MB of RAM or higher Standard USB 1 1 port or higher 4x speed CD ROM drive or higher At least 200MB of available disk space Note A USB 1 1...

Page 14: ...USB Video cable Audio cable Li ion battery Battery charger Power cord Quick Guide CD ROM Driver and application software 1 3 About the camera Refer to the following illustrations to familiarize yourse...

Page 15: ...English 14 1 3 1 Front view 1 Lens assembly 2 Self timer LED 3 Flash 1 3 2 Top view 1 Speaker 2 Zoom switch 3 Scroll wheel...

Page 16: ...English 15 1 3 3 Back view 1 Flash Stop button 2 Menu button 3 LCD screen cover 4 Earphone 5 USB port 6 Busy light LED Red 7 Power light LED Green 8 Mode switch 9 Shutter button 1 3 4 Right view 1 MIC...

Page 17: ...English 16 1 3 5 Bottom view 1 Battery cover 2 Tripod connector 1 3 6 LCD display 1 LCD screen 2 Display button 3 Playback button 4 Up and down arrow keys 5 Delete OK button...

Page 18: ...s to adjust volume while playing video or voice files Playback z Press to playback images video clips or recorded voice files Mode z Turn to switch between Video mode Photo mode Voice mode and Music m...

Page 19: ...ss to play pause while playing video voice music Power z Hold the blue button and turn the mode switch at the same time to turn power on off Scroll wheel z In Playback mode scroll to select previous n...

Page 20: ...ecording Self timer LED N A N A Power LED G Busy LED R Photo mode Power on Self capture Shutter button Flash charging Self timer LED R N A N A N A Power LED G N A Busy LED R Voice mode Power on Record...

Page 21: ...ards turning it on and making preliminary settings See later chapters for advanced functions 2 1 Inserting an SD card An SD card can be installed in the camera to provide additional storage space for...

Page 22: ...ry recommended by the manufacturer or your dealer should be used Note Install the batteries exactly as described here Ensure that the polarity of the batteries is correct Installing the batteries inco...

Page 23: ...English 22 2 3 Charging the battery Insert the battery into the charger as shown and connect the power supply to the charging unit and the mains supply...

Page 24: ...o turn on the video camera Press and hold the blue button and turn the mode switch to the left to turn the video camera off 2 5 Changing modes The video camera can operate in four modes Video mode Pho...

Page 25: ...time 1 Turn on the video camera and press the MENU button to display the menu screen 2 When the Date Time option is highlighted press the OK button to display the submenu 3 Use the OK button to highl...

Page 26: ...enu screen 2 Move the scroll to show the setup menu and use the Up Down arrow keys to highlight the Language option Press the OK button to confirm 3 Use the Up Down arrow keys to select the language A...

Page 27: ...video 3 Press the Shutter button to start recording 4 Press the Shutter button again to end recording 5 The video clip will automatically be saved with a unique file name Note To adjust the brightnes...

Page 28: ...ess the Shutter button or the Up arrow key to playback the video clip 4 To pause while playing back the video clip press the Shutter button or the Up arrow key again 5 When viewing the video clip use...

Page 29: ...the LCD screen to frame the picture 3 Press the Shutter button to capture the picture 4 The picture will automatically be saved with a unique file name Note To adjust the brightness of the LCD screen...

Page 30: ...LCD screen 2 Move the scroll wheel to select the previous next image 3 Use the Zoom out Zoom in switch to enlarge reduce the image Press the Up Down arrow keys to move the zoomed image up and down Use...

Page 31: ...e will automatically be saved with a unique file name 2 9 2 To playback a voice file 1 Press the Playback button and the most recent file will be shown on the LCD screen 2 Press the Shutter button or...

Page 32: ...and make sure it is in Music mode 2 Use the scroll wheel to select the file to playback 3 Press the Shutter button or the Up arrow key to playback the voice file 4 To pause while playing back the voi...

Page 33: ...w to transfer files to a PC or use the camera as a PC web camera for conferences Connect the camera to a computer with the USB cable provided 2 12 Connecting to a TV Connect the camera to a TV as show...

Page 34: ...deo clips and store them in internal memory or on an SD card 3 1 1 Video mode icons Use the following picture to familiarize yourself with the Video mode icons and symbols See the table below for a de...

Page 35: ...5 Battery indicator 6 Audio indicator An icon is displayed when audio is disabled 7 Zoom indicator An icon indicating the zoom is displayed when the zoom switch is pressed 8 Video mode icon 9 Image fi...

Page 36: ...display Help information for the function keys in Video mode Press the Display button again to return to main screen The following screen is displayed when the Display button is pressed An illustratio...

Page 37: ...display the quick access menu You can adjust settings for items such as file size EV compensation self timer image quality color effect and white balance To make adjustments do the following 1 Use the...

Page 38: ...D card 3 2 1 Photo mode icons Use the following picture to familiarize yourself with the photo mode icons and symbols See the table below for a description of each icon and symbol 1 Memory status indi...

Page 39: ...shown when set to single shot 9 White balance indicator shows the white balance setting 10 Self timer function 10 20 seconds 11 Macro function indicator This function is on when the icon is displayed...

Page 40: ...e picture is taken to reduce the red eye effect Forced flash flash is always on Slow sync flash A flash mode designed for low light conditions with long shutter speed 3 2 3 Using the macro function Th...

Page 41: ...eo mode the zoom function works with 3x optical and 10x digital zoom In Photo mode the zoom function works with 3x optical zoom and 4x digital zoom Move the zoom switch to the right to get closer to a...

Page 42: ...display Help information for the function keys in Photo mode Press the Display button again to return to main screen The following screen is displayed when the Display button is pressed An illustratio...

Page 43: ...quick access menu You can adjust the settings for items such as file size EV compensation white balance image quality self timer driver mode and color effect To make adjustments do the following 1 Us...

Page 44: ...in internal memory or on an SD card 3 3 1 Voice mode icons Use the following picture to familiarize yourself with the Voice mode icons and symbols See the table below for a description of each icon a...

Page 45: ...ton to display Help information for the function keys in Voice mode Press the Display button again to return to main screen The following screen is displayed when the Display button is pressed An illu...

Page 46: ...4 1 Music mode icons Refer to the following picture to familiarize yourself with the Music mode icons and symbols 1 Displays number of music files stored on the SD card 2 Volume indicator 3 Battery in...

Page 47: ...or internal memory 3 4 2 Help information Press the Display button to display Help information for the function keys in Music mode Press the Display button again to return to main screen The followin...

Page 48: ...sure it is in Playback mode 2 The most recent file will be shown on the LCD screen with basic information such as file type storage directory battery etc 3 Press the Display button for the first time...

Page 49: ...mode icons and symbols See the table below for a description of each icon and symbol 1 Displays the number of current shot and total number of pictures video clips 2 Shows current file type Video cli...

Page 50: ...ghlight an image press the OK butt functions on to view the image in full screen size 4 Press the Stop button again to return to the thumbnail mode Note Only image files are shown in thumbnail mode 3...

Page 51: ...his option to set the size of the captured image Bigger images contain more detail and therefore use more memory space 1 Turn the camera on and ensure it is in Video mode 2 Press the MENU button and u...

Page 52: ...mory storage space 1 Turn the camera on and ensure it is in Video mode 2 Press the MENU button and move the joystick downward to highlight the Quality option Press the OK button to display the submenu...

Page 53: ...d ensure it is in Video mode 2 Press the MENU button and use the Up Down arrow keys to highlight the White Balance option Press the OK button to display the submenu 3 Use the Down arrow key to select...

Page 54: ...se the value if taking a picture of something very bright 1 Turn the camera on and ensure it is in Video mode 2 Press the MENU button and use the Up Down arrow keys down to the second page to highligh...

Page 55: ...rn the camera on and ensure it is in Video mode 2 Press the MENU button and press the Up Down arrow keys down to the next page to highlight the Color option Press the OK button to display the submenu...

Page 56: ...video starts recording 1 Turn the camera on and ensure it is in Video mode 2 Press the MENU button and press the Up Down arrow keys down to the next page to highlight the Self timer option Press the...

Page 57: ...the File Format option Press the OK button to display the submenu 3 Use the Up Down arrow keys to select the file format to save your video clip Press the OK button to confirm 4 Press the MENU button...

Page 58: ...it is in Video mode 2 Press the MENU button and press the Up Down arrow keys down to the second page to highlight the Audio function Press the OK button to display the submenu 3 Use the Up Down arrow...

Page 59: ...sure it is in Video mode 2 Press the MENU button and press the Up Down arrow keys down to the second page to highlight the Continue Focus function Press the OK button to display the submenu 3 Use the...

Page 60: ...n Video mode 2 Press the MENU button and press the Up Down arrow keys down to the second page to highlight the Stabilizer function Press the OK button to display the submenu 3 Use the Up Down arrow ke...

Page 61: ...Playback menu 2 Use the Up Down arrow keys to highlight the Delete all option Press the OK button to display the submenu 3 Press the Up Down arrow keys to confirm and select OK or Cancel Press the OK...

Page 62: ...display Movie Playback menu to display Movie Playback menu 2 Press the MENU button and use the arrow keys to highlight the Unlock all option Press the OK button to display the submenu 3 Use the Up Dow...

Page 63: ...ain more detail and therefore use more memory space 1 Turn the camera on and ensure it is in Photo mode 2 Press the MENU button and use the Up Down arrow keys to highlight the Size option Press the OK...

Page 64: ...ses more memory space 1 Turn the camera on and ensure it is in Photo mode 2 Press the MENU button and use the Up Down arrow keys to highlight the Quality option Press the OK button to display the subm...

Page 65: ...nd ensure it is in Photo mode 2 Press the MENU button and use the Up Down arrow keys to highlight the White Balance option Press the OK button to display the submenu 3 Use the Up Down arrow keys to se...

Page 66: ...ng or decrease the value if taking a picture of something very bright 1 Turn the camera on and ensure it is in Photo mode 2 Press the MENU button and use the Up Down arrow keys to highlight the EV opt...

Page 67: ...tion is turned off it is set to color mode 1 Turn the camera on and ensure it is in Photo mode 2 Press the MENU button and use the Up Down arrow keys to highlight the Color option Press the OK button...

Page 68: ...cture is actually taken 1 Turn the camera on and ensure it is in Photo mode 2 Press the MENU button and press the Up Down arrow keys down to the next page to highlight the Self timer option Press the...

Page 69: ...Down arrow keys down to the second page to highlight the Drive mode option Press the OK button to display the submenu 3 Use the Up Down arrow key to select Single shot or Continuous shot to be taken P...

Page 70: ...t is in Photo mode 2 Press the MENU button and press the Up Down arrow keys down to the second page to highlight the Date stamp option Press the OK button to display the submenu 3 Use the Up Down arro...

Page 71: ...mages to show though 1 Turn the camera on and ensure it is in Photo mode 2 Press the MENU button and press the Up Down arrow keys down to the second page to highlight the Night mode option Press the O...

Page 72: ...arrow keys to highlight the Delete all option Press the OK button to display the submenu 3 Use the Up Down arrow keys to select OK or Cancel Press the OK button to confirm 4 Press the MENU button agai...

Page 73: ...tton to display the Photo Playback menu 2 Use the Up Down arrow keys to highlight the Unlock all option Press the OK button to display the submenu 3 Use the Up Down arrow keys to select OK or Cancel P...

Page 74: ...n press the MENU button to display the Photo Playback menu 2 Press the MENU button and use the Up Down arrow keys to highlight the slide show option Press the OK button to display the submenu 3 Use th...

Page 75: ...ress the MENU button to display the Photo Playback menu 2 Press the MENU button and use the arrow keys to highlight the DPOF option Press the OK button to display the submenu 3 Use the arrow keys to s...

Page 76: ...English 75 5 Press the MENU button again to exit the menu Note This function is available when an SD card is inserted into the video camera...

Page 77: ...y 1 Turn the camera on and ensure it is in Music mode Press the MENU button to display the Music Playback menu 2 Use the Up Down arrow keys to highlight the Repeat option Press the OK button to displa...

Page 78: ...o highlight the Delete all option Press the OK button to display the submenu 3 Use the Up Down arrow keys to select OK or Cancel Press the OK button to confirm 4 Press the MENU button again to exit th...

Page 79: ...the Music Playback menu 2 Use the Up Down arrow keys to highlight the Unlock all option Press the OK button to display the submenu 3 Use the Up Down arrow keys to select On or Off Press the OK button...

Page 80: ...date and time 4 6 2 Beep 1 Turn the camera on and press the MENU button to display the menu screen 2 Move the scroll wheel to show the System menu and use the Up Down arrow keys to highlight the Beep...

Page 81: ...w the System menu and press the Up Down arrow keys to highlight the Format option Press the OK button to display the submenu 3 Use the Up Down arrow keys to select OK or Cancel and press the OK button...

Page 82: ...NU button to display the menu screen 2 Move the scroll wheel to show the System menu and press the Up Down arrow keys to highlight the Default option Press the OK button to display the submenu 3 Use t...

Page 83: ...to display the menu screen 2 Move the scroll wheel to show the System menu and press the Up Down arrow keys to highlight the Memory option Press the OK button to confirm 3 The number of files saved a...

Page 84: ...splay the menu screen 3 Move the scroll wheel to show the System menu and press the Down arrow key down to the second page to highlight the TV option Press the OK button to display the submenu 4 Use t...

Page 85: ...ENU button to display the menu screen 2 Move the scroll wheel to show the System menu and press the Up Down arrow keys down to the second page to highlight the Auto Power Off option Press the OK butto...

Page 86: ...rn the camera on and press the MENU button to display the menu screen 2 Move the scroll wheel to show the System menu and press the Up Down arrow keys down to the second page to highlight the LCD Brig...

Page 87: ...ce You can treat this digital camera as an SD device You will only need to install a driver for the camera if your operating system is Windows 98SE Windows XP ME 2000 are plug and play operating syste...

Page 88: ...ks 6 Presto Video Works 6 is an advanced software application for editing video To install Presto Video Works 6 1 Insert the supplied CD ROM in the CD ROM drive 2 If the CD ROM doesn t automatically b...

Page 89: ...instructions on screen More information about Presto Mr Photo 3 can be found in the help files when the application is started 5 4 XviD codec for PC Installing the XviD codec program 1 Insert the Soft...

Page 90: ...ment to accept the conditions of Software License Agreement and click Next to continue 8 Click Browse to select the folder location and click Next to continue 9 Click Browse to select a different prog...

Page 91: ...nglish 90 10 Click Next to continue from the additional tasks setup screen 11 Press Install to continue from the main program setup screen 12 Press Cancel if you want to stop setup during installation...

Page 92: ...English 91 13 The following screen will appear after the installation is completed Click Finish to complete the installation...

Page 93: ...a Built in 32 MB Flash memory SD MMC card 32 64 128 256 512 MB 1GB compatible Sensor sensitivity Auto Lens 3X optical zoom lens Wide F 2 8 7 5 f 6 0mm Tele F 4 7 12 5 f 16 9 mm Focus range Normal 0 2m...

Page 94: ...igital zoom TFT Monitor 2 5 LTPS high resolution 960 x 240 pixels Flash 1 0 2 0m range Auto Off Auto with Red Eye Reduction Forced Slow Sync White balance Auto Sunny Cloudy Tungsten Fluorescent EV com...

Page 95: ...English 94 General Auto power off Off 2 5 minutes user definable Power supply One 1700mAh rechargeable Li ion battery Dimension 130 L x 57 W x 70 H mm Weight 355 5g without battery...

Page 96: ......

Page 97: ......

Reviews: