background image

English  


71

5.3


Presto! Mr. Photo 

Presto! Mr. Photo is an advanced photo editing software 
application. 
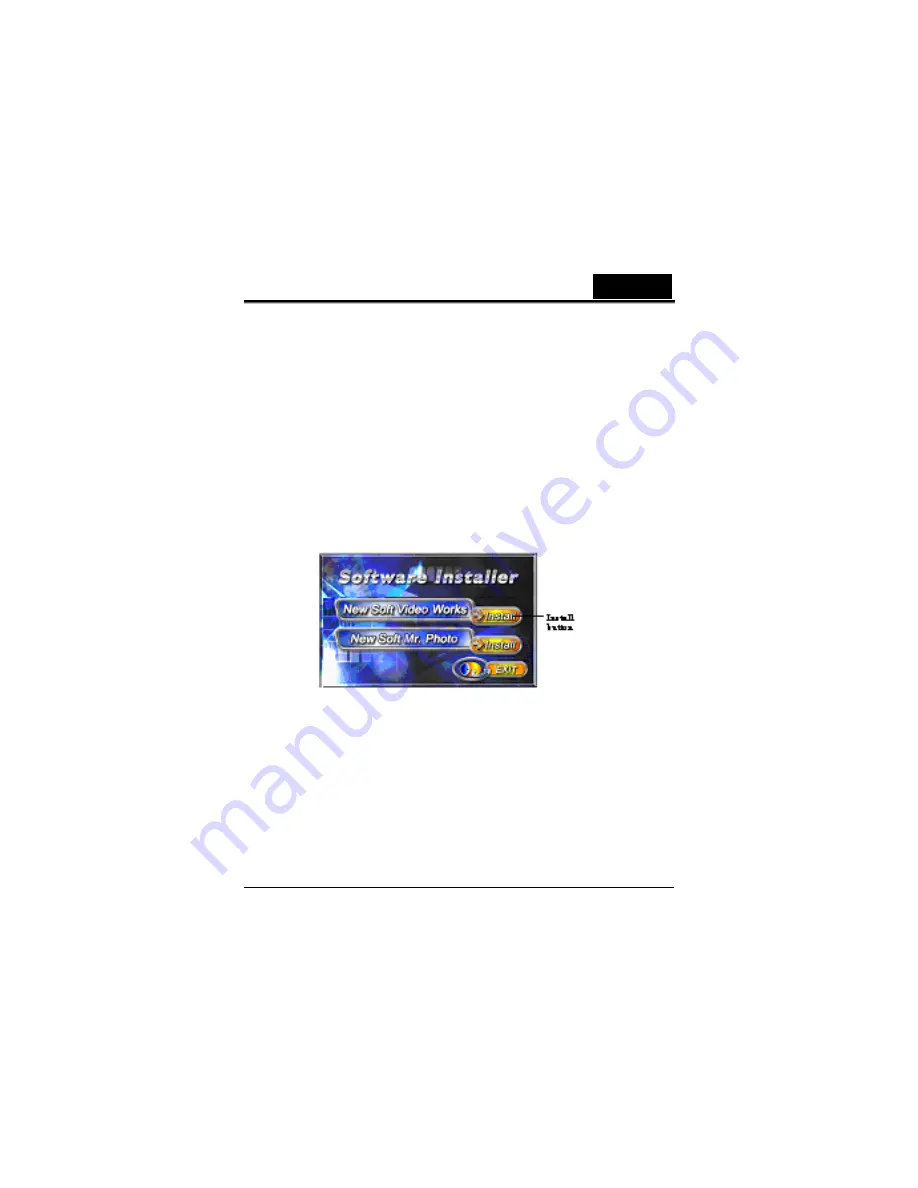
To install Presto! Mr. Photo: 

1.


Insert the supplied CD-ROM in the CD-ROM drive. 

2.


If the CD-ROM does not automatically boot, use 
Windows Explorer to execute the 

InstallMgr.exe

 file in 

the root directory. 

The following screen is displayed. 


3.


Click 

Install

 to begin the installation process and follow 

the instructions on-screen. 

More information about Presto! Mr. Photo can be found in the help 
files when the application is started. 


Summary of Contents for G-SHOT DV506

Page 1: ...interference received including interference that may cause undesired operation Note This equipment has been tested and found to comply with the limits for Class B digital devices pursuant to Part 15...

Page 2: ...ce guide for the product 2 The product and accessories that come with your camera may be different from those described in this manual This is due to the fact that different retailers often specify sl...

Page 3: ...f purchase Do not use the camera in areas near water This might cause fire or electric shock Take special care during rain snow on the beach or near the shore Do not place the camera on inclined or un...

Page 4: ...to the camera Do not use the camera in humid steamy smoky or dusty places This might cause fire or electric shock Do not remove the battery immediately after long period of continuous use The battery...

Page 5: ...ents 1 1 2 Features 1 1 3 Unpacking the video camera 2 1 4 About the camera 3 1 4 1 Front view 3 1 4 2 Top view 3 1 4 3 Bottom view 4 1 4 4 Right view 4 1 4 5 Left view 5 1 4 6 Back view 5 1 4 7 Adjus...

Page 6: ...lip 19 2 6 4 Playing back a voice file 20 2 7 Taking viewing pictures 21 2 7 1 Taking a still picture 21 2 7 2 Viewing images 22 2 8 Connecting to a computer 23 2 9 Connecting to a TV 23 3 Using the c...

Page 7: ...icons 32 3 5 Photo Playback mode 33 3 5 1 Photo Playback mode icons 33 3 6 Thumbnail mode 35 3 7 USB mode 36 3 7 1 Using the mass storage feature 36 3 7 2 Using the DPS Direct Print feature 36 4 Using...

Page 8: ...Face Detect 54 4 4 Photo playback menu 55 4 4 1 Delete 55 4 4 2 Protect 57 4 4 3 Slide show 59 4 4 4 DPOF 60 4 4 5 Copy to Card 62 4 5 System menu 63 4 5 1 Language 63 4 5 2 Format 63 4 5 3 Default 6...

Page 9: ...English ix 5 1 Drivers 69 5 1 1 Mass Storage 69 5 2 Presto Video Works 70 5 3 Presto Mr Photo 71 Appendix 72 Specifications 72 Troubleshooting 75...

Page 10: ...n and our company reserves the right to change the contents or technical rules without notice in advance Also the manufacturer reserves the right to change the technical specification without notice i...

Page 11: ...k when exposed Do not drop or knock the product Rough handling may damage the internal components Do not use harsh chemicals cleaning solvents or strong detergents to clean the product Wipe the produc...

Page 12: ...ith eyes wash eyes with clean water for at least 15 minutes and go to the hospital as soon as possible If the fluid is swallowed first rinse mouth with water then drink a large amount of water and ind...

Page 13: ...important occasion such as a wedding ceremony or an overseas trip do test the DV camera beforehand to ensure that it functions properly Any additional loss caused by the malfunction of this product s...

Page 14: ......

Page 15: ...ntel Pentium 4 2 8 GHz CPU or higher At least 512 MB of RAM or higher Standard USB 1 1 port or higher Video Card 64MB or higher Video Card Note A USB 1 1 port will enable you to transfer files to and...

Page 16: ...a The following items should be present in the package If any item is missing or appears damaged contact your dealer immediately User s Manual Video camera CD ROM Driver and application software 3xAAA...

Page 17: ...the camera Refer to the following illustrations to familiarize yourself with the buttons and controls of this video camera 1 4 1 Front view Lens LED white light USB port 1 4 2 Top view Macro button M...

Page 18: ...English 4 1 4 3 Bottom view Tripod mount 1 4 4 Right view LCD screen cover SD card compartment Power button...

Page 19: ...English 5 1 4 5 Left view Battery compartment Macro switch Zoom button USB port 1 4 6 Back view Playback button Joystick Mode button REC STOP button Zoom button Menu button...

Page 20: ...English 6 1 4 7 Adjusting the LCD display Flip and twist the LCD screen as shown while capturing a still image or recording a video clip...

Page 21: ...vie Photo and SET modes Joystick z In Photo and Movie modes 1 Press up and down to adjust the exposure setting 2 Press the center joystick button to adjust the LED light setting 3 Press right once to...

Page 22: ...ode 1 Press up and down to scroll through stored movies 2 Press and hold up and down during playback to fast forward and rewind 3 Press right once to show all OSD icons twice to turn off all OSD icons...

Page 23: ...on z Press to enter playback mode Zoom button z In Photo and Movie modes press to zoom in and out z In Photo Playback mode 1 Press the button down to zoom in your photo 2 Press the button up to show a...

Page 24: ...eo playback 1 4 8 About the LEDs The following table describes the camera LEDs LED Color Definition Green Power on Green Blinking Indicates battery low Red Formatting Delete Protect operation Power Re...

Page 25: ...cards and configuring preliminary settings See later chapters for advanced functions 2 1 Inserting an SD card An SD card can be installed in the video camera to provide additional storage space for st...

Page 26: ...English 12 3 Press down the SD card compartment cover 4 Push the SD card compartment cover inwards...

Page 27: ...mended by the manufacturer or your dealer Note Install the batteries exactly as described here Ensure that the polarity of the batteries is correct Installing the batteries incorrectly could cause dam...

Page 28: ...ing on the video camera Press and hold the power button to turn the video camera on off 2 4 Changing modes The video camera can operate in three modes Movie Photo and SET Press the mode button to togg...

Page 29: ...and time 1 Turn on the video camera and press the mode button to SET Move the joystick up down to highlight DATE TIME Press the center joystick button to confirm 2 Press the joystick up down to highl...

Page 30: ...highlight Language Press the center joystick button to confirm 2 Use the joystick to select the following languages English Arabic Dutch Portuguese Turkish Korean Russian Italian Spanish French German...

Page 31: ...REC STOP button to start recording 4 Press the REC STOP button again to stop recording 5 The video clip is automatically saved with a unique file name Notes The maximum length of each video recording...

Page 32: ...ce file 1 Turn on the video camera and switch to Voice mode 2 Press the REC STOP button to start recording 3 Press the REC STOP button again to stop recording 4 The voice file is automatically saved w...

Page 33: ...k the video clip press the REC STOP button 4 When viewing the video clip press the zoom button up or down to adjust the volume 5 To view the video clip in rewind and fast forward modes press and hold...

Page 34: ...scroll through the audio files Press the REC STOP button to playback the audio file 3 When viewing the audio press the zoom button up or down to adjust the volume 4 To skip to the previous or next fil...

Page 35: ...2 7 1 Taking a still picture 1 Turn on the camera and switch to Photo mode 2 Use the LCD screen to frame the picture 3 Press the REC STOP button to capture the image 4 The picture is automatically sa...

Page 36: ...Press the zoom button down to zoom in on the picture and press up to zoom out 4 Press the joystick up and down to move the zoomed image vertically or horizontally Press the center joystick button to c...

Page 37: ...lish 23 2 8 Connecting to a computer Connect the video camera to a computer with the USB AV cable provided 2 9 Connecting to a TV Connect the video camera to a TV as shown with the USB AV cable provid...

Page 38: ...1 Movie mode icons Use the following picture to familiarize yourself with the Movie mode icons and symbols 13 12 11 10 8 7 1 2 4 5 14 15 6 3 9 See the table below for a description of each icon and sy...

Page 39: ...attery indicator 8 Macro indicator 9 Histogram indicator 10 Effect indicator 11 White balance indicator 12 LED white light indicator 13 Movie mode indicator 14 EV compensation indicator 15 Zoom indica...

Page 40: ...26 While in Photo or Movie modes move the macro button on the side of the video camera to activate macro function and an icon displays on the LCD screen Move the macro button again to return to norma...

Page 41: ...lluminate subjects in dark environments Press the center joystick button to choose from the following lighting options Off On and Night modes An icon displays on the screen when activated 3 1 5 Quick...

Page 42: ...emory or on an SD card 3 2 1 Voice mode icons Use the following picture to familiarize yourself with the Voice mode icons and symbols 1 2 3 See the table below for a description of each icon and symbo...

Page 43: ...the Photo mode icons and symbols 17 18 1 2 3 4 6 16 15 14 13 12 11 10 5 7 9 8 See the table below for a description of each icon and symbol 1 Displays the number of photos taken remaining number of ph...

Page 44: ...e 8 Histogram indicator 9 Burst mode indicator 10 Battery indicator 11 Macro indicator 12 Date stamp indicator 13 Effect indicator 14 White balance 15 LED white light indicator 16 Photo mode indicator...

Page 45: ...3 5 Quick access controls You can also adjust the settings of the exposure by pressing the joystick up or down In Photo mode press the joystick up or down to adjust the EV compensation settings Press...

Page 46: ...o familiarize yourself with the Movie Playback mode icons and symbols 7 6 5 1 2 3 8 4 See the table below for a description of each icon and symbol 1 Displays the number of current movie total number...

Page 47: ...ack mode icons Refer to the following picture to familiarize yourself with the Photo Playback mode icons and symbols 2 6 5 4 1 3 See the table below for a description of each icon and symbol 1 Display...

Page 48: ...English 34 6 Playback mode icon...

Page 49: ...mage video clip displays on the screen Press the zoom button up to view four thumbnail images video clips on the LCD screen Press the zoom button up again to view nine thumbnail images video clips on...

Page 50: ...plays Press the joystick left and right to highlight an option and press the center joystick button to confirm 3 7 1 Using the mass storage feature When used as a USB mass storage device the video cam...

Page 51: ...fference for different lighting conditions When white balance is set to Auto the video camera automatically compensates for different lighting conditions 1 Turn the video camera on and ensure it is in...

Page 52: ...English 38 4 Press the MENU button again to exit the menu...

Page 53: ...space 1 Turn the video camera on and ensure it is in Movie mode 2 Press the MENU button and use the joystick to highlight the Quality option Press the center joystick button to display the submenu 3...

Page 54: ...d look 1 Turn the video camera on and ensure it is in Movie mode 2 Press the MENU button and use the joystick to highlight the Effect option Press the center joystick button to display the submenu 3 U...

Page 55: ...camera on and ensure it is in Movie mode 2 Press the MENU button and use the joystick to highlight the Resolution option Press the center joystick button to display the submenu 3 Use the joystick to s...

Page 56: ...video camera on and ensure it is in Movie mode 2 Press the MENU button and use the joystick to highlight the Capture Mode option Press the center joystick button to display the submenu 3 Use the joyst...

Page 57: ...Playback button and then press the MENU button to display Movie Playback menu 2 Use the joystick to highlight the DELETE option Press the center joystick button to display the submenu 3 Use the joysti...

Page 58: ...tton to confirm 4 Press the MENU button again to exit the menu Note Once deleted files cannot be recovered Make sure the files are transferred to PC via USB cable or saved to another storage device Fi...

Page 59: ...2 Use the joystick to highlight the PROTECT option Press the center joystick button to display the submenu 3 Use the joystick to select Cancel Protect One or Protect All Press the center joystick but...

Page 60: ...repeat the above steps The lock icon disappears when the file is unlocked 5 Select Protect All then press the center joystick to protect all files Repeat this step to unprotect all files 6 Press the M...

Page 61: ...de Press the Playback button and then press the MENU button to display Movie Playback menu 2 Use the joystick to highlight the Copy to card option Press the center joystick button to display the subme...

Page 62: ...g conditions 1 Turn the video camera on and ensure it is in Photo mode 2 Press the MENU button and use the joystick to highlight the White Balance option Press the center joystick button to display th...

Page 63: ...more memory space 1 Turn the video camera on and ensure it is in Photo mode 2 Press the MENU button and use the joystick to highlight the Quality option Press the center joystick button to display the...

Page 64: ...d look 1 Turn the video camera on and ensure it is in Photo mode 2 Press the MENU button and use the joystick to highlight the Effect option Press the center joystick button to display the submenu 3 U...

Page 65: ...ory space 1 Turn the video camera on and ensure it is in Photo mode 2 Press the MENU button and use the joystick to highlight the Size option Press the center joystick button to display the submenu 3...

Page 66: ...ensure it is in Photo mode 2 Press the MENU button and use the joystick to highlight the Date Stamp option Press the center joystick button to display the submenu 3 Use the joystick to select whether...

Page 67: ...gle or Burst mode 1 Turn the video camera on and ensure it is in Photo mode 2 Press the MENU button and use the joystick to highlight the Burst Mode option Press the center joystick button to display...

Page 68: ...mode 2 Press the MENU button and use the joystick to highlight the Face Detect option Press the center joystick button to display the submenu 3 Use the joystick to select OK or Cancel to enable or dis...

Page 69: ...display the Photo Playback menu 2 Use the joystick to highlight the Delete option Press the center joystick button to display the submenu 3 Use the joystick to select Cancel Delete One or Delete All P...

Page 70: ...tton to confirm 4 Press the MENU button again to exit the menu Note Once deleted files cannot be recovered Make sure the files are transferred to PC via USB cable or saved to another storage device Fi...

Page 71: ...ystick to highlight the Protect option Press the center joystick button to display the submenu 3 Use the joystick to select Cancel Protect One or Protect All Press the center joystick button to confir...

Page 72: ...eat the above steps The lock icon disappears when the file is unlocked Select Protect All then press the center joystick button to protect all files Repeat this step to unprotect all files 4 Press the...

Page 73: ...s in Photo mode Press the Playback button and then press the MENU button to display the Photo Playback menu 2 Use the joystick to highlight the Autplay option Press the center joystick button to displ...

Page 74: ...he MENU button to display the Photo Playback menu 2 Use the joystick to highlight the DPOF option Press the center joystick button to display the submenu 3 Use the joystick to select from Cancel Singl...

Page 75: ...select Print All three options are displayed You can use the joystick to highlight X to cancel print all files with the DPOF tag or clear the DPOF tags from all files Then press the center joystick b...

Page 76: ...de Press the Playback button and then press the MENU button to display Photo Playback menu 2 Use the joystick to highlight the Copy to card option Press the center joystick button to display the subme...

Page 77: ...the current storage media This format action will delete everything on the media 1 Turn on the video camera and switch to SET mode 2 Use the joystick to highlight the Format option Press the center jo...

Page 78: ...he default settings 1 Turn on the video camera and switch to SET mode 2 Use the joystick to highlight the Default option Press the center joystick button to display the submenu 3 Use the joystick to s...

Page 79: ...n to display the submenu 3 Use the joystick to select Off 1 minute or 5 minutes Press the center joystick button to confirm 4 5 5 Frequency Use the Frequency option to set the frequency system for you...

Page 80: ...em for the area 1 Turn on the video camera and switch to SET mode 2 Use the joystick to highlight the TV Standard option Press the center joystick button to display the submenu 3 Use the joystick to s...

Page 81: ...is option to enable disable operation sound 1 Turn on the video camera and switch to SET mode 2 Use the joystick to highlight the BEEP option Press the center joystick button to display the submenu 3...

Page 82: ...les saved in the video camera 1 Turn on the video camera and switch to SET mode 2 Use the joystick to highlight the Memory Status option Press the center joystick button to display the submenu 3 The n...

Page 83: ...e digital camera offers Mass Storage function via the built in card reader You can treat this digital camera as a USB device Windows Vista XP are plug and play operating systems and do not require a d...

Page 84: ...the CD ROM drive 2 If the CD ROM does not automatically boot use Windows Explorer to execute the InstallMgr exe file in the root directory The following screen is displayed 3 Click the Install button...

Page 85: ...CD ROM drive 2 If the CD ROM does not automatically boot use Windows Explorer to execute the InstallMgr exe file in the root directory The following screen is displayed 3 Click Install to begin the i...

Page 86: ...sensor Active pixels 5 0 Megapixel Storage media Built in 128 MB flash memory 109 MB for storage SD Card SDHC Compatible Up to SDHC 8GB Class 6 Sensor sensitivity ISO100 Color effects Color B W Sepia...

Page 87: ...1 HD 720p Frame rate 30 fps max Zoom Movie Digital Zoom 8X Advanced Zoom 2X Camera Digital Zoom 8X Advanced Zoom 2X Still Image Playback Digital Zoom 16X max TFT Monitor 2 4 TFT 480 x 234 pixels LED L...

Page 88: ...interface USB 2 0 high speed TV out format NTSC PAL Shutter Electronic shutter 1 8 1 2000 second Auto power off Off 1 min 5 min Power supply 3 x AAA Alkaline Ni Mh batteries Dimension 109 H x 73 5 W x...

Page 89: ...ectly See 2 2 Inserting the batteries Replace the batteries The camera suddenly turns off The auto power off function was enabled The camera is running out of battery power Turn the power on again Rep...

Page 90: ...eyond focus range Please take a picture within the available focus range and choose normal or macro mode See 3 3 2 Using the macro function Memory card cannot be used The memory card is protected The...

Page 91: ...English 77 All buttons are inactive Short circuit occurred when connecting the camera with other devices Remove the batteries from the camera and insert again...

Page 92: ......

Reviews: