background image

 English  

-37- 


CONNECTING TO A PICTBRIDGE 
COMPLIANT PRINTER 

If a printer that supports PictBridge is available, 
images can be printed by connecting the digital video 
camera directly to the PictBridge-compatible printer 
without using a computer. 
 
1. 

Connect the digital video camera to the printer 
using the USB cable. 

2. 

Turn on the printer and digital video camera. 

†


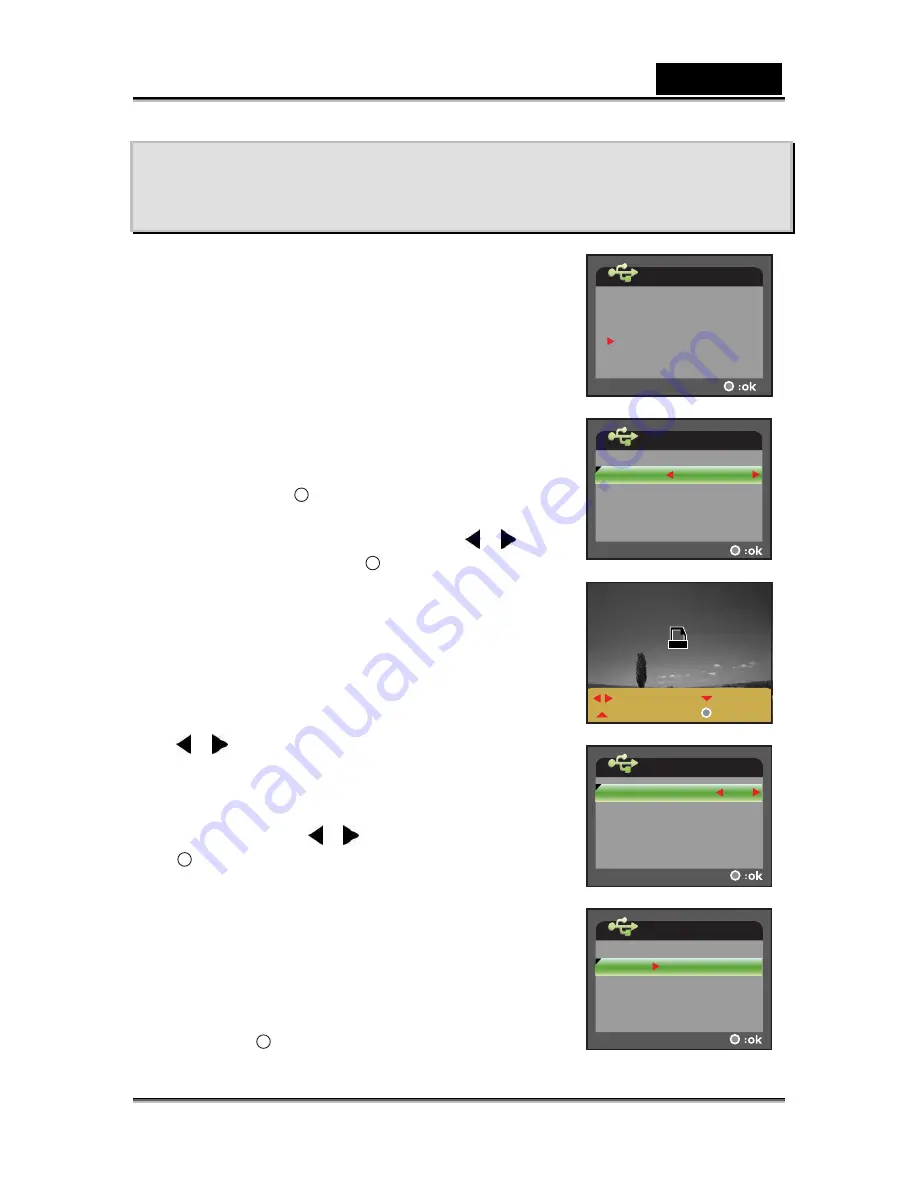
The [USB MODE] screen appears on the 
screen. 

3. Select 

[PICTBRIDGE] 

with the zoom lever, and 

then press the 

 button. 

4. 

Select [SIZE] or [BORDERLESS] with the zoom 
lever and select its print type with the 


buttons. Then press the 

 button to confirm the 

selection. 

†


[SIZE]: You may select the desired item 
according to the type of printer being used. 

†


[BORDERLESS]: You may select the 
desired item according to the type of printer 
being used. 

5. 

Select the image that you want to print with the 


  buttons, and then use the zoom lever to 

set more detailed print settings. 

6. 

Select [PRINT NUMBER], [DATE] or [FILE 
NAME] with the zoom lever and change their 
settings with the 


 buttons. Then press the 

  button to confirm the selection. 

†


[PRINT NUMBER]: Select the number of 
each image to be printed up to 10. 

†


[DATE]: Select [WITH] to print the image 
with date imprint. 

†


[FILE NAME]: Select [WITH] to print the 
image with file name. 

7. 

Use the zoom lever to select [PRINT]. Then 
press the 

  button to confirm the print settings 

and start printing. 

USB MODE

MASS STORAGE

WEBCAM

PICTBRIDGE


USB MODE 

BORDERLESS

STANDARD

STANDARD

SIZE


100-0001 

:PRINT

:SELECT
:CANCEL

:MORE

x


2


USB MODE 

DATE

WITH

9

PRINT NUMBER

FILE NAME

WITH


USB MODE 

CANCEL

PRINT

Summary of Contents for DV811

Page 1: ...d and found to comply with the limits for Class B digital devices pursuant to Part 15 of the FCC rules These limits are designed to provide reasonable protection against harmful interference in a residential installation This equipment generates uses and can radiate radio frequency energy and if not installed and used in accordance with the instructions may cause harmful interference to radio comm...

Page 2: ...uage support Occasionally a retailer will specify a unique product color appearance and internal memory capacity Contact your dealer for precise product definition and included accessories 3 The illustrations in this manual are for the purpose of explanation and may differ from the actual design of your camera 4 The manufacturer assumes no liability for any errors or discrepancies in this user man...

Page 3: ...e the internal fluid to leak If the internal fluid enters your eyes or comes into contact with your body or clothes rinse with fresh water If the internal fluid has entered your eyes consult a physician to receive treatment A camera is a precision instrument Do not drop it strike it or use excessive force when handling the camera This might cause damage to the camera Do not use the camera in humid...

Page 4: ... the battery and discharge it for at least one complete cycle before use The battery may feel warm after long period of continuous use of the camera or the flash This is normal and not a malfunction The camera may feel warm after long period of continuous use This is normal and not a malfunction If the battery is not to be used for a long period of time remove it from the camera to prevent leakage...

Page 5: ... THE SD MEMORY CARD______________________________________ 15 USING THE LCD PANEL_______________________________________________ 16 SETTING THE DATE AND TIME __________________________________________ 16 CHOOSING THE DISPLAY LANGUAGE _____________________________________ 17 FORMATTING INTERNAL MEMORY OR AN SD MEMORY CARD____________________ 17 SETTING IMAGE RESOLUTION AND QUALITY __________________...

Page 6: ..._________________________________________________________ 32 AWB __________________________________________________________ 32 ISO ___________________________________________________________ 33 DATE PRINT____________________________________________________ 33 TV MENU ________________________________________________________ 33 SIZE __________________________________________________________ 33 QUALI...

Page 7: ...SB DRIVER WINDOWS 98 ONLY ______________________ 39 STEP 2 CONNECTING THE DIGITAL VIDEO CAMERA TO YOUR COMPUTER __________ 39 STEP 3 DOWNLOADING STILL IMAGES VIDEO CLIPS AND AUDIO FILES _____________ 40 USING THE DIGITAL VIDEO CAMERA AS A WEB CAMERA _______________ 41 STEP 1 INSTALL THE WEB CAMERA DRIVER _______________________________ 41 STEP 2 CONNECT THE DIGITAL VIDEO CAMERA TO YOUR COMPUTER___...

Page 8: ... MP3 Player Voice Recording Web Camera and Mass storage device Powerful MPEG4 video format for larger image capacity and better quality Supports 12 types of photo frames in camera mode PictBridge support Package Contents Carefully unpack your kit box and ensure that you have the following items In the event that any item is missing or if you find any mismatch or damage promptly contact your dealer...

Page 9: ...9 GETTING TO KNOW YOUR DIGITAL VIDEO CAMERA Front View 1 2 4 6 5 3 7 8 1 Lens 2 Flash 3 Self timer LED 4 Focus switch Normal mode Macro mode 5 Speaker 6 Microphone 7 Battery SD memory card cover 8 Tripod socket ...

Page 10: ...utton 3 Zoom lever T Zoom in W Zoom out 4 Record button 5 Image button 6 Right button Self timer button 7 Left button Flash button 8 MENU Menu button 9 Status LED indicator 10 USB connector 11 A V IN terminal 12 A V OUT terminal 13 Earphone connector 14 Strap holder 15 LCD panel monitor ...

Page 11: ... no battery power 4 SD memory card indicator An SD memory card is loaded No SD memory card is loaded SD memory card is full 5 Macro mode 6 EV compensation 7 White balance AUTO AUTO DAYLIGHT LAMP FLUORESCENT 1 FLUORESCENT 2 SHADE 8 Video quality SUPER FINE FINE NORMAL 9 Video resolution 640 x 480 pixels 320 x 240 pixels 10 Available recording time Before recording Elapsed time While recording ...

Page 12: ...s 6 Flash mode Flash off Auto flash Auto flash with red eye reduction 7 Macro mode 8 ISO sensitivity AUTO ISO 100 ISO 200 ISO 400 9 EV compensation 10 AWB White balance 11 Image quality SUPER FINE FINE NORMAL 12 Image resolution 3264 x 2448 FW interpolation 2560 x 1920 2048 x 1536 1 2M 1280 x 960 640 x 480 13 Self timer indicator if used 3 seconds delay 10 seconds delay ...

Page 13: ...e High volume Fully volume Mute no sound Still Image Playback 1 Still image playback mode 2 Battery power indicator 3 SD memory card indicator 4 Folder and file name Audio MP3 Playback 1 Audio MP3 playback mode icon 2 File name 3 Battery power indicator 4 SD memory card indicator 5 Audio MP3 status bar 6 Sound level speaker volume 7 Playback indicator 8 Play mode indicator Play one file Play all f...

Page 14: ...in the correct orientation as shown 3 Close the battery SD memory card cover firmly Turning the power On Off Press and hold the button until the digital video camera turns on To turn the power off press and hold the button again LCD Indicator Indicator Status Description Activity LED indicator Solid green 1 The digital video camera is powering up 2 The digital video camera is ready to record image...

Page 15: ...ard If the card cannot be inserted check the orientation 3 Close the battery SD memory card firmly To remove the SD memory card make sure the camera is turned off Open the battery SD memory card cover then press lightly on the edge of the memory card and it will eject NOTE Be sure to format an SD memory card with this digital video camera before using it Refer to section in the manual titled Forma...

Page 16: ...oving the LCD panel z Do not hold the digital video camera by the LCD panel Setting the Date and Time The date time setting screen will automatically appear When first turning the digital video camera on When turning the power on after leaving the digital video camera without the batteries for an extended period of time 1 Turn on your digital video camera 2 Press the MENU button 3 Move to SYSTEM M...

Page 17: ... that are stored on the SD memory card or in internal memory Formatting is not possible if an SD memory card is locked 1 Turn on your digital video camera 2 Press the MENU button 3 Move to SYSTEM MENU by using the button 4 Select FORMAT with the zoom lever and press the button 5 Select YES with the zoom lever and press the button NOTE You should format an SD memory card before using it for the fir...

Page 18: ... resolution quality images take up less memory space and may be quite suitable for sharing images via e mail in a report or on a web page To change image resolution or image quality perform these steps below 1 Turn on your digital video camera 2 Press the MODE button continuously until the Capture or Video Mode appears 3 Press the MENU button The CAPTURE MENU or MOVIE MENU screen is displayed 4 Se...

Page 19: ...ER FINE 30 78 159 317 616 1233 FINE 59 153 312 622 1207 2417 1280 x 960 NORMAL 88 226 458 916 1776 3554 SUPER FINE 115 295 600 1197 2322 4648 FINE 214 480 975 1946 3774 7553 640 x 480 NORMAL 249 640 1300 2595 5032 10070 Possible recording time sec video clip SD memory Card capacity Size Quality Internal Memory 64MB 128MB 256MB 512MB 1GB SUPER FINE 00 43 01 53 03 53 07 47 15 08 30 20 FINE 00 57 02 ...

Page 20: ...mode is Video Mode If not press the MODE button continuously until the Video Mode appears 3 Compose the shot 4 Press the button The recording of the video clip will start Pressing the button again will pause the recording Pressing the button during pause will resume recording 5 Press the button to stop recording NOTE When recording video clips the flash and self timer cannot be used Normal Mode Th...

Page 21: ...o off once you switch to Macro mode Using the Digital Zoom Zoom photography allows you to capture telephoto and wide angle shots 1 Turn on your digital video camera 2 Compose the shot with the zoom lever The subject appears closer by sliding the zoom lever to the T side The subject appears farther away by sliding the zoom lever to the W side 3 Press the button to capture a zoomed image To record v...

Page 22: ...ance to the subject is beyond the effective range of the flash Auto Flash The flash fires automatically according to the ambient lighting conditions Select this mode for general flash photography Auto Flash with Red eye Reduction Use this mode to reduce the red eye phenomenon when you want to capture natural looking images of people and animals in low light conditions When capturing images the red...

Page 23: ...e button is pressed 10ec The picture is taken about 10 seconds after the button is pressed NOTE z Self timer cannot be set in video mode z The self timer setting is automatically cancelled after an image is captured TV Recording Mode The TV recording function allows you to record a TV program from a television 1 Connect one end of the A V IN cable to the A V IN terminal of the digital video camera...

Page 24: ...verse play To pause video playback press the button to cancel pause press the button again To stop video playback press the button This stops playback and returns to the start of the video clip NOTE If the video cannot playback in WMP 9 0 please update WMP 9 0 from the Microsoft website To adjust the sound level sliding the zoom lever to the T side will increase the volume sliding the zoom lever t...

Page 25: ...can be enlarged by each press of the button The magnification factors range from 1x to 8x within 16 stages 1 0x 1 5x 2 0x 2 5x 3 0x 3 5x 4 0x 4 5x 5 0x 5 5x 6 0x 6 5x 7 0x 7 5x 8 0x and thumbnail display During zoom playback the outer frame indicates the entire image while the inner frame indicates the location of the currently enlarged area 6 Slide the zoom lever upward or downward or press the b...

Page 26: ... executed and the digital video camera returns to the play mode The protect icon is displayed with protected images When ALL FILE is selected is displayed with all the images To cancel protection follow the step 5 8 to select UNLOCK by pressing the buttons and press the button The removal of image protection is executed and the digital video camera returns to the play mode Slide Show Display The s...

Page 27: ...t the still image video clip that you want to erase with the zoom lever You may select the still image video clip that you want to erase from the thumbnail display 5 Press the MENU button 6 Select DELETE FILE or DELETE ALL with the zoom lever and press the button DELETE FILE Delete the current still image video clip DELETE ALL Delete all still images video clips 7 Select YES with the zoom lever an...

Page 28: ...DE button to go to SELECT MODE 3 Select MP3 with the zoom lever and press the button The MP3 LIST appears on the screen Button operations MP3 State Button Playlist During playback Power off press hold Power off press hold T Scroll up Volume W Scroll down Volume Previous page Next page Add selection MODE Back to LCD preview MENU Enter MP3 menu Stop playing MP3 music Start to play MP3 music Pause pl...

Page 29: ... is over 1 hour Playing Back Audio Files 1 Turn on your digital video camera 2 Toggle the MODE button to go to SELECT MODE 3 Select AUDIO with the zoom lever and press the button The AUDIO LIST appears on the screen Button operations Audio State Button Playlist During playback Power off press hold Power off press hold T Scroll up Volume W Scroll down Volume Previous page Next page Add selection MO...

Page 30: ...n The MP3 MENU or AUDIO MENU appears on the screen 5 Select DELETE with the zoom lever and press the button SELECT Delete the selected audio or MP3 file ALL Delete all audio or MP3 files in a single operation 6 Select YES with the zoom lever and press the button To not delete select NO and press the button If all files are deleted NO FILE pops up If you want to turn back to the photography mode pr...

Page 31: ...which the video is to be recorded Super Fine Fine Normal EV Your digital video camera adjusts the exposure of each scene automatically However if the subject is very dark or very bright you may override the digital video camera s automatic exposure determination to make the subject brighter or darker This is called EV compensation The EV compensation can be adjusted from 1 8EV to 1 8EV AWB This se...

Page 32: ...elect the desired option item with the zoom lever and press the button 5 Select the desired setting with the zoom lever and press the button 6 To exit from the menu press the MENU button SIZE Sets the desired image resolution 3264 x 2448 FW interpolation 2560 x 1920 2048 x 1536 1 2M 1280 x 96 640 x 480 QUALITY Sets the quality compression rate at which the still image will be compressed and stored...

Page 33: ...ages when capturing images NO Does not imprint the date on the still images when capturing images TV Menu This menu is for the basic settings to be used when capturing TV clips in the TV recording mode 1 Turn on your digital video camera 2 Press the MENU button The TV MENU is displayed on the screen 3 Select the desired option item with the zoom lever and press the button 4 Select the desired sett...

Page 34: ...ELETE FILE Refer to Deleting Still Images Video Clips for further details DELETE ALL Refer to Deleting Still Images Video Clips for further details PROTECT Refer to Protecting Still Images Video Clips for further details MP3 Audio Menu This sets whether or not to play MP3 files repeatedly or delete MP3 files 1 Turn on your digital video camera 2 Toggle the MODE button to go to SELECT MODE 3 Select...

Page 35: ...camera s operating environment 1 Turn on your digital video camera 2 Toggle the MODE button to access in video camera or playback 3 SELECT MODE mode then press the MENU button 4 Press to access in SYSTEM MENU 5 Select the desired option item with the zoom lever and press the button 6 Select the desired setting with the zoom lever and press the button 7 To exit from the menu press the MENU button L...

Page 36: ...ws you to copy your files from the digital video camera s internal memory to a memory card Of course you can only do this if you have a memory card installed and some files in internal memory YES NO VIDEO OUT Sets video output system of the video equipment that you are going to connect to the digital video camera NTSC NTSC system PAL PAL system RESET Returns all basic settings to the digital video...

Page 37: ...e of printer being used BORDERLESS You may select the desired item according to the type of printer being used 5 Select the image that you want to print with the buttons and then use the zoom lever to set more detailed print settings 6 Select PRINT NUMBER DATE or FILE NAME with the zoom lever and change their settings with the buttons Then press the button to confirm the selection PRINT NUMBER Sel...

Page 38: ...ht hand side appear until the printing is complete 9 To cancel printing press the button while the printing is proceeding A selection screen appears Use the zoom lever to select CANCEL Then press the button to cancel printing USB MODE CANCEL USB MODE CONTINUE CANCEL ...

Page 39: ... computers Installing the USB driver on computers running Windows 2000 ME XP is not necessary 1 Insert the CD ROM that came with the digital video camera into your CD ROM drive The welcome screen appears 2 Click Install USB Web Cam driver Follow the on screen instructions to complete the installation After the USB driver has been installed restart your computer Step 2 Connecting the Digital Video ...

Page 40: ...dered to be a disk drive just like a floppy disk or CD You can download transfer images by copying them from the Removable disk to your computer hard drive Windows Open the removable disk and subsequent folders by double clicking on them Your images videos and audio are inside these folder s Select the files that you want and then choose Copy from the Edit menu Open the destination location folder...

Page 41: ...nference To use the digital video camera for videoconference your computer system must include Microphone Sound card Speakers or headphones Network or Internet connection Step 1 Install the Web Camera Driver The Web camera driver included on the CD ROM is exclusively for Windows The Web camera function is not supported for Mac platforms 1 Insert the CD ROM that came with the camera into your CD RO...

Page 42: ...the Place Call button 4 Type the e mail address or the network address of the computer that you are calling 5 Click Call The person that you are calling must also have Windows NetMeeting running and be willing to accept your call to start the videoconference NOTE The video resolution for videoconferencing applications is generally 320 x 240 For more information about the operation of videoconferen...

Page 43: ...d devices by supporting the latest formats To install VideoStudio 1 Insert the CD ROM that came with the camera into your CD ROM drive 2 The welcome screen appears 3 Click Install Ulead VideoStudio Follow the on screen instructions to complete the installation NOTE For more information about the operation of VideoStudio application software refer to its respective help documentation For Windows 20...

Page 44: ...ion format MPEG 4 SP Video IMA ADPCM Audio File format EXIF 2 1 DCF 1 0 JPEG ASF Video Lens Aperture range 3 3 Focal Length 6 95mm Focus range Normal 1m infinity Macro 0 6m 1m Shutter speed 1 2000 1 2 sec Digital zoom 8X Self timer 3 sec delay 10 sec delay Terminal DC in USB with cradle terminal Interface USB connector A V IN terminal A V OUT terminal earphone jack Power supply Rechargeable Lithiu...

Page 45: ...ed and unused so the auto power off cuts it off Turn the power back on The power cuts out during use The battery is exhausted Recharge the battery The power does not go off Digital video camera malfunction Reload the battery It is being used in extreme low temperature Many shots are being captured in dark places inside requiring flash The battery runs out quickly The battery is not fully charged T...

Page 46: ...camera Even if I press the shutter button the digital video camera does not shoot The auto power off function is activated Turn the power on again The power is not on Turn the power on Images do not appear on the LCD monitor The LCD monitor is dark Adjust the brightness of the LCD monitor in the SYSTEM MENU The digital video camera is set to mode Set the focus switch to position The flash does not...

Page 47: ...ory card cannot be replayed You played back a memory card that was not formatted by this device Load a card that was formatted and stored on by this device The file is protected Cancel protection Files cannot be deleted You played back a memory card that was not formatted by this device Load a card that was formatted and stored on by this device The memory card is write protected Remove the write ...

Page 48: ... the correct date and time The date set has disappeared The battery is removed with the power still on Set the date and time again About connecting to your computer software Symptom Cause Measure The free space on the hard disk drive of your computer may be insufficient Check whether the hard disk drive has enough space for running Windows and if the drive for loading files has a capacity at least...

Reviews: