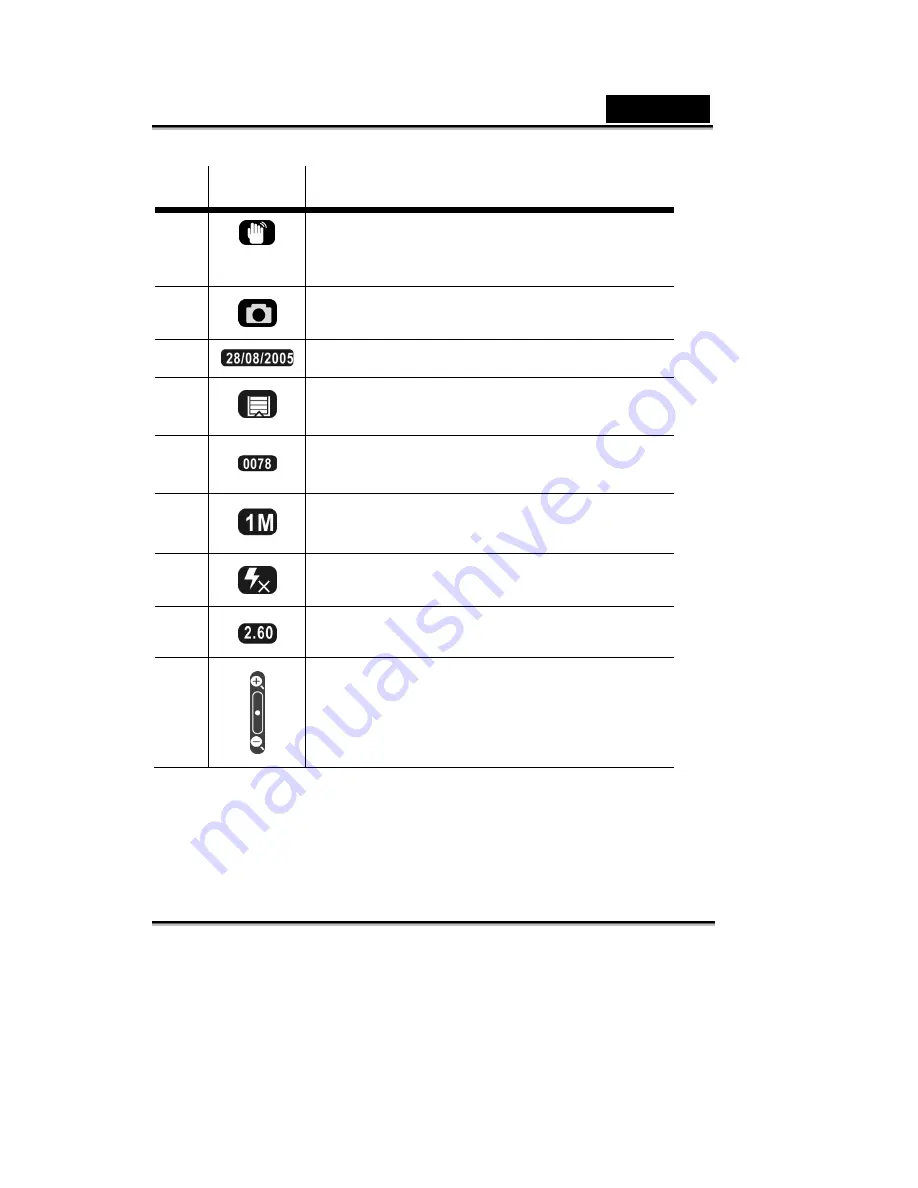
background image

 English  


-24- 


 Icon


Description


Displays the camera shaking icon. When 

this icon is displayed, you need to steady 

the camera to take a clear shot.


Indicates Photo mode. 

  Date display. 


Memory indicator, SD card or internal 

memory. 


Counter to display the number of 

avail-able shots using current settings. 


Indicates current resolution 


Flash mode indicator. 


Indicates zoom ratio. 

10 


Zoom indicator shows the current zoom 

status graphically. 

Summary of Contents for D612

Page 1: ...rmful interference to radio communications However there is no guarantee that interference will not occur in a particular installation If this equipment does cause harmful interference to radio or tel...

Page 2: ...specially with accessories such as batteries chargers AC adapters memory cards cables carrying cases pouches and language support Occasionally a retailer will specify a unique product color appearance...

Page 3: ...to fall over or result in traffic accident Cautions Insert the batteries paying careful attention to the polarity or of the terminals Inserting the batteries with its polarities inverted might cause f...

Page 4: ...ulting in fire Use the camera in a well ventilated place Do not leave the camera in places where the temperature may rise significantly such as inside a car This might adversely affect the case or the...

Page 5: ...is normal and not a malfunction The camera may feel warm when being used continuously or for an extended period of time This is normal and not a malfunction If you will not be using the batteries for...

Page 6: ...ht view 12 2 Getting started 13 2 1 Inserting the batteries 13 2 2 Inserting an SD card 14 2 3 Turning on for the first time 14 2 4 Changing modes 15 2 5 Before you start 15 2 5 1 Setting the date and...

Page 7: ...ng the macro function 28 3 6 Playback mode 28 3 6 1 Playback mode icons 28 3 6 2 Viewing pictures and videos 30 3 6 3 Displaying file information 30 3 6 4 Using thumbnail mode 31 3 6 5 Viewing a slide...

Page 8: ...guage 39 4 3 3Format storage 39 4 3 4USB connection 40 4 3 5Auto power off 41 4 3 6Light frequency 41 4 3 7Default setting 42 4 3 8System info 42 5 Installing the software and drivers 43 5 1 Drivers 4...

Page 9: ...etter z 4 x speed CD ROM drive or better z At least 10 MB of available disk space Note A USB 1 1 port will enable you to transfer files to and from your host PC but transfer speeds will be much faster...

Page 10: ...Strap 2x AAA Batteries USB CABLE Quick Guide 1 4 About the camera Refer to the following illustrations to familiarize yourself with the buttons and controls of the camera 1 4 1 Front view Self timer...

Page 11: ...ew 1 4 3 Back view Note Refer to About the LEDs on 3 2 for information on the camera s LEDs Shutter button Power button Busy LED Macro LED LCD screen Playback display button Menu button Previous butto...

Page 12: ...English 12 1 4 4 Bottom view 1 4 5 Right view Tripod mounting hole SD card slot Battery compartment Macro switch USB port...

Page 13: ...ettings See later chapters for details about advanced functions 2 1 Inserting the batteries The camera is powered by two alkaline AAA batteries Note Install the batteries exactly as described here Ens...

Page 14: ...er files Install an SD card at the bottom of the camera as shown in the illustration Make sure the gold contacts are facing up as shown To remove the SD card gently push it into the card slot and rele...

Page 15: ...NEXT buttons to select a mode and press OK to confirm your selection Camera mode 2 5 Before you start Before you use your camera there are some basic settings to configure that are described in the fo...

Page 16: ...ime Setting option Press OK to confirm 5 Use the PREV or NEXT buttons to alter values in the selected field Press the Playback Display button to move between fields such as date month year and so on T...

Page 17: ...o display the main menu screen 3 Use the PREV or NEXT buttons to select the setup menu Press OK to confirm your selection 4 Use the PREV or NEXT buttons to highlight the Language option Press OK to co...

Page 18: ...Before you start on 2 5 To shoot a video 1 Turn on the camera and change the mode to video mode 2 Use the LCD screen to frame your video 3 Press the shutter button to begin recording 4 Press the shut...

Page 19: ...English 19...

Page 20: ...ction to learn how to use the camera 3 1 Using the camera buttons All buttons are located on the top and the back of the camera Back Top Playback display button Menu button Previous and zoom button OK...

Page 21: ...menu or Video menu z Press and hold to display the Mode menu Prev Next Zoom z Use Prev to zoom in Photo or Video modes z Use Next to zoom out in Photo or Video modes z Use Prev function key to view pr...

Page 22: ...he menu system Icons showing the current configuration are also displayed on the LCD display 3 3 1 Changing the LCD display You may decide that you don t want to display icons on the LCD screen Press...

Page 23: ...r on an SD card The camera is in Photo mode when the Photo mode icon is displayed 3 4 1 Photo mode icons Use the following picture to familiarize yourself with the Photo mode icons and symbols See the...

Page 24: ...a to take a clear shot 3 Indicates Photo mode 4 Date display 5 Memory indicator SD card or internal memory 6 Counter to display the number of avail able shots using current settings 7 Indicates curren...

Page 25: ...ng the macro function The macro function enables you to capture images of subjects very close to the lens In macro mode you can focus on subjects as close as 17 cm When not in macro mode the minimum d...

Page 26: ...ject get closer to it Press the NEXT button to zoom out from the subject move away from it The zoom status is indicated by the zoom bar on the left of the screen The zoom ratio is also represented in...

Page 27: ...ure to familiarize yourself with the Video mode icons and symbols See the table below for a description of each icon and symbol Icon Description 1 Indicates battery status 2 Indicates Video mode 3 Dat...

Page 28: ...unction See Using the zoom function on 3 4 4 3 5 3 Using the macro function See Using the macro function on 3 4 3 3 6 Playback mode Use playback mode to review all the pictures and videos stored in yo...

Page 29: ...nd moved Press the shutter button to enable zooming and moving 2 Time and date of photograph or video 3 Photo resolution 4 Current photo number total number of photos and videos on internal memory or...

Page 30: ...h the image and video files stored in memory 3 Press OK to view thumbnails of the videos and images 4 To play videos Press the shutter button to play videos Press the shutter button again to fast forw...

Page 31: ...n screen 3 Use Prev Next to highlight an image 4 Press the OK button to display the highlighted image on screen full size 3 6 5 Viewing a slide show The camera includes a slide show function A slide s...

Page 32: ...set as a USB mass storage device the camera appears as a removable drive in Windows Explorer with a folder labeled DCIM You can drag and drop files to and from the new removable drives just like any...

Page 33: ...y 4 1 1 Picture quality Use the picture quality option to set the size of the captured image Bigger images contain more detail and therefore use more memory space To set the image size 1 Turn the came...

Page 34: ...u button 3 Use Prev Next to highlight the Exposure Value option 4 Use OK to move the slider up through the scale When it gets to the highest value press OK to start at the lowest value again 5 Press t...

Page 35: ...one press of the shutter It is useful to take series shots of moving objects and for artistic effect To set burst snapshot 1 Turn the camera on and ensure that it is in Photo mode 2 Press the menu bu...

Page 36: ...Fluorescent 1 or Fluorescent 2 5 Press the menu button again to leave the menu 4 1 6 Time stamp Use the time stamp function to print a date on captured images Turn the camera on and ensure that it is...

Page 37: ...ton 3 Use Prev Next to highlight the Delete option 4 Press OK to delete 5 A dialog asks you to confirm Press OK for yes or Menu for no Note Once deleted files cannot be recovered so make sure you have...

Page 38: ...tect files from being accidentally deleted To protect a file or files 1 Turn the camera on and ensure that it is in Playback mode 2 Press the menu button 3 Use Prev Next to highlight the Protect optio...

Page 39: ...mation is stored 5 Press the menu button again to leave the menu 4 3 Video menu The setup menu can be accessed from any camera mode and is used to configure the miscellaneous camera functions 4 3 1 Da...

Page 40: ...ection The camera can be set to act as a USB mass storage device or a web cam when connected to a PC using the USB cable To change the USB settings 1 Press the power button on the top to turn on the c...

Page 41: ...save power To set the power saving function 1 Turn the camera on and ensure that it is in Settings mode 2 Use Prev Next to highlight the Power Saving option 3 Press OK to select a setting 30 SEC 1 MIN...

Page 42: ...in Settings mode 2 Use Prev Next to highlight the Default Setting option 3 Press OK to restore factory defaults You are prompted to confirm the reset 4 Press OK to confirm or Menu to cancel 4 3 8 Syst...

Page 43: ...the camera if your operating system is Windows 98SE Windows XP ME 2000 are plug and play operating systems and do not require a driver to be manually loaded When the driver has been installed and the...

Page 44: ...e on screen instructions 5 Click Finish to restart the computer and finish the camera driver installation 5 2 Presto Video Works 6 Presto Video Works 6 is an advanced software application for editing...

Page 45: ...5 Read the legal disclaimer and click Yes if you agree 6 Select the version of English required if applicable Note This window will show only when English language software is installed 7 Click next t...

Page 46: ...8 Click Yes to agree to the licence agreement 9 Click Next to select the default installation directory or Browse to select one of your own 10 Click Next to select the default menu entry or add one o...

Page 47: ...lation progress 11 Click Yes to continue 12 The following message appears when Window Media Format 9 setup is complete Click OK 13 Click Finish to complete the installation Keep the check box checked...

Page 48: ...files when the application is started 5 3 Presto Mr Photo 3 Presto Mr Photo 3 is an advanced photo editing software application To install Presto Mr Photo 3 1 Insert the supplied CD ROM in the CD ROM...

Page 49: ...English 49 5 Click next to start the installation 6 Click Yes to agree to the licence agreement 7 Click Next to select the default installation directory or Browse to select one of your own...

Page 50: ...own A status bar indicates installation progress 9 Presto Mr Photo 3 can be set to launch automatically when certain devices are connected like the camera with mass storage mode activated Use the set...

Page 51: ...English 51 10 Click Finish to complete the installation More information about Presto Mr Photo 3 can be found in the help files when the application is started...

Page 52: ...m Focus range 1 2m infinity 17 19 cm macro Still image Formats JPEG DCF EXIF Resolution 1280 x 960 1600 x 1200 2048 x 1536 4032 x 3024 firmware interpolation Movie clips AVI Motion JPEG sound availabl...

Page 53: ...EV in 0 5 EV steps Self timer Off 10 seconds 15 seconds 20 seconds PC interface USB 1 1 for PC camera and mass storage Shutter Electronic shutter 1 6 1 2000 seconds Auto power off 30s 1min 3min or 5mi...

Reviews: