background image

October 2015

Second Edition - First Printing

Part No. 57.0009.0662                                        GTH-1256                                                                    25 

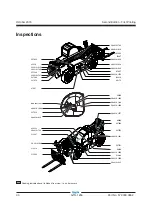
Inspections

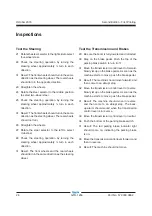
Function Tests

1  Select a test area that is firm, level and free of 

obstruction. Be sure there is no load on the forks 
or attachment.

2  Enter the cab and sit on the seat.

3  Adjust the seat and steering column, if needed.

4  Fasten and secure the seat belt around your waist.

5  Adjust the cab mounted mirror, the rear fish-

eye mirror and the exterior right hand mirror, if 
required.

6  Be sure the parking brake is on and the 

transmission control is in neutral.

7  Start the engine. See Starting the Engine in the 

Operating Instructions section.

8  Rear object detection system (if equipped), when 

power is turned on, the display of the video camera 
on machine back (CCTV) runs a self-test.

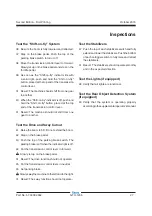
Test the Ignition System

9  Set the transmision control lever in neutral 

position.

10  Step on the brake pedal. Push the top of the 

parking brake switch to turn it off

11  Insert the key in the ignition switch.

12  Turn the key to start the engine.


Result: The engine should not start.

13  Set the transmision control lever in gear.

14  Push the bottom of the parking brake switch to 

turn it on.

15  Insert the key in the ignition switch.

16  Turn the key to start the engine.


Result: The engine should not start.

Test the Control Handle

17  Start the machine with the parking brake on 

and the transmission control lever set to neutral 
position.

18  Using the control handle, momentarily raise the 

boom, extend the boom, retract the boom and 
lower the boom.


Result: All functions should operate smoothly.

19  Using the control handle and the grey thumb 

switch, momentarily tilt the forks up and tilt the 
forks down.


Result: All functions should operate smoothly.

20  Using the control handle and the grey finger 

switch, momentarily sway the machine to the 
right and to the left.


Result: The frame level function should operate 
smoothly.

Summary of Contents for GTH-1256

Page 1: ...Original Instructions Second Edition First Printing October 2015 Part No 57 0009 0662 Serial number range GTH 1256 Perkins Tier 4i GTH 1256 Deutz Tier 4i From GTH1216M 181 to GTH12M 280 From GTH1216M...

Page 2: ...Lifting Instructions 42 Maintenance 45 Attachments 49 Specifications 60 Load Charts 61 Copyright 2015 by Terex Corporation Second Edition First Printing October 2015 Genie is a registered trademark o...

Page 3: ...ck with a pivoting boom which maybeequippedwithvariousattachmentsforpicking transporting and placing loads with the established load range charts Use of this product in any other way is prohibited and...

Page 4: ...pplications and safety Standards and regulatory compliance information QuestionsregardingProductModifications Current owner updates such as changes in machine ownership or changes in your contact info...

Page 5: ...and the safety rules before going on to the next section 2 Always perform a pre operation inspection 3 Always perform function tests prior to use 4 Inspect the workplace 5 Only use the machine as it w...

Page 6: ...age Introduction Standards Many aspects of rough terrain forklift operation and testing are discussed in standards published by the American National Standards Institute and the IndustrialTruckStandar...

Page 7: ...charts and manual Tip over hazard Always wear seat belt Keep load low Crush hazard Crush hazard Work platform use Crush hazard Keep away from moving parts Burn hazard Do not loosen cap until cool Kee...

Page 8: ...will result WARNING 97667 B 215268 A 214418 A 28175 H 97667 B 214418 A 82558 B 237598 A 237970 A 237605 A 237605 A WARNING Burn Hazard Release of hot fluid under pressure can result in death or serio...

Page 9: ...manuals o DANGER 09 4618 1635 2 N 2 09 4618 1635 28236 D DANGER237971 A Explosion Burn Hazard Fuel and fumes can explode and burn resulting in death or serious injury No smoking Keep all open flames a...

Page 10: ...vel the machine using the frame sway control unless the boom angle indicator is at zero degrees or less Do not use the sway control to position an elevated load Do not raise a load and then drive to p...

Page 11: ...rs of the machine Type of ground geomorphological features Allowable superficial pressure kg cm2 N mm2 loose non compact soil generally speaking not solid special precautions needed loamy peaty pasty...

Page 12: ...erator skill load position tire inflation machine speed etc Additionally tip over of a machine is dependent in large part upon operator inputs such as the speed and smoothness of the operation as well...

Page 13: ...dows Do not operate the machine with a faulty back up alarm The back up alarm should sound when the machine is in reverse Do not operate the machine in low light conditions Operators must comply with...

Page 14: ...intenance personnel should access compartments Access by the operator is only advised when performing a pre operation inspection All compartments must remain closed and secured during operation Damage...

Page 15: ...ral andlowerthecarriageortheattachmenttotheground before leaving the machine Keep clear of elevated components Supportcomponentsbeforeperformingservice Keep clear of moving parts during machine operat...

Page 16: ...see below For power lines over 1000kV the minimum clearance distance must be established by the utility owner or operator or by a registered professional engineer who is a qualified person with respec...

Page 17: ...gas Electrocution Hazard Avoid contact with electrical terminal During maintenance or repair works and while welding disconnect the battery turning the cut out switch see Inspection for Decals section...

Page 18: ...9 Engine on opposite side of machine 10 Forks 11 Seat belt 12 Seat 13 Brake pedal 14 Accelerator pedal 15 Transmission control lever 16 Load charts 17 Front rear level indicator 18 Right rear view mi...

Page 19: ...erator pedal 13 Brake pedal 14 Windshield wiper switch if equipped 15 Windshield washer switch if equipped 16 Work lights switch if equipped 17 Hazard warning lights switch if equipped 18 Transmission...

Page 20: ...the boom will lower Push the control handle to the right and the boom will extend Pull the control handle to the left and the boom will retract Hold down the grey thumb switch and pull the control han...

Page 21: ...heater fan on first position for low speed and second position for high speed Release the switch to turn the cab heater fan off 22 DPF switch DEUTZ engine configuration Push the switch to enable the...

Page 22: ...t 7 Diesel particulate filter indicator light Deutz configuration 8 Not active 9 Not active 10 Engine air filter restricted indicator light 11 DPF Alert indicator light 12 Engine Critical Fault indica...

Page 23: ...n the supplemental operator s manual 10 Engine air filter restricted indicator light When this lamp comes on the engine air filter is clogged proceed with cleaning or changing the air filter cartridge...

Page 24: ...ction is designed to discover if anything is apparentlywrongwithamachinebeforetheoperator performs the function tests Thepre operationinspectionalsoservestodetermine ifroutinemaintenanceproceduresarer...

Page 25: ...mage improperlyinstalledormissingpartsandunauthorized modifications Electrical components wiring and electrical cables Hydraulic hoses fittings cylinders and manifolds Fuel and hydraulic tanks Drive m...

Page 26: ...5 Only use the machine as it was intended Function Test Fundamentals The function tests are designed to discover any malfunctions before the machine is put into service Theoperatormustfollowthestep b...

Page 27: ...0 Step on the brake pedal Push the top of the parking brake switch to turn it off 11 Insert the key in the ignition switch 12 Turn the key to start the engine Result The engine should not start 13 Set...

Page 28: ...ection Result The front wheels and the rear wheels should turn in the same direction as the steering wheel Test the Transmission and Brakes 29 Be sure the boom is fully lowered and retracted 30 Step o...

Page 29: ...the Drive and Sway Cutout 41 Raise the boom to 55 Do not extend the boom 42 Step on the brake pedal 43 Push the top of the parking brake switch The parking brake is off when the indicator light is of...

Page 30: ...n helps the operator determineiftheworkplaceissuitableforsafemachine operation Itshouldbeperformedbytheoperatorprior to moving the machine to the workplace Itistheoperator sresponsibilitytoreadandreme...

Page 31: ...21 Cosmetic Genie 1 09 4618 1622 Danger Warning 7 Decal Combination 1 09 4618 1625 Cosmetic Genie 1 09 4618 1767 Cosmetic GTH 1256 2 09 4618 1765 Cosmetic GTH 1256 1 09 4618 1768 Cosmetic GTH 1256 1 0...

Page 32: ...618 1638 214418 28175 09 4618 1765 82558 237605 09 4618 1768 237598 237598 237970 97667 97667 09 4618 1646 09 4618 1672 load chart set 09 4618 1619 237606 09 4618 1399 09 4618 1418 09 4618 1622 28236...

Page 33: ...nuals A variable reach rough terrain forklift truck is defined as a wheeled type truck designated primarily as a fork truck with a pivoted boom which may be equipped with attachments for lifting mater...

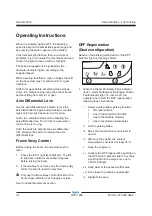
Page 34: ...ith the machine before switching the steering mode Do not realign the wheels while driving Parking Brake Use the parking brake switch to apply the parking brake before raising the boom or leaving the...

Page 35: ...ire 3 Squeeze the handle 4 Sweep nozzle side to side Operating Instructions Transmission Control Use the transmission control lever to control the direction of machine travel Step on the service brake...

Page 36: ...gear won t be shifted If the indicator light flashes there are errors or problems Try to modulate the machine speed and check if the light comes on with a solid light The speed engagement is signalled...

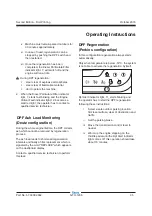
Page 37: ...gine lifetime the DPF collects ash which cannot be removed by regeneration process The ash load leads to shortened regeneration intervals and finally a filter replacement which is signaled by the word...

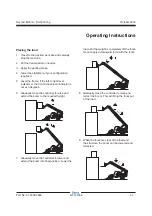
Page 38: ...If you have not lowered the stabilizers lower the stabilizers and use the load chart for stabilizers down If the stabilizers are down 2 Move the machine closer to the loading or pick point so that th...

Page 39: ...ont to back level indicator is not at 0 degrees 6 Gradually move the controller to raise and extend the boom to the required height 7 Gradually move the controller to lower and extend the boom into fi...

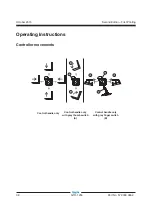
Page 40: ...GTH 1256 Part No 57 0009 0662 Second Edition First Printing Operating Instructions Controller movements Control handle only Control handle only with grey thumb switch A Control handle only with grey...

Page 41: ...lock of the new attachment 8 Retract and raise the attachment a small distance It will centre automatically on the quick coupling frame 9 Refit mechanical locking pin fixing it with its safety split p...

Page 42: ...mp start the machine directly to the starter or the starter solenoid Serious injury or death could result from the machine moving forward or backward To avoid personal injury when jump starting with a...

Page 43: ...chine will tip over during dynamic machine operation involves many variables that need to be considered Among these are pavement ground conditions stability and slope as well as machine equipment oper...

Page 44: ...in preparing loading and securing construction and lifting equipment for international shipment Only qualified operators should move the machine on or off the truck The transport vehicle must be park...

Page 45: ...oading level the telehandler and retract the boom Retract the stabilizers Use a spotter to load and unload the telehandler Keep the boom as low as possible when loading and unloading Set the parking b...

Page 46: ...ty loading surfaces and straps or lines are sufficient to withstand the machine weight See the serial label for the machine weight Lifting Instructions Fully lower and retract the boom Retract the sta...

Page 47: ...of a maintenance procedure it conveys the meaning below Indicates that tools will be required to perform this procedure Indicates that new parts will be required to perform this procedure Indicates t...

Page 48: ...Maintenance Check the Hydraulic Oil Level Maintaining the hydraulic oil at the proper level is essential to machine operation Improper hydraulic oil levels can damage hydraulic components Daily check...

Page 49: ...ing cap and adding fluids Check the Tire Pressure Tip over hazard An over inflated tire can explode which may compromise machine stability and cause the machine to tip over Tip over hazard The use of...

Page 50: ...formance and operational safety Improper fluid levels or damaged cables and connections can result in component damage and hazardous conditions Electrocution hazard Contact with hot or live circuits m...

Page 51: ...ed regarding the specific hazards associated with using the telehandler with the work platform and utilize all means including those provided by the user or employer to avoid them Always perform a pre...

Page 52: ...t the platform Do not climb down from the platform when raised Do not place or attach overhanging loads to any part of this machine or platform Do not place ladders or scaffolds in the platform or aga...

Page 53: ...0 ft 6 10m 25 ft 7 62m 30 ft 9 14m 0 ft 5 ft 10 ft 15 ft 20 ft 25 ft 30 ft 35 ft 40 ft 45 ft 5 ft 10 67m 12 19m 13 72m 0 m 1 52 m 3 05m 4 57m 6 10m 7 62m 9 14m 1 52 m 0 ft 0 m 5 ft 1 52 m 10 ft 3 05m...

Page 54: ...ected by the occupants Always lift and lower personnel smoothly and with caution and only at their request Operating Instructions Preparation and Setup Read understand and obey all jobsite local state...

Page 55: ...s Close and secure the entry point gate or railing before signaling to be lifted Attach PFPE to the designated lanyard anchor Occupants should use the guardrail to help stabilize themselves during mov...

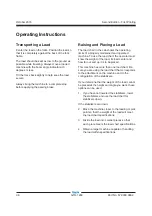
Page 56: ...y As a suspended load moves the load center can change As a result extreme caution in transporting and lifting or placing the load must be observed to minimize the potential for the load to move Overt...

Page 57: ...s as the load center will move towards the tipping line thereby reducing stability Only climb or descend inclines with extreme care as the load center will move towards the tipping line thereby reduci...

Page 58: ...and gradually raise the boom and load making sure to keep the load and boom as low to the ground as practical Be sure that all boom and attachment movements are performed as slow as practical to avoi...

Page 59: ...rigging and tethers can be removed Signal Person from 1926 1419 Per OSHA CFR 1926 1419 a signal person is required when The point of operation meaning the load travel or the area near or at load place...

Page 60: ...sed RAISE THE BOOM AND LOWER THE LOAD With arm extended horizontally to the side and thumb pointing up fingers open and close while load movement is desired DOG EVERYTHING Hands held together at waist...

Page 61: ...in the initial connection of a load to a component or structure and are within the fall zone all of the following criteria must be met The materials being hoisted must be rigged to prevent unintention...

Page 62: ...kg 3 200 kg Lift capacity maximum reach with 24 in 61 cm load center stabilizers up stabilizers down 500 lbs 3 500 lbs 227 kg 1 588 kg Max Lift Capacity stabilizers up stabilizers down 12 000 lbs 12 0...

Page 63: ...rst Printing Part No 57 0009 0662 GTH 1256 61 Load Charts GTH 1256 Standard Carriage stabilizers up GTH 1256 Rotating Carriage stabilizers up GTH 1256 Standard Carriage stabilizers down GTH 1256 Rotat...

Page 64: ...10 A E 60 40 30 5 ft 1 52 m 10 ft 3 05 m 15 ft 4 57 m 20 ft 6 10 m 25 ft 7 62 m 30 ft 9 14 m 0 ft 0 m 0 ft 0 m 5 ft 1 52 m 10 ft 3 05 m 20 ft 6 10 m 25 ft 7 62 m 30 ft 9 14 m 15 ft 4 57 m 35 ft 10 67...

Page 65: ...October 2015 Second Edition First Printing Part No 57 0009 0662 GTH 1256 63 Load Charts GTH 1256 Shackle stabilizers up GTH 1256 Shackle stabilizers down...

Page 66: ...t u b i r t s i D www genielift com California Proposition 65 Warning The exhaust from this product contains chemicals known to the State of California to cause cancer birth defects or other reproduct...

Reviews: