background image

Section 4 • Repair Procedures

November 2014

4 - 66

GS-2669 RT • GS-3369 RT • GS-4069 RT

Part No. 229753

MANIFOLDS

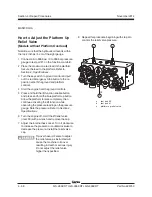
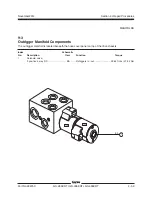
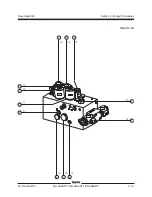
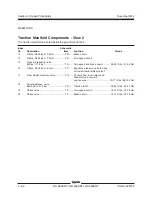
How to Test a Coil Diode

Genie incorporates spike suppressing diodes in
many valve coils. Properly functioning coil diodes
protect the electrical circuit by suppressing voltage
spikes. Voltage spikes naturally occur within a
function circuit following the interruption of electrical
current to a coil. Faulty diodes can fail to protect
the electrical system, resulting in a tripped circuit
breaker or component damage.

Electrocution/burn hazard. Contact
with electrically charged circuits
could result in death or serious
injury. Remove all rings, watches
and other jewelry.

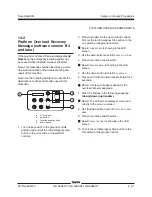
1 Test the coil for resistance. See 9-6, 

How to

Test a Coil.

2 Connect a 10

Ω

 resistor to the negative terminal

of a known good 9V DC battery. Connect the
other end of the resistor to a terminal on the
coil.

Note: The battery should read 9V DC or more
when measured across the terminals.

Resistor, 10

Ω

Ω

Ω

Ω

Ω

Genie part number

27287

3 Set a multimeter to read DC current.

Note: The multimeter, when set to read DC
current, should be capable of reading up to 800
mA.

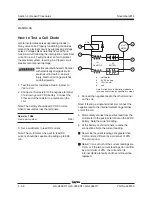
a

multimeter

b

9V DC battery

c

10

Ω

 resistor

d

coil

Note: Dotted lines in illustration indicate a
reversed connection as specified in step 6

4 Connect the negative lead to the other terminal

on the coil.

Note: If testing a single-terminal coil, connect the
negative lead to the internal metallic ring at either
end of the coil.

5 Momentarily connect the positive lead from the

multimeter to the positive terminal on the 9V DC
battery. Note the current reading.

6 At the battery or coil terminals, reverse the

connections. Note the current reading.

Result: Both current readings are greater than

0 mA and are different by a minimum of 20%.
The coil is good.

Result: If one or both of the current readings are

0 mA, or if the two current readings do not differ
by a minimum of 20%, the coil and/or its
internal diode are faulty and the coil should be
replaced.

d

b

b

a

c

c

-

-

+

+

COIL

MULTI

METER

1W

RESISTOR

9V

BATTERY

Summary of Contents for GS-2669 RT

Page 1: ...Parts Manual Serial Number Range Service Manual Part No 229753 Rev D2 November 2014 Serial Number Range GS 2669 RT from GS6911 101 GS 3369 RT GS 4069 RT ...

Page 2: ...ealer service center Compliance MachineClassification Group B Type 3 as defined by ISO 16368 Machine Design Life Unrestricted with proper operation inspection and scheduledmaintenance Technical Publications Genie has endeavored to deliver the highest degree of accuracy possible However continuous improvement of our products is a Genie policy Therefore product specifications are subject to change w...

Page 3: ...r 7 3 9 4 11 5 6 Schem All schematics C1 5 2012 2 Spec Tires Wheels Gradeability Hose Fitting Torque 3 Maint A 7 A 11 B 16 D 6 4 Repair 4 50 6 Schem 6 2 6 4 6 8 6 11 6 19 6 27 6 35 6 43 6 51 6 59 6 67 6 74 6 75 D 1 2014 4 Repair 9 2 6 Schem All schematics and Legends D1 5 2014 2 Spec Machine Spec D2 11 2014 4 Repair 14 2 REFERENCEEXAMPLES KubotaEngine_Section2_Specifications A 6 B 3 C 7_Section3_M...

Page 4: ...e Schematic Page Description REFERENCEEXAMPLES KubotaEngine_Section2_Specifications A 6 B 3 C 7_Section3_MaintenanceProcedure 3 2 6 4 9 1_Section4_RepairProcedure Fault Codes_Section 5 6 35 6 56 6 104_Section 6_Schematic Page ElectronicVersion Click on any procedure or page number highlighted in blue to view the update ...

Page 5: ...mum allowable inclination of the chassis Country of manufacture USA This machine complies with Serial number Rated work load including occupants Electrical schematic number Gradeability Maximum allowable side force Maximum number of platform occupants Machine unladen weight ANSI A92 6 CAN B354 2 GS 3369 GS6911A 12345 04 12 11 ES0141 2 714 lb 1 231 kg 500 lb 227 kg N A N A 100 lb 445 N 2 2011 Terex...

Page 6: ... injury Indicates a potentially hazardous situation which if not avoided may result in property damage Be sure to wear protective eye wear and other protective clothing if the situation warrants it Be aware of potential crushing hazards such as moving parts free swinging or unsecured components when lifting or placing loads Always wear approved steel toed shoes Danger Failure to obey the instructi...

Page 7: ... machine components and causedamage Be sure any forklift overhead crane or other lifting or supporting device is fully capable of supporting and stabilizing the weight to be lifted Use only chains or straps that are in good condition and of ample capacity Be sure that fasteners intended for one time use i e cotter pins and self locking nuts are not reused These components may fail if they are used...

Page 8: ...1 PerformanceSpecifications 2 2 Hydraulic Specifications 2 3 HydraulicComponentsSpecifications 2 4 ManifoldComponentSpecifications 2 5 Kubota D1105 Engine Tier 4 2 6 KubotaWG972Engine 2 7 Perkins403D 11Engine 2 9 Hydraulic Hose and Fitting Torque Specifications 2 10 TorqueProcedure 2 11 SAE and Metric Fasteners Torque Charts 2 12 Section 3 ScheduledMaintenanceProcedures Introduction 3 1 Pre delive...

Page 9: ...0 Perform Engine Maintenance Kubota Models 3 12 A 11 Replace the Drive Hub Oil 3 13 A 12 Perform Engine Maintenance Kubota Models 3 13 A 13 Drain the Fuel Filter Water Separator Kubota Diesel Models 3 14 A 14 Perform Engine Maintenance Kubota Diesel Models 3 15 ChecklistBProcedures B 1 Inspect the Battery 3 16 B 2 Inspect the Electrical Wiring 3 17 B 3 Inspect the Tires Wheels and Lug Bolt Torque ...

Page 10: ...e Hydraulic Tank Breather Cap Models with Optional Hydraulic Oil 3 32 C 5 Perform Engine Maintenance Diesel Models 3 33 C 6 Perform Engine Maintenance Kubota Diesel Models 3 33 ChecklistDProcedures D 1 Check the Scissor Arm Wear Pads and Slider Blocks 3 34 D 2 Replace the Hydraulic Tank Return Filter 3 34 D 3 Perform Engine Maintenance Kubota Models 3 35 D 4 Perform Engine Maintenance Perkins Mode...

Page 11: ... Assembly GS 3369 RT 4 11 3 3 Scissor Assembly GS 4069 RT 4 15 3 4 WearPads 4 19 3 5 LiftCylinder s 4 21 KubotaD1105Engine 4 1 Timing Adjustment 4 23 4 2 Glow Plugs 4 23 4 3 EngineRPM 4 24 4 4 Flex Plate 4 24 4 5 Coolant Temperature and Oil Pressure Switches 4 25 KubotaWG972Engine 5 1 Timing Adjustment 4 27 5 2 CarburetorAdjustment 4 27 5 3 ChokeAdjustment 4 27 5 4 Flex Plate 4 27 5 5 Coolant Temp...

Page 12: ...iliaryPlatformLowering 4 33 7 2 FunctionSpeedTuning 4 33 7 3 SoftwareConfiguration 4 38 7 4 Level Sensor Models without Outriggers 4 40 7 5 Level Sensor Models with Outriggers 4 43 Hydraulic Pump 8 1 HydraulicPump 4 48 Manifolds 9 1 FunctionManifoldComponents 4 50 9 2 Valve Adjustments Function Manifold 4 52 9 3 OutriggerManifoldComponents 4 59 9 4 TractionManifoldComponents 4 60 9 5 GeneratorMani...

Page 13: ... Yoke and Drive Motor 4 70 11 2 SteerCylinder 4 71 11 3 Tie Rod 4 72 11 4 Oscillate Cylinder 4 72 11 5 Oscillate Hoses 4 73 Non steerAxleComponents 12 1 Drive Motor Brake Assembly 4 75 12 2 DriveHub 4 76 OutriggerComponents 13 1 OutriggerCylinder 4 77 PlatformOverloadComponents 14 1 Platform Overload System 4 78 14 2 Platform Overload Recovery Message 4 81 Section 5 FaultCodes Introduction 5 1 Fau...

Page 14: ...and GS 3369 RT Gas LPG Models ANSI CSA 6 17 Electrical Schematic GS 2669 RT and GS 3369 RT Diesel Models ANSI CSA 6 20 Ground Control Box Layout GS 2669 RT and GS 3369 RT Diesel Models ANSI CSA 6 24 Platform Control Box Layout GS 2669 RT and GS 3369 RT Diesel Models ANSI CSA 6 25 Electrical Schematic GS 2669 RT and GS 3369 RT Gas LPG Models AS 6 28 Ground Control Box Layout GS 2669 RT and GS 3369 ...

Page 15: ...esel Models CE 6 56 Platform Control Box Layout GS 2669 RT and GS 3369 RT Diesel Models CE 6 57 Electrical Schematic GS 4069 RT Gas LPG Models ANSI CSA 6 60 Ground Control Box Layout GS 4069 RT Gas LPG Models ANSI CSA 6 64 Platform Control Box Layout GS 4069 RT Gas LPG Models ANSI CSA 6 65 Electrical Schematic GS 4069 RT Diesel Models ANSI CSA 6 68 Ground Control Box Layout GS 4069 RT Diesel Model...

Page 16: ...6 89 Electrical Schematic GS 4069 RT Gas LPG Models CE 6 92 Ground Control Box Layout GS 4069 RT Gas LPG Models CE 6 96 Platform Control Box Layout GS 4069 RT Gas LPG Models CE 6 97 Electrical Schematic GS 4069 RT Diesel Models CE 6 100 Ground Control Box Layout GS 4069 RT Diesel Models CE 6 104 Platform Control Box Layout GS 4069 RT Diesel Models CE 6 105 Hydraulic Schematic GS 2669 RT and GS 336...

Page 17: ...0 7 liters gear oil API service classification GL5 Fuel tank 10 gallons 38 liters Tire and wheels Wheel lugs steer end 6 1 2 20 Lug bolt torque dry 90 ft lbs Front 122 Nm Lug bolt torque lubricated 68 ft lbs Front 92 Nm Wheel lugs non steer end 9 5 8 18 Lug nut torque dry 170 ft lbs Rear 230 Nm Lug nut torque lubricated 130 ft lbs Rear 176 Nm Castle nut steer end Castle nut torque dry 300 ft lbs 4...

Page 18: ...ange on paved surface less than 2 ft less than 0 6 m Gradeability See Operator s Manual Function speed maximum from platform controls with maximum rated load in platform GS 2669 RT Platform up 29 to 39 seconds Platform down 26 to 36 seconds GS 3369 RT Platform up 34 to 44 seconds Platform down 24 to 34 seconds GS 4069 RT Platform up 56 to 66 seconds Platform down 26 to 36 seconds Outrigger levelin...

Page 19: ...eration suppression properties Optionalfluids Biodegradable Petro Canada Environ MV 46 Statoil Hydra Way Bio Pa 32 BP Biohyd SE S Fire resistant UCON Hydrolube HP 5046 Quintolubric 822 Mineral based Shell Tellus S2 V 32 Shell Tellus S2 V 46 Chevron Aviation A Arnica 32 Continued use of Chevron Aviation A hydraulic fluid when ambient temperatures are consistently above 32 F 0 C may result in compon...

Page 20: ...0 psi GS 3369 RT 200 bar Lift relief valve pressure 2850 psi GS 4069 RT 197 bar Oscillate relief valve pressure 3300 psi 228 bar Steer flow regulator 2 gpm 7 6 L min Lift Outrigger flow regulator 6 gpm 23 L min Oscillate flow regulator 1 gpm 4 L min SPECIFICATIONS Tractionmanifold Traction relief valve pressure 2500 psi 172 bar Generator manifold Relief valve pressure 2700 psi 186 bar Flow rate 7 ...

Page 21: ...RT 2 5 Manifold Component Specifications Plugtorque SAE No 4 13 ft lbs 18 Nm SAE No 6 18 ft lbs 24 Nm SAE No 8 50 ft lbs 68 Nm SAE No 10 55 ft lbs 75 Nm SPECIFICATIONS Continuous improvement of our products is a Genie policy Product specifications are subject to change without notice ...

Page 22: ...si 1 93 to 4 41 bar Oil capacity including filter 5 4 quarts 5 1 liters Oil viscosity requirements Units ship with 15W 40 Extreme operating temperatures may require the use of alternative engine oils For oil requirements refer to the Engine Operator Handbook on your machine Injection system Injection pump make Bosch MD Injection timing 18 BTDC Injection pump pressure 1991 psi 137 bar Fuel requirem...

Page 23: ... coolant capacity 2 4 quarts 2 3 liters Lubrication system Oil pressure 28 to 64 psi operating temperature 3850 rpm 1 9 to 4 4 bar Oil capacity including filter 3 6 quarts 3 4 liters SPECIFICATIONS Oil viscosity requirements Units ship with 15W 40 Extreme operating temperatures may require the use of alternative engine oils For oil requirements refer to the Engine Operator Handbook on your machine...

Page 24: ... 5 kΩ 75 F 24 C 1 Spark plug wire resistance 2 81 to 4 79kΩ 2 Spark plug wire resistance 3 4 to 5 8kΩ 3 Spark plug wire resistance 3 57 to 6 09kΩ Spark plug type NGK BKR4E 11 Spark plug gap 0 024 to 0 028 inches 0 6 to 0 7 mm Alternator Output 30A 14V DC Fan belt deflection 0 28 to 0 35 inch 7 0 to 9 0 mm SPECIFICATIONS Continuous improvement of our products is a Genie policy Product specification...

Page 25: ...uarts 1 9 liters Engine coolant should be clean soft water with 50 anti freeze concentration ethylene glycol to BS 6580 1992 or ASTMD 3306 89 or AS 2108 1977 Lubrication system Oil pressure 40 to 60 psi hot 2000 rpm 3 to 4 bar Oil capacity including filter 4 6 quarts 4 4 liters Oil viscosity requirements Units ship with 15W 40 Extreme operating temperatures may require the use of alternative engin...

Page 26: ...6 18 1 1 4 8 3 4 16 1 10 7 8 14 1 12 1 1 16 12 1 16 1 5 16 12 1 20 1 5 8 12 1 24 1 7 8 12 1 SAE O ring Boss Port tube fitting installed into Aluminum all types SAE Dash size Torque 4 14 ft lbs 19 Nm 6 23 ft lbs 31 2 Nm 8 36 ft lbs 54 2 Nm 10 62 ft lbs 84 Nm 12 84 ft lbs 114 Nm 16 125 ft lbs 169 5 Nm 20 151 ft lbs 204 7 Nm 24 184 ft lbs 249 5 Nm SAE O ring Boss Port tube fitting installed into Stee...

Page 27: ...fittings 1 Align the tube flare hex nut against the nose of the fitting body body hex fitting and tighten the hex nut to the body hex fitting to hand tight approximately 30 in lbs 3 4 Nm 2 Make a reference mark on one of the flats of the hex nut and continue it on to the body hex fitting with a permanent ink marker Refer to Figure 1 Figure 1 a hex nut b reference mark c body hex fitting 3 Working ...

Page 28: ...Section 2 Specifications November2014 2 12 GS 2669 RT GS 3369 RT GS 4069 RT PartNo 229753 SPECIFICATIONS 10 9 12 9 8 8 4 6 ...

Page 29: ...el surface Platform in the stowed position Key switch in the off position with the key removed The red Emergency Stop button in the off position at both ground and platform controls Wheelschocked All external AC power supply disconnected from the machine About This Section This section contains detailed procedures for each scheduled maintenance inspection Each procedure includes a description safe...

Page 30: ...reparation report to use for each inspection Store completed forms as required Maintenance Schedule There are five types of maintenance inspections that must be performed according to a schedule daily quarterly semiannually annually and two year The Scheduled Maintenance Procedures Section and the Maintenance Inspection Report have been divided into five subsections A B C D and E Use the following...

Page 31: ... a check in the appropriate box after each part is completed Follow the instructions in the operator s manual If any inspection receives an N remove the machine from service repair and reinspect it After repair place a check in the R box Legend Y yes completed N no unable to complete R repaired Comments Fundamentals It is the responsibility of the dealer to perform the Pre delivery Preparation The...

Page 32: ...Section 3 Scheduled Maintenance Procedures November2014 3 4 GS 2669 RT GS 3369 RT GS 4069 RT PartNo 229753 This page intentionally left blank ...

Page 33: ...ach inspection Select the appropriate checklist s for the type of inspection to be performed Daily or 8 hours Inspection A Quarterly or 250 hours Inspection A B Semiannually or 500 hours Inspection A B C Annually or 1000 hours Inspection A B C D Two year or 2000 hours Inspection A B C D E Place a check in the appropriate box after each inspection procedure is completed Use the step by step procedu...

Page 34: ...ructions Make copies of this report to use for each inspection Select the appropriate checklist s for the type of inspection to be performed Daily or 8 hours Inspection A Quarterly or 250 hours Inspection A B Semiannually or 500 hours Inspection A B C Annually or 1000 hours Inspection A B C D Two year or 2000 hours Inspection A B C D E Place a check in the appropriate box after each inspection pro...

Page 35: ...ard and could result in unsafe operating conditions 1 Check to make sure that the operator s and safety manuals are present and complete in the storage container on the platform 2 Examine the pages of each manual to be sure that they are legible and in good condition Result The operator s manual is appropriate for the machine and all manuals are legible and in good condition Result The operator s ...

Page 36: ...erves to determine if routine maintenance procedures are required Complete information to perform this procedure is available in the appropriate operator s manual Refer to the Operator s Manual on your machine A 3 Perform Function Tests Genie specifications require that this procedure be performed every 8 hours or daily whichever comes first Completing the function tests is essential to safe machi...

Page 37: ... all four tires maintain firm contact to the ground on unlevel terrain improving traction and machine stability Proper axle oscillation is essential to safe machine operation If the axle oscillation system is not operating correctly the stability of the machine is compromised and it may tip over 1 Start the engine from the platform controls Select the high idle function Test the Oscillate System s...

Page 38: ...eaner canister Remove the end cap All other models Disconnect the retaining clamps securing the end cap to the air cleaner canister Remove the end cap 3 Remove the air filter element 4 Clean the inside of the air filter canister and the canister gasket with a damp cloth 5 Inspect for and remove any blockage or debris from the intake air passages 6 Inspect the air filter element If needed blow from...

Page 39: ...models B 3 Inspect the Tires Wheels and LugNutTorque B 4 Perform Engine Maintenance Perkins Models B 8 Check the Oil Level in the Drive Hubs C 4 Perform Engine Maintenance Diesel Models D 2 Replace the Hydraulic Tank ReturnFilter A 8 Perform Engine Maintenance Kubota Models Engine specifications require that this one time procedure be performed after the first 50 hours of operation Change engine o...

Page 40: ...ubotapartnumberEG801 8916 2 Kubota D1105 Operator s Manual Genie part number 131379 Kubota WG972 Operator s Manual Genie part number 234803 A 10 Perform Engine Maintenance Kubota Models Engine specifications require that this procedure be performed every 100 hours KubotaD1105 Clean air filter Clean fuel filter Inspect fan belt KubotaWG972 Clean fuel filter Inspect fan belt Inspect spark plugs Requ...

Page 41: ...ner 3 Drive the machine until one of the two plugs is at the highest point a drive hub plugs 4 Fill the hub until the oil level is even with the bottom of the lowest plug hole Refer to Section 2 Specifications 5 Install the plugs into the drive hub 6 Repeat this procedure for the other drive hub A 12 Perform Engine Maintenance Kubota Models Engine specifications require that this procedure be perf...

Page 42: ...tilated area away from heaters sparks flames and lighted tobacco Always have an approved fire extinguisher within easy reach 1 Locate the fuel filter water separator and loosen the vent plug located on the fuel filter water separatorhead 2 Loosen the drain plug located at the bottom of the bowl Allow the water to drain into a suitable container until fuel starts to come out Immediately tighten the...

Page 43: ... a maximum of 15 seconds resting the starter for 30 seconds before trying again 11 Inspect the fuel filter water separator for leaks Explosion and fire hazard If a fuel leak is discovered keep any additional personnel from entering the area and do not operate the machine Repair the leak immediately Note Information to perform this procedure is also available in the Kubota D1105 Operator s Manual K...

Page 44: ...ventative sealant will help eliminate corrosion on the battery terminals and cables 3 Be sure that the battery retainers and cable connections are tight 4 Fully charge the battery Allow the battery to rest 24 hours before performing this procedure to allow the battery cells to equalize 5 Remove the battery vent caps and check the specific gravity of each battery cell with a hydrometer Note the res...

Page 45: ...The difference in specific gravity readings between cells is greater than 0 1 OR the specific gravity of one or more cells is 1 172 or less Replace the battery 10 Check the battery acid level If needed replenish with distilled water to 1 8 inch 3 mm below the bottom of the battery fill tube Do not overfill 11 Install the vent caps and neutralize any electrolyte that may have spilled B 2 Inspect th...

Page 46: ...o platform wiring 9 Raise the platform and return the safety arm to the stowed position 10 Lower the platform to the stowed position and turn the machine off B 3 Inspect the Tires Wheels and Lug Bolt Torque Genie requires that this procedure be performed every 250 hours or quarterly whichever comes first Maintaining the tires and wheels in good condition is essential to safe operation and good per...

Page 47: ...itch action and response is essential to safe machine operation The machine can be operated from the ground or platform controls and the activation of one or the other is accomplished with the key switch Failure of the key switch to activate the appropriate control panel could cause a hazardous operating situation 1 Pull out the red Emergency Stop button to the ON position at both the ground and p...

Page 48: ...top button to the off position Result The engine should shut off and no machine functions should operate Note The red Emergency Stop button at the ground controls should stop all machine operation even if the key switch is switched to platform control CHECKLIST B PROCEDURES B 7 Test the Automotive style Horn Genie requires that this procedure be performed every 250 hours or quarterly whichever com...

Page 49: ...e fuel select toggle switch to the gasoline position at the ground controls 2 Start the engine from the platform controls and allow the engine to run at low idle 3 Press the high idle button at the platform controls to allow the engine to run at high idle Result The high idle indicator light should be ON and the engine should start promptly and operate smoothly in low and high idle 4 Press the hig...

Page 50: ...e direction indicated by the blue arrow on the control panel until the machine begins to move then return the joystick to the center position Result The machine should move in the direction that the blue arrow points on the control panel then come to an abrupt stop 5 Slowly move the joystick in the direction indicated by the yellow arrow on the control panel until the machine begins to move then r...

Page 51: ...ed Emergency Stop button to the on position at both the ground and platform controls 3 Start the engine from the platform controls 4 Lower the platform to the stowed position 5 Choose a point on the machine i e contact patch of a tire as a visual reference for use when crossing the start and finish lines 6 Bring the machine to maximum forward drive speed before reaching the start line Begin timing...

Page 52: ... line 6 Continue at maximum speed and note the time when your reference point on the machine crosses the finish line Refer to Section 2 Specifications Note If the raised drive speed does not meet specifications refer to the Repair procedure 7 2 FunctionSpeedTuning B 12 Inspect the Fuel Tank Check Valve Venting System Gas LPG Models Note For machines located in the United States EPA Certificate 40 ...

Page 53: ...ry 250 hours or quarterly whichever comes first Perform this procedure more often if dusty conditions exist Free breathing fuel and hydraulic tank caps are essential for good machine performance and service life A dirty or clogged tank cap may cause the machine to perform poorly and continued use may cause component damage Extremely dirty conditions may require that the caps be inspected more ofte...

Page 54: ...tive tank cap venting air should pass freely through the cap 7 Using a mild solvent carefully wash the cap venting system Dry using low pressure compressed air Repeat this procedure beginning with step 6 8 Install the breather cap onto the hydraulic tank B 14 Perform Hydraulic Oil Analysis Genie requires that this procedure be performed every 250 hours or quarterly whichever comes first Replacemen...

Page 55: ... 2 Turn the key switch to platform controls Result The beacons should flash B 16 Check the Oil Level in the Drive Hubs Failure to maintain proper drive hub oil levels may cause the machine to perform poorly and continued use may cause component damage 1 Select the drive hub to be serviced Drive the machine until one of the two plugs is at the highest point a drive hub plugs 2 Remove the plug locat...

Page 56: ... Kubota Diesel Models Engine specifications require that this procedure be performed every 400 hours Replace fuel filter Requiredmaintenanceproceduresandadditional engine information is available in the Kubota D1105 Operator s Manual Kubotapartnumber16622 89166 Kubota D1105 Operator s Manual Genie part number 131379 CHECKLIST B PROCEDURES ...

Page 57: ...s at the ground controls side of the machine 3 Locate the Electronic Control Module ECM wire harness 6 pin connector to platform controls connection below and behind the control box 4 Securely connect the platform controls to the ECM wire harness 5 Tag and disconnect the platform controls wire harness from the ECM wire harness 6 Securely connect the platform controls to the ECM wire harness 7 Turn...

Page 58: ...should stop and an alarm should sound A fault code 99 PLATFORM OVERLOAD should be present in the ECM diagnostic display window at the ground controls Result The engine does not stop OR an alarm doesn t sound OR fault code 99 is not present in the ECM diagnostic display window at the ground controls Refer to Repair Procedure 14 1 Calibrate the Platform Overload System if equipped 14 Lower the platf...

Page 59: ...500 hours or six months whichever comes first Removing sediment from the fuel tank is essential to good engine performance and service life A dirty fuel tank may cause the fuel filter to clog prematurely resulting in poor engine performance and possible component damage Explosion and fire hazard Engine fuels are combustible Clean the fuel tank in an open well ventilated area away from heater spark...

Page 60: ...p 5 into the side of the tank 8 Install the tank onto the machine 9 Attach the fuel lines to the tank Tighten the clamps 10 Secure the tank with the tank strap Tighten the retaining fastener Do not over tighten C 4 Replace the Hydraulic Tank Breather Cap Models with Optional Hydraulic Oil Genie requires that this procedure be performed every 500 hours or six months whichever comes first The hydrau...

Page 61: ...sandadditional engine information is available in the KubotaD1105Operator sManual Kubotapartnumber16622 89166 ORthe Perkins403D 11Operator sManual PerkinspartnumberSEBU8311 01 Kubota D1105 Operator s Manual Genie part number 131379 Perkins 403D 11 Operator s Manual Genie part number 131661 C 6 Perform Engine Maintenance Kubota Diesel Models Engine specifications require that this procedure be perf...

Page 62: ...sult The measurement is 1 4 inch 6 35 mm or more Proceed to step 3 Result The measurement is less than 11 32 inch 8 71 mm Replace both upper and lower slider wear pads D 2 Replace the Hydraulic Tank Return Filter Genie requires that this procedure be performed every 1000 hours or annually whichever comes first Replacement of the hydraulic tank return filter is essential for good machine performanc...

Page 63: ...ition at both the ground and platform controls Start the engine 7 Raise the platform approximately 3 feet 1 m 8 Inspect the filter and related components to be sure that there are no leaks D 3 Perform Engine Maintenance Kubota Models Engine specifications require that this procedure be performedannually KubotaD1105 Replace air filter KubotaWG972 Replace air filter Replace fuel lines and clamps Cle...

Page 64: ...03D 11Operator sManual PerkinspartnumberSEBU8311 01 Perkins 403D 11 Operator s Manual Genie part number 131661 D 5 Perform Engine Maintenance Kubota Gas LPG Models Engine specifications require that this procedure be performedevery1000hours Replace spark plugs Inspect LPG coolant hoses Inspect LPG vacuum hose Flush coolant system Adjust valves Inspect valve seats Clean cylinder heads Requiredmaint...

Page 65: ...he two plugs is at the lowest point 2 Remove both plugs and drain the oil into a suitablecontainer 3 Drive the machine until one of the two plugs is at the highest point a drive hub plugs 4 Fill the hub until the oil level is even with the bottom of the lowest plug hole Refer to Section 2 Specifications 5 Install the plugs into the drive hub 6 Repeat this procedure for the other drive hub CHECKLIS...

Page 66: ...ation Refer to Section 2 Hydraulic Hose and Fitting torque Specifications 1 Push in the red Emergency Stop button to the off position 2 Tag and disconnect the harnesses from the ground control box 3 Remove the ground control box retaining fasteners and set aside Remove the ground control box 4 Locate the tank cover plate Remove the tank cover plate mounting fasteners and remove the cover 5 Place a...

Page 67: ...r 21 Fill the tank with hydraulic oil until the fluid is within the top 2 inches 5 cm of the sight gauge Do not overfill 22 Clean up any oil that may have spilled Properly discard the oil 23 Operate all machine functions through a full cycle and check for leaks 24 Check the oil level in the tank and add if needed 25 Install the tank cover plate and install the tank cover plate mounting fasteners E...

Page 68: ...enanceproceduresandadditional engine information is available in the KubotaWG972Operator sManual KubotapartnumberEG801 8916 2 Kubota WG972 Operator s Manual Genie part number 234803 E 4 Perform Engine Maintenance Kubota Diesel Models Engine specifications require that this procedure be performed every two years Replace radiator hoses and clamps Flush coolant system Replace fuel hoses and clamps Re...

Page 69: ...formation is available in the Perkins403D 11Operator sManual PerkinspartnumberSEBU8311 01 Perkins 403D 11 Operator s Manual Genie part number 131661 E 6 Perform Engine Maintenance Kubota Diesel Models Engine specifications require that this procedure be performedevery3000hours Inspect injection pump Inspect injection timing Requiredmaintenanceproceduresandadditional engine information is available...

Page 70: ...Section 3 Scheduled Maintenance Procedures November2014 3 42 GS 2669 RT GS 3369 RT GS 4069 RT PartNo 229753 This page intentionally left blank ...

Page 71: ...ided may result in property damage Indicates that a specific result is expected after performing a series of steps Indicates that an incorrect result has occurred after performing a series of steps Observe and Obey Repair procedures shall be completed by a person trained and qualified on the repair of this machine Immediately tag and remove from service a damaged or malfunctioning machine Repair a...

Page 72: ... the platform control box lid retaining fasteners Open the control box and secure the control box lid in a level position 3 Visually locate the circuit board mounted to the inside of the platform control box lid 4 Tag and disconnect the wire connections from the red Emergency Stop button 5 Tag and disconnect the wire harness connectors from the platform controls circuit board Electrocution burnhaz...

Page 73: ...s cable to the platform 3 Disconnect the platform controls cable from the connector located under the platform 4 Remove the platform control box from the platform and lay it off to the side Componentdamagehazard The platform controls wiring can be damaged if it is kinked or pinched 5 Remove the cover to the AC power to platform outlet Tag and disconnect the wiring from the outlet Electrocution bur...

Page 74: ... of supporting it Crushing hazard The platform will become unbalanced and fall when removed from the machine if not properlysupported Note Note the position of the slider blocks before the platform is removed so that when the platform is installed they will be in the correct position 2 2 Platform Extension Deck How to Remove the Platform Extension Deck 1 Remove the retaining fasteners from the dec...

Page 75: ...s even with the bottom of the platform extension 7 Carefully slide the platform extension out until the platform extension makes contact with the carriage on the forklift a 8 Secure the platform extension deck railings to the carriage of the forklift to support the platform extension deck 9 Carefully slide the platform extension out and away from the platform and place it on a structure capable of...

Page 76: ...2 each 6 Number 2 pivot pin steer end 7 Number 1 center pivot pin 2 each 8 Number 1 inner arm 9 Chassis pivot 10 Slider block 2 each 11 Number 3 inner arm 12 Number 3 center pivot pin 2 each 13 Number 3 pivot pin non steer end 14 Number 2 inner arm 15 Number 2 outer arm 16 Number 2 pivot pin non steer end 17 Lift cylinder barrel end pivot pin 18 Number 1 outer arm Non steer End Steer End 16 17 12 ...

Page 77: ... 454 kgs 1 Remove the platform See 2 1 How to Remove the Platform 2 Remove the retaining fasteners that attach the ladder to the drive chassis Remove the ladder and set aside 3 Remove the cables from the linkage assembly Componentdamagehazard Cables can be damaged if they are kinked or pinched 4 Using a suitable supporting device attach a strap to the rod end of the lift cylinder Do not applypress...

Page 78: ... 14 Using a soft metal drift remove the pivot pins and set aside 15 Carefully lift the linkage assembly off of the machine and place it on a structure capable of supporting it 16 Tag and disconnect the harness from the lift cylinder valve block 17 Tag and disconnect the hydraulic hoses from the lift cylinder Plug the hoses and cap the fittings Bodily injury hazard Spraying hydraulic oil can penetr...

Page 79: ...t Separate the link sets 1 Using an overhead lifting device attach a 4 hook sling chain to the ends of the inner arm index 8 11 or 14 Make the chains tight but do not apply lifting pressure Crushing hazard The linkage assembly could become unbalanced and fall if not properly supported when removed from the machine 2 Remove the retaining fasteners from the center pivot pins index 5 7 or 12 Note Do ...

Page 80: ...nd 9 Number 1 outer arm 10 Number 1 center pivot pin 2 each 11 Number 1 inner arm 12 Chassis pivot 13 Slider block 2 each 14 Number 4 inner arm 15 Number 4 outer arm 16 Number 4 pivot pin non steer end 17 Number 3 inner arm 18 Number 3 outer arm 19 Number 3 pivot pin non steer end 20 Number 2 inner arm 21 Number 2 outer arm 22 Number 2 pivot pin non steer end 23 Lift cylinder barrel end pivot pin ...

Page 81: ...vice and sling chains capable of supporting 1000 lbs 454 kgs 1 Remove the platform See 2 1 How to Remove the Platform 2 Remove the retaining fasteners that attach the ladder to the drive chassis Remove the ladder and set aside 3 Remove the cables from the linkage assembly Componentdamagehazard Cables can be damaged if they are kinked or pinched 4 Using an overhead lifting device attach a 4 hook sl...

Page 82: ... if not properly supported when removed from the machine 13 Remove the retaining fasteners from the number 3 pivot pins index 6 and 19 Note Do not remove the external snap ring 14 Using a soft metal drift remove the pivot pins and set aside 15 Carefully lift the linkage assembly off of the machine and place it on a structure capable of supporting it 16 Using an overhead lifting device attach a 4 h...

Page 83: ... unbalanced and fall if not properly supported when removed from the machine 24 Remove the two carriage bolts that secure the inner arm and chassis pivot to the steer end of the drive chassis 25 Move the linkage towards the non steer end of the machine until the slider feet are clear of the sliderchannel 26 Carefully lift the linkage assembly off of the machine and place it on a structure capable ...

Page 84: ...pin 9 Number 3 inner arm 10 Number 3 pivot pin steer end 11 Number 2 center pivot pin 2 each 12 Number 2 pivot pin steer end 13 Number 1 center pivot pin 2 each 14 Number 1 inner arm 15 Chassis pivot 16 Slider block 2 each 17 Number 5 inner arm 18 Number 5 outer arm 19 Number 5 pivot pin non steer end 20 Upper lift cylinder rod end pivot pin 21 Number 4 outer arm 22 Number 4 pivot pin non steer en...

Page 85: ...f supporting 1000 lbs 454 kgs 1 Remove the platform See 2 1 How to Remove the Platform 2 Remove the retaining fasteners that attach the ladder to the drive chassis Remove the ladder and set aside 3 Remove the cables from the platform through the linkage assembly Componentdamagehazard Cables can be damaged if they are kinked or pinched 4 Using an overhead lifting device attach a 4 hook sling chain ...

Page 86: ...de 15 Carefully lift the linkage assembly off of the machine and place it on a structure capable of supporting it 16 Tag and disconnect the harness from the upper lift cylinder valve block 17 Tag and disconnect the hydraulic hoses from the upper lift cylinder Plug the hoses and cap the fittings Bodily injury hazard Spraying hydraulic oil can penetrate and burn skin Loosen hydraulic connections ver...

Page 87: ...e pivot pins and set aside 27 Carefully lift the linkage assembly off of the machine and place it on a structure capable of supporting it 28 Using an overhead lifting device attach a 4 hook sling chain to the ends of the number 2 inner arm index 26 Make the chains tight but do not apply lifting pressure Crushing hazard The linkage assembly could become unbalanced and fall if not properly supported...

Page 88: ... Remove the two carriage bolts that secure the inner arm and chassis pivot to the steer end of the drive chassis 37 Move the linkage towards the non steer end of the machine until the slider feet are clear of the sliderchannel 38 Carefully lift the linkage assembly off of the machine and place it on a structure capable of supporting it Separate the link sets 1 Using an overhead lifting device atta...

Page 89: ...Arm Wear Pads 1 Attach a lifting strap from a suitable lifting device to the ladder at the non steer end of the machine Support the ladder Do not apply lifting pressure 2 Remove the fasteners securing the ladder to the chassis Remove the ladder from the machine and set aside Crushing hazard The ladder could fall if not properly supported when the fasteners are removed from the machine 3 Using an o...

Page 90: ...6 Using a soft metal drift remove the pivot pins and set aside 7 Remove the slider feet by sliding them out of the sliderchannel 8 Remove the upper and lower wear pads and discard 9 Using a hard rubber mallet secure the upper and lower wear pads to the slider feet a upper wear pads b slider foot c lower wear pad 10 Install the slider feet into the slider channel and secure them to the linkage asse...

Page 91: ...ut these skills and tools could result in death or serious injury and significant componentdamage Dealer service is strongly recommended Note When removing a hose assembly or fitting the O ring on the fitting and or hose must be replaced and then torqued to specification during installation Refer to Section 2 Hydraulic Hose and Fitting Torque Specifications 1 Remove the platform See 2 1 How to Rem...

Page 92: ...the O ring on the fitting and or hose must be replaced and then torqued to specification during installation Refer to Section 2 Hydraulic Hose and Fitting Torque Specifications 1 Remove the platform See 2 1 How to Remove the Platform 2 Disassemble the scissor assembly See 3 3 How to Disassemble the Scissor Assembly GS 4069 RT a platform down solenoid valve b upper lift cylinder c lower lift cylind...

Page 93: ...ximately 1Ω 2 If the ohm reading is different than 1Ω remove the wire and connector plate from the three individual glow plugs Then one glow plug at a time measure the resistance between the glow plug and ground Result The resistance should be approximately 1 8Ω for each individual glow plug 3 Install the connector plate and wires to all three glow plugs 4 Turn the key switch to ground control and...

Page 94: ... toggle switch to the start position and check the engine RPM on the diagnostic display Refer to Section 2 Specifications 6 To correct the high idle speed loosen the lock nut on the solenoid then turn the solenoid boot counterclockwise to increase the rpm or clockwise to decrease the rpm Tighten the lock nut and recheck the rpm b a d c KUBOTAD1105ENGINE 4 4 Flex Plate The flex plate couples the en...

Page 95: ...tch contacts close at approximately 225 F 107 C If the coolant temperature rises above the switch point the switch contacts close and the engine will shut off to prevent damage The engine will not start until the temperature drops below the switch point An over temperature indicator light at the ground controls should turn on when the switch closes The engine oil pressure switch is a normally clos...

Page 96: ...ew switch and tighten Torque to 8 18 ft lbs 11 24 Nm Note Always use pipe thread sealant when installing a new switch a coolant temperature switch b oil pressure switch How to Repair the Kubota D1105 Engine Repair procedures and additional engine information are available in the Kubota D1105 Operator s Manual Kubotapartnumber16622 89166 KubotaD1105WorkshopManual Kubotapartnumber9Y111 00123 Kubota ...

Page 97: ...ur local Kubotadealer 5 2 Carburetor Adjustment Note The carburetor cannot be adjusted The carburetor mixture screws are factory sealed with tamper resistant caps installed by the manufacturer If service or repair is needed contact your local Kubota dealer 5 3 Choke Adjustment The choke is solenoid operated and functions only in the gasoline mode The choke will not operate in LPG mode 5 4 Flex Pla...

Page 98: ...n the high idle adjustment nut 5 Turn the high idle adjustment nut counterclockwise until the adjustment nut is flush against the solenoid 6 Turn the lock nut against the adjustment nut Do not tighten 7 Hold the throttle lever against the low idle adjustment screw and turn the adjustment screw clockwise to increase rpm or counterclockwise to decrease rpm 8 While holding the throttle lever against ...

Page 99: ... e high idle adjustment nut f high idle solenoid f e d c a b How to Repair the Kubota WG972 Engine Repairproceduresandadditionalengineinformation are available in the KubotaWG972Operator sManual KubotapartnumberEG801 8916 2 KubotaWG972WorkshopManual Kubotapartnumber9Y111 03180 Kubota WG972 Operator s Manual Genie part number 234803 Kubota WG972 Workshop Manual Genie part number 234802 ...

Page 100: ...ase rpm Tighten the lock nut and recheck the rpm See the illustration 4 Move the engine idle control switch to high idle rabbit symbol from the ground controls 5 Hold the start toggle switch to the start position and check the engine RPM on the diagnostic display Refer to Section 2 Specifications 6 To correct the high idle speed loosen the yoke lock nut on the high idle solenoid then turn the high...

Page 101: ...e switch point the switch contacts close and the engine will shut off to prevent damage The engine will not start until the temperature drops below the switch point The engine oil pressure switch is a normally open switch The switch contacts close at approximately 4 27 psi 0 3 bar If the oil pressure drops below the switch point the contacts close and the engine will shut off to prevent damage A f...

Page 102: ...ine Bodily injury hazard Contact with hot engine fluids or components may cause severe burns 3 Coolant temperature switch Install the new switch Torque to 20 ft lbs 27 Nm Oil pressure switch Install the new switch Torque to 88 in lbs 10 Nm Note Always use pipe thread sealant when installing a new switch How to Repair the Perkins 403D 11 Engine Repairproceduresandadditionalengineinformation are ava...

Page 103: ...d cause the machine to tip over resulting in death or serious injury Tip over hazard This procedure must only be performed by a trained service professional Attempting this procedure without the necessary skills will result in death or serious injury How to Determine the Revision Level 1 Turn the key switch to ground controls and pull out the red Emergency Stop buttons to the on position at both p...

Page 104: ...t MAX FWD HIGH SPEED DRIVE is showing in the diagnostic display window 7 Press the lift function enable button 8 Press the yellow platform down button to decrease the drive speed or press the blue platform up button to increase the drive speed Refer to Section 2 Specifications a diagnostic display b blue platform up button c lift function enable button d yellow platform down button 9 Press the lif...

Page 105: ...the yellow platform down arrow to scroll to max fwd high torque drive Result MAX FWD HIGH TORQUE DRIVE is showing in the diagnostic display window 7 Press the lift function enable button 8 Press the yellow platform down button to decrease the drive speed or press the blue platform up button to increase the drive speed Refer to Section 2 Specifications a diagnostic display b blue platform up button...

Page 106: ...IVE SPEED is showing in the diagnostic display window 7 Press the lift function enable button 8 Press the yellow platform down button to decrease the drive speed or press the blue platform up button to increase the drive speed Refer to Section 2 Specifications a diagnostic display b blue platform up button c lift function enable button d yellow platform down button 9 Press the lift function enable...

Page 107: ...window The ECM is now in programming mode 5 Press the lift function enable button 6 Use the yellow platform down arrow to scroll to max lift speed Result MAX LIFT SPEED is showing in the diagnostic display window 7 Press the lift function enable button a diagnostic display b blue platform up button c lift function enable button d yellow platform down button 8 Press the yellow platform down button ...

Page 108: ...S is showing in the diagnostic displaywindow a diagnostic display b blue platform up button c lift function enable button d yellow platform down button Machine Option Definitions Descent Delay This option halts descent when the down limit switch is activated All controls must be released for 4 to 6 seconds before descent is re enabled Required for Europe Motion Alarm The motion alarm will sound wh...

Page 109: ...pped with flashing beacons and this option is set to on the ECU will display a 4021 fault code 9 Models with platform overload option Use the yellow platform down arrow to scroll to overload Result OVERLOAD ON is showing in the diagnostic displaywindow Result OVERLOAD OFF is showing in the diagnostic display window Press the lift function enable button to activate the overload option Note For CE a...

Page 110: ...ency Stop button to the off position at the ground controls GROUNDCONTROLS 7 4 Level Sensor Models without Outriggers The Electronic Control Module ECM is programmed to deactivate the lift and drive functions and activate an alarm when a signal is received from the level sensor The tilt alarm sounds when the incline of the chassis exceeds 2 to the side and 3 to the front orrear How to Install and ...

Page 111: ...stall the new level sensor onto the machine with the Y on the level sensor base towards the steer end of the machine Install and tighten the level sensor retaining fasteners Tip over hazard The tilt level sensor must be installed with the Y on the level sensor base towards the steer end of the machine Failure to install the tilt level sensor as instructed will cause the machine to tip over resulti...

Page 112: ...does not sound and all functions will operate Proceed to step 15 Result The drive function and the lift function will not operate and the tilt alarm will sound at 180 beeps per minute Proceed to step 14 GROUNDCONTROLS 14 Turn the level sensor adjusting nuts just until the level sensor alarm does not sound 15 Lower the platform to the stowed position 16 Raise the machine approximately 4 inches 10 c...

Page 113: ...is received from the level sensor When the outriggers are stowed the tilt alarm sounds when the incline of the chassis exceeds 2 to the side When the outriggers are deployed the tilt alarm sounds when the incline of the chassis exceeds 0 8 to the side At all times the tilt alarm sounds when the incline of the chassis exceeds 3 to the front or rear How to Install and Calibrate the Level Sensor Tip ...

Page 114: ...level sensor retaining fasteners Tip over hazard The tilt level sensor must be installed with the X on the level sensor base towards the steer end of the machine Failure to install the tilt level sensor as instructed could result in the machine tipping over causing death or serious injury 6 Connect the wire harness to the level sensor 7 Turn the key switch to platform control and pull out the red ...

Page 115: ...rgency Stop button to the off position at the platform controls 18 Press and hold the auto level button and press and hold the left front outrigger button Pull out the red Emergency Stop button to the on position at the platform controls Continue to hold the auto level button and left front outrigger button for approximately 3 seconds or until a beep is heard Release the buttons 19 Push in the red...

Page 116: ...to the yellow wire at the level sensor and the negative lead to the black wire 26 Raise the machine approximately 6 inches 15 cm 27 Remove the blocks from under both wheels 28 Lower the machine and remove the jack GROUNDCONTROLS 29 Center a lifting jack under the drive chassis at the tank side of the machine 30 Raise the machine approximately 6 inches 15 cm 31 Models with RT tires Place a 2 15 x 1...

Page 117: ... remove the jack 55 Turn the key switch to the off position GROUNDCONTROLS Confirmthefront to backlevelsensorsetting 37 Center a lifting jack under the drive chassis at the steer end of the machine 38 Raise the machine approximately 6 inches 15 cm 39 Place a 4 08 x 10 x 10 inch 10 36 x 25 x 25 cm thick steel block under both wheels at the steer end of the machine 40 Lower the machine onto the bloc...

Page 118: ... place the controls near the function manifold on the tank side of the machine 3 Start the engine from the platform controls 4 Steer the machine fully to the right or left and hold Note the pressure readings on the pressure gauge Refer to Section 2 Specifications How to Remove the Hydraulic Pump 1 Tag disconnect and plug the hydraulic hoses on the pump Bodily injury hazard Spraying hydraulic oil c...

Page 119: ...ent damage will occur 1 Turn the key switch to ground controls and pull out the red Emergency Stop buttons to the on position at both the ground and platform controls 2 Gasoline LPG models Disconnect the ignition coil wire from the center of the ignition coil Diesel models Hold the manual fuel shut off lever clockwise in the closed position 3 Crank the engine with the starter motor for 15 seconds ...

Page 120: ...3500 psi 241 3 bar FF System relief 20 25 ft lbs 27 34 Nm 7 Differential sensing valve 160 psi 11 bar FG Proportional valve circuit 20 25 ft lbs 27 34 Nm 8 Check valve FH Differential sensing circuit 12 14 ft lbs 16 19 Nm 9 Flow control valve 2 gpm 7 6 L min FI Controls flow to the steer circuit 20 25 ft lbs 27 34 Nm 10 Solenoid valve 3 position 5 way NC FK Steer left right 15 20 ft lbs 20 27 Nm C...

Page 121: ... 1 16 15 13 12 14 11 10 5 Y4 FI FA FB FC FD FE FF FG FQ FP FO FN FM FL FK Y3 FJ Y9 Y94 Y93 Y95 Y8 1 1 Note alpha calloutsreferto correspondingnotesonthe hydraulicschematic Note alphanumeric callouts refertocorrespondingnotes ontheelectricalschematic FJ CHECK VALVE IS LOCATED INSIDE THE MANIFOLD UNDER THE VALVE CARTRIDGE ...

Page 122: ...t the engine from the platform controls 4 Steer the machine fully to the right or left and hold Note the pressure readings on the pressure gauge Refer to Section 2 Specifications 5 Turn the engine off Use a wrench to hold the system relief valve item C and remove the cap 6 Adjust the internal hex socket Turn it clockwise to increase the pressure or counterclockwise to decrease the pressure Install...

Page 123: ...from the platform controls 5 Fully move the drive controller in either direction Note the pressure readings on the pressure gauge Refer to Section 2 Specifications Note The machine will not drive and a fault will appear on the ground control display 6 Turn the engine off Use a wrench to hold the oscillate relief valve item A and remove the cap 7 Adjust the internal hex socket Turn it clockwise to ...

Page 124: ...mmingmode 4 Press the lift function enable button Result DESCENT DELAY is showing in the diagnostic display window 5 Press the lift function enable button to deactivate the descent delay option 6 Use the yellow platform down arrow to scroll to overload Result OVERLOAD ON is showing in the diagnostic displaywindow 7 Press the lift function enable button to deactivate the overload option 8 Use the y...

Page 125: ...arness a platform down solenoid valve b lift cylinder c pressure switch 18 On the machine side of the harness connect a jumper from pin 1 yellow to pin 3 red 19 Pull out the red Emergency Stop button to the on position and raise the platform approximately 10 feet 3m 20 Return the safety arm to the stowed position 21 Lower the platform to the stowed position 22 Place the maximum rated load in the p...

Page 126: ...the relief valve cap Tip over hazard Failure to adjust the relief valve as instructed will cause the machine to tip over resulting in death or serious injury Do not adjust the relief valve higher than specified 27 Repeat this procedure beginning with step 23 to confirm the relief valve pressure a b c FE a test port 2 b test port 1 c platform up relief valve 28 Lower the platform and remove the tes...

Page 127: ...o select options Result SELECT OPTIONS is showing in the diagnostic display window The ECM is now in programmingmode 40 Press the lift function enable button Result DESCENT DELAY is showing in the diagnostic display window 41 Press the lift function enable button to deactivate the descent delay option 42 Use the yellow platform down arrow to scroll to overload Result OVERLOAD ON is showing in the ...

Page 128: ...5 Press and hold the lift function enable button and press and hold the blue platform up button Allow the platform to raise completely then continue activating the lift function while observing the pressure reading on the pressure gauge Note the pressure Refer to Section 2 Specifications 6 Turn the engine off Hold the lift relief valve item FE with a wrench and remove the cap 7 Adjust the internal...

Page 129: ...RT 4 59 MANIFOLDS 9 3 Outrigger Manifold Components The outrigger manifold is located beneath the hose cover panel on top of the drive chassis Index Schematic No Description Item Function Torque 1 Solenoid valve 3 position 4 way NC BA Outriggers in out 20 25 ft lbs 27 34 Nm Y40 Y39 1 BA ...

Page 130: ...d reverse 20 25 ft lbs 27 34 Nm 6 Orifice 0 060 inch 1 5 mm TF Equalizes pressure on both sides of flow divider combiner valve 17 7 Flow divider combiner valve TG Controls flow to flow divider combiner valves 8 and 17 73 77 ft lbs 99 104 Nm 8 Flow divider combiner valve TH Controls flow to steer end drive motors in forward and reverse 48 52 ft lbs 65 71 Nm 9 Orifice 0 060 inch 1 5 mm TI Equalizes ...

Page 131: ...Section 4 Repair Procedures November2014 PartNo 229753 GS 2669 RT GS 3369 RT GS 4069 RT 4 61 MANIFOLDS 12 TL 11 TK 1 TA 2 TB 3 TC 10 TJ 8 TH 7 TG 4 TD 5 TE 9 TI 6 TF Y6 Y5 Y98 Y97 Y96 Y27 Y2 ...

Page 132: ... circuit 15 Pressure reducing valve 250 psi 17 2 bar TO Two speed and brake circuit 20 25 ft lbs 27 34 Nm 16 Orifice 0 035 inch 9 mm TP Equalizes pressure on both sides of flow divider combiner valve 7 17 Flow divider combiner valve TQ Controls flow to non steer end drive motors in forward and reverse 73 77 ft lbs 99 104 Nm 18 Counterbalance valve 3500 psi 241 3 bar TR Traction relief 30 35 ft lbs...

Page 133: ...Section 4 Repair Procedures November2014 PartNo 229753 GS 2669 RT GS 3369 RT GS 4069 RT 4 63 MANIFOLDS 20 TT 19 TS 13 TM 14 TN 15 TO 16 TP 17 TQ 18 TR ...

Page 134: ... 5 Generator Manifold Components The generator manifold is located above the function manifold Index Schematic No Description Item Function Torque 1 Proportional solenoid valve DA Generator speed 33 37 ft lbs 45 50 Nm 2 Relief valve 2700 psi 186 bar DB Generator circuit 20 25 ft lbs 27 34 Nm 2 1 DA DB Y29 ...

Page 135: ...t the wiring from the coil to be tested 2 Test the coil resistance using a multimeter set to resistance Ω Refer to the Valve Coil Resistance Specification table Result If the resistance is not within the adjusted specification plus or minus 10 replace the coil Valve Coil Resistance Specification Note The following coil resistance specifications are at an ambient temperature of 68 F 20 C As valve c...

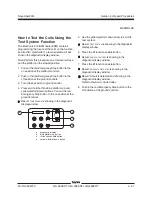
Page 136: ...r more when measured across the terminals Resistor 10Ω Ω Ω Ω Ω Genie part number 27287 3 Set a multimeter to read DC current Note The multimeter when set to read DC current should be capable of reading up to 800 mA a multimeter b 9V DC battery c 10Ω resistor d coil Note Dotted lines in illustration indicate a reversed connection as specified in step 6 4 Connect the negative lead to the other termi...

Page 137: ... and hold both the blue platform up and yellow platform down buttons Pull out the red Emergency Stop button to the on position at the groundcontrols Result TUNE SPEEDS is showing in the diagnostic displaywindow a diagnostic display b blue platform up button c lift function enable button d yellow platform down button 5 Use the yellow platform down arrow to scroll to test system Result TEST SYSTEM i...

Page 138: ... container due to the possibility of fire 1 Remove the fuel filler cap from the tank 2 Using an approved hand operated pump drain the fuel tank into a suitable container Refer to Section 2 Machine Specifications Note Be sure to only use a hand operated pump suitable for use with gasoline and or diesel fuel 3 Tag disconnect and plug the fuel supply and return hoses from the fuel tank 4 Clean up any...

Page 139: ...ank side cover 2 Remove the drain plug from the hydraulic tank and completely drain the tank into a container of suitable capacity Refer to Section 2 Machine Specifications Bodily injury hazard Spraying hydraulic oil can penetrate and burn skin Loosen hydraulic connections very slowly to allow the oil pressure to dissipate gradually Do not allow oil to squirt or spray 3 Tag and disconnect the harn...

Page 140: ...p the fittings on the drive motor Bodily injury hazard Spraying hydraulic oil can penetrate and burn skin Loosen hydraulic connections very slowly to allow the oil pressure to dissipate gradually Do not allow oil to squirt or spray 6 Support and secure the yoke and drive motor assembly with a lifting device Left side yoke 7 Remove the tie rod rue ring and clevis pin from the yoke and set aside Ski...

Page 141: ...rque Specifications 1 Refer to Repair Procedure 11 1 How to Remove the Yoke and Drive Motor 2 Remove the drive motor mounting fasteners Remove the drive motor from the yoke 11 2 Steer Cylinder How to Remove the Steer Cylinder Note When removing a hose assembly or fitting the O ring on the fitting and or hose must be replaced and then torqued to specification during installation Refer to Section 2 ...

Page 142: ...g Torque Specifications 1 Tag disconnect and plug the hydraulic hoses from the oscillate cylinder Cap the fittings on the cylinder Bodily injury hazard Spraying hydraulic oil can penetrate and burn skin Loosen hydraulic connections very slowly to allow the oil pressure to dissipate gradually Do not allow oil to squirt or spray 2 Block the non steer wheels and center a lifting jack under the drive ...

Page 143: ...the oscillate right coil item B and set aside Refer to illustration 2 illustration 2 3 Tag and disconnect the connector with the blue wire from the steer right coil item C Connect it to the oscillate right coil item B Refer to illustration 2 4 Tag and disconnect the connector with the blue black wire from the steer left coil item D Connect it to the oscillate left coil item A Refer to illustration...

Page 144: ...onnect the connector with the blue black wire from the oscillate left coil item A Connect it to the steer left coil item D Refer to illustration 2 11 Connect the connector with the red wire to the oscillate left coil item A and the connector with the white wire to the oscillate right coil item B that were removed in step 2 Refer to illustration 2 Continue to Check the Steering STEER AXLE COMPONENT...

Page 145: ... wheels 2 Tag disconnect and plug the hydraulic hoses from the drive motor brake assembly Cap the fittings Bodily injury hazard Spraying hydraulic oil can penetrate and burn skin Loosen hydraulic connections very slowly to allow the oil pressure to dissipate gradually Do not allow oil to squirt or spray 3 Support and secure the drive motor brake assembly with a lifting device 4 Remove the drive mo...

Page 146: ... Drive Motor Brake Assembly 2 Center a lifting jack of ample capacity under the drive chassis at the non steer end of the machine 3 Loosen the wheel lug nuts Do not remove them 4 Raise the machine approximately 2 inches 5 cm Place blocks under the chassis for support Crushing hazard The chassis will fall if it is not properly supported 5 Remove the wheel lug nuts Remove the tire and wheel assembly...

Page 147: ...rom the outside outrigger cover Remove the cover 5 Tag disconnect and plug the hydraulic hoses from the outrigger cylinder Cap the fittings on the cylinder Bodily injury hazard Spraying hydraulic oil can penetrate and burn skin Loosen hydraulic connections very slowly to allow the oil pressure to dissipate gradually Do not allow oil to squirt or spray 6 Attach a lifting strap from an overhead cran...

Page 148: ...Electronic Control Module ECM wire harness 6 pin connector to platform controls connection below and behind the control box 6 Tag and disconnect the platform controls wire harness from the ECM wire harness 7 Securely connect the platform controls to the ECM wire harness 8 Using a suitable lifting device place a weight in the center of the platform floor Secure the weight to the platform Refer to t...

Page 149: ...each quarter turn of the nut to allow the platform overload system to reset Note Wait a minimum of 3 seconds between each quarter turn of the nut to allow the platform overload system to reset 17 Remove the supporting device from under the platform 18 Start the engine and raise the platform to 13 ft 4 m 19 Rotate the safety arm away from the machine and let it hang down 20 Lower the scissor assemb...

Page 150: ...te the safety arm away from the machine and let it hang down 4 Raise the platform until it activates the maximum height limit switch Result The alarm does not sound and the engine will continue to run Proceed to step 7 Result The overload alarm is sounding and the engine stops running Proceed to step 5 5 Lower the scissor assembly until the safety arm rest on the cross tube 6 Adjust the maximum he...

Page 151: ...gency stop button to the on position at the platform controls 2 Press and hold both the up and down buttons Pull out the red Emergency Stop button to the on position at the ground controls Result TUNE SPEEDS is showing in the LCD screen 3 Use the down button to scroll to SELECT OPTIONS 4 Press the function enable button Result DESCENT DELAY is showing in the LCD screen 5 Use the down button to scr...

Page 152: ...UT OF TURN THE PRESSURE ADJUSTMENT SWITCH NUT 1 4 TURN INTO THEHYDRAULICLINE BATTERIES ARE NOT FULLY CHARGE BATTERIES CHARGED OVERLOAD SYSTEM NOT REPEATCALIBRATION ADJUSTEDPROPERLY PROCEDURE SLIDERCHANNELNOT LUBRICATE THE SLIDER LUBRICATED CHANNEL AT DOWN LIMIT WITH RATED SYSTEM NEEDS TO BE TURN OFF RED EMERGENCY LOAD IN PLATFORM THE RESET STOP BUTTON WAIT THREE PRESSURE SWITCH ALARM SECONDSANDTUR...

Page 153: ...other jewelry Bodily injury hazard Spraying hydraulic oil can penetrate and burn skin Loosen hydraulic connections very slowly to allow the oil pressure to dissipate gradually Do not allow oil to squirt or spray Observe and Obey Troubleshootingandrepairproceduresshallbe completed by a person trained and qualified on the repair of this machine Immediately tag and remove from service a damaged or ma...

Page 154: ... Identify symptoms Troubleshoot Perform repair Return to service problem solved problem still exists Inspect and test FAULT CODES Ground Control LED Diagnostic Readout The diagnostic readout displays numerical codes that provide information about the machine operating status and about malfunctions The dot to the right of the numbers remain on when a fault code is displayed The codes listed in the ...

Page 155: ...Chassis Up Switch N A Platform up Platform up ReplaceECU switch fault at disabled groundcontrols 23 ChassisLift N A Platform up down Platform up down ReplaceECU Switch enable button fault functionsdisabled at ground controls 24 DownSwitch N A Platform down Platform down ReplaceECU switch fault at disabled groundcontrols 25 Left Turn Switch N A Left turn switch Malfunctioningsteer Troubleshootsteer...

Page 156: ...ontrols disabled replace circuit board at platform controls 32 PlatformStart N A Engine start buttonEngine will not Troubleshoot button or Switch fault at platform start replace circuit board controls at platform controls 33 LeftFront N A Leftfrontoutrigger Outriggersdisabled Troubleshootbuttonor OutriggerSwitch enable button fault replace circuit board platformcontrols at platform controls 34 Rig...

Page 157: ...lue to low Voltage below 1000 mV 19 Voltage out of range 21 Voltage inconsistent 39 Down Limit Switch 21 Voltage Elevated drive and Troubleshootstowed inconsistent platform up disabled limit switch 40 OscillateOutput 21 Bothoscillate Elevated drive and Troubleshootoscillate valveoutputsare platform up disabled limit switches or on at the same replaceECU time while elevated Flashing or Motion Set t...

Page 158: ...bleshootplatform Y8 fault disabled up valve coil or wiring 55 Down Coil N A Platform down Platform down Troubleshootplatform coil Y7 or functiondisabled down valve coil or Y7A GS4069 wiring 56 Right Turn Coil N A Steer right coil Steer right function Troubleshootsteer Y3 fault disabled right valve coil or wiring 57 Left Turn Coil N A Steer left coil Steerleftfunction Troubleshootsteer Y4 fault dis...

Page 159: ...ight N A Value too low Elevated drive and Troubleshootoscillate Coil OR platform up disabled right valve coil Y94 Value too high or wiring 66 Low Oil Pressure N A Low engine oil Engineshutdown Check engine oil level pressure Check wiring to pressureswitch Replace oil pressure switch 67 HighCoolant N A High engine Engineshutdown Gas LPG Models Temperature coolant Check the engine temperature coolan...

Page 160: ...bled wiring 82 RightFront N A Rightfront Rightfrontoutrigger Troubleshoot coil or OutriggerCoil outrigger coil disabled wiring Y36 fault 83 RightRear N A Rightrear Right frontoutrigger Troubleshoot coil or OutriggerCoil outrigger coil disabled wiring Y34 fault 84 OutriggerExtend N A Outriggerextend Outriggerextend Troubleshoot coil or Coil coil Y40 fault functiondisabled wiring 85 OutriggerRetract...

Page 161: ...r machine Be sure that all necessary tools and test equipment are available and ready for use About This Section There are two groups of schematics in this section ElectricalSchematics Electrocution burnhazard Contact with electrically charged circuits could result in death or serious injury Remove all rings watches and other jewelry HydraulicSchematics Bodily injury hazard Spraying hydraulic oil ...

Page 162: ...Engine water temp SW1 input C10 Not used C11 Fuel pump output Gas LPG models C12 Oscillate resistor R1 input 1 A 12 B C 1 1 12 12 6 6 6 1 A 12 B C 1 1 12 12 1 A 12 B C 1 1 12 12 J2 J1 U5 Electronic Control Unit J2 Connector 36 pin A1 Not used A2 Down limit switch LS6 input A3 Auxiliary down power input A4 Auxiliary down relay CR72 86 output A5 Key switch KS1 3 input A6 Level sensor S7 white input ...

Page 163: ... alarm platform H2 Horn H5 Multi function alarm ground JC Halleffectcontroller JC4 Drive Steer JC10 Platformup down Outriggersextend retract Option Item Description KS Keyswitch KS1 Key switch L LEDorLight L12 Leftfrontoutrigger option platform L13 Rightfrontoutrigger option platform L14 Leftrearoutrigger option platform L15 Rightrearoutrigger option platform L16 Platformup downenable platform L21...

Page 164: ...oat FC Relief valve oscillate circuit FD 2position 3waydirectionalvalve platformup down FE Relief valve Platform up circuit FF Relief valve Main system FG Differentialsensingvalve metersflowtofunctions FH Checkvalve differentialsensingcircuit FI Flow regulator valve controls flow to the steer circuit FJ Check valve steer circuit FK 3position 5waydirectionalvalve steerright left FL Proportionalvalv...

Page 165: ...n Valve coil with suppression diode Valve coil without suppression diode Limit switch not held Limit switch held Spark plug Ignition coil Level sensor without outriggers Circuit breaker with amperage Button normally open Red Emergency Stop button normally closed Temperature switch Pressure switch normally closed Key switch Key switch Fuel solenoid Starting aid glow plug Electric motor Battery Nega...

Page 166: ...valve closed center Solenoid operated 3 position 5 way directional valve closed center Solenoid operated 2 position 2 way directional valve normally closed Hydraulically released brake Pump prime mover engine or motor Orifice with size Check valve Solenoid operated proportional valve Pilot operated directional valve 2 position 2 way Solenoid operated 2 position 3 way directional valve normally ope...

Page 167: ... b right rear outrigger limit switch LS15 c right front outrigger limit switch LS13 left front outrigger limit switch LS12 not shown d left axle oscillate limit switches LSA10S and LSA10SS e right axle oscillate limit switches LSA20S and LSA20SS f platform overload pressure switch S25 g platform down limit switches LS6 and LS6B h platform up limit switch LS16 ...

Page 168: ...Section 6 Schematics November2014 6 8 GS 2669 RT GS 3369 RT GS 4069 RT PartNo 229753 This page intentionally left blank ...

Page 169: ...Section 6 Schematics November2014 6 9 Control Panel Circuit Diagram 6 10 ...

Page 170: ...A12 J2 A11 J2 A10 J2 A9 J2 A8 J2 A7 J2 A6 J2 A5 J2 A4 J2 A3 J2 A2 J2 A1 J1 C12 J1 C11 J1 C10 J1 C9 J1 C8 J1 C7 J1 C6 J1 C5 J1 C4 J1 C3 J1 C2 J1 C1 J1 B12 J1 B11 J1 B10 J1 B9 J1 B8 J1 B7 J1 B6 J1 B5 J1 B4 J1 B3 J1 B2 J1 B1 J1 A12 J1 A11 J1 A10 J1 A9 J1 A8 J1 A7 J1 A6 J1 A5 J1 A4 J1 A3 J1 A2 J1 A1 J2 RIGHT VIEWED FROM BACK J1 LEFT VIEWED FROM BACK Y98 BYPASS TB 23 OVERLOAD CR74 87A CR55 30 J10 11 TB...

Page 171: ...Section 6 Schematics November2014 6 11 Electrical Schematic GS 2669 RT and GS 3369 RT Gas LPG Models ANSI CSA 6 12 ...

Page 172: ...H SW1 COOLANT TEMPERATURE SWITCH J1 C8 J1 C9 BN23 BN91 J2 B9 J2 C4 30 86 CR4 87 85 87A J2 C1 J1 B1 Y29 GENERATOR OPTION PR2 STARTER RELAY D1 ALTERNATOR G6 ENGINE HOURMETER J2 A2 J1 B3 CR1 CR5 86 30 87A 87 85 30 86 87A 85 87 30 86 87 85 87A 30 86 87A 87 85 30 86 87A 85 87 Y9 PROPORTIONAL FLOW CONTROL J1 A12 J2 A3 86 30 87A 87 85 J2 A4 J2 A5 CR71 CR62 CR2 J1 A6 J1 A4 J1 A5 Y6 DRIVE FORWARD Y5 DRIVE ...

Page 173: ...C HO NO HC NC HO NO HC J1 C12 J2 B5 R2 1k W R3 620W NO HC NC HO NC HO NO HC 30 86 87 85 87A J1 B8 CR10 CR9 JC4 JC10 P2 LS14 NO NO NO NO J1 B7 Y33 L R OUTRIGGER Y35 L F OUTRIGGER J1 B9 Y34 R R OUTRIGGER J1 B6 Y36 R F OUTRIGGER J1 C5 J1 C3 J1 C6 J1 C4 LS12 LS13 LS15 Y39 OUTRIGGER EXTEND Y40 OUTRIGGER RETRACT J1 B5 J1 B10 J1 B11 PLATFORM GND FROM PLAT J2 A11 J2 A12 J2 A10 DATA LINK DATA LINK 2 BL 1 W...

Page 174: ...November2014 Section 6 Schematics 6 14 6 13 Electrical Schematic GS 2669 RT and GS 3369 RT Gas LPG Models ANSI CSA ...

Page 175: ...Section 6 Schematics November2014 6 15 Ground Control Box Layout GS 2669 RT and GS 3369 RT Gas LPG Models ANSI CSA 6 16 ...

Page 176: ...31 BN29 BN32 BN23 LABEL DESCRIPTION BN23 AUXILIARY PLATFORM DOWN ENABLE BUTTON BN29 HIGH RPM BUTTON BN30 ENGINE START BUTTON BN31 ENGINE CHOKE BUTTON BN32 PROPANE SELECT BUTTON BN33 FUNCTION ENABLE BUTTON BN34 PLATFORM UP BUTTON BN35 PLATFORM DOWN BUTTON BN91 AUXILIARY PLATFORM DOWN BUTTON CB2 CONTROLS ENGINE CIRCUIT BREAKER 20A CB7 HIGH IDLE CIRCUIT BREAKER 15A CR1 ENGINE START RELAY CR2 IGNITION...

Page 177: ...RD BK BL GY JC10 BN6 BN5 BN7 BN3 BN14 BN2 BN4 BN9 JC10 JC4 P2 BN20 LABEL DESCRIPTION BN2 ENGINE START BUTTON BN3 ENGINE CHOKE BUTTON BN4 HIGH RPM BUTTON BN5 HORN BUTTON BN6 DRIVE SPEED BUTTON BN7 GENERATOR BUTTON OPTION BN9 PLATFORM UP DOWN ENABLE BUTTON BN14 PROPANE SELECT BUTTON BN20 AUTO LEVEL ENABLE BUTTON OPTION H1 ALARM JC4 DRIVE STEER CONTROLLER JC10 PLATFORM UP DOWN OUTRIGGER UP DOWN SWITC...

Page 178: ...November2014 Section 6 Schematics 6 18 6 17 Platform Control Box Layout GS 2669 RT and GS 3369 RT Gas LPG Models ANSI CSA ...

Page 179: ...Section 6 Schematics November2014 6 19 Electrical Schematic GS 2669 RT and GS 3369 RT Diesel Models ANSI CSA 6 20 ...

Page 180: ...0 86 CR4 87 85 87A J2 C1 J1 B1 J2 C11 FB1 FLASHING BEACON OPTION Y29 GENERATOR OPTION PR2 STARTER RELAY D1 ALTERNATOR G6 ENGINE HOURMETER J2 A2 J1 B3 CR1 CR5 86 30 87A 87 85 30 86 87A 85 87 30 86 87 85 87A 30 86 87A 87 85 30 86 87A 85 87 Y9 PROPORTIONAL FLOW CONTROL J1 A12 J2 A3 86 30 87A 87 85 J2 A4 J2 A5 CR71 CR62 CR2 J1 A6 J1 A4 J1 A5 Y6 DRIVE FORWARD Y5 DRIVE REVERSE Y27 2 SPEED COIL Y98 HI SP...

Page 181: ... HO NO HC NC HO NO HC J1 C12 J2 B5 R2 1k W R3 620W NO HC NC HO NC HO NO HC 30 86 87 85 87A J1 B8 CR10 CR9 JC4 JC10 P2 LS14 NO NO NO NO J1 B7 Y33 L R OUTRIGGER Y35 L F OUTRIGGER J1 B9 Y34 R R OUTRIGGER J1 B6 Y36 R F OUTRIGGER J1 C5 J1 C3 J1 C6 J1 C4 LS12 LS13 LS15 Y39 OUTRIGGER EXTEND Y40 OUTRIGGER RETRACT J1 B5 J1 B10 J1 B11 PLATFORM GND FROM PLAT J2 A11 J2 A12 J2 A10 DATA LINK DATA LINK 2 BL 1 WH...

Page 182: ...November2014 Section 6 Schematics 6 22 6 21 Electrical Schematic GS 2669 RT and GS 3369 RT Diesel Models ANSI CSA ...

Page 183: ...Section 6 Schematics November2014 6 23 Ground Control Box Layout GS 2669 RT and GS 3369 RT Diesel Models ANSI CSA 6 24 ...

Page 184: ...H IDLE CIRCUIT BREAKER 15A CR1 ENGINE START RELAY CR2 IGNITION RELAY CR4 HIGH IDLE RELAY CR5 HORN RELAY CR9 OSCILLATE FLOAT ENABLE RELAY CR10 OSCILLATE FLOAT DISABLE RELAY CR15 ENGINE GLOW PLUG RELAY CR17 OIL COOLER RELAY OPTION CR62 EMERGENCY STOP CONTROL RELAY CR71 EMERGENCY STOP POWER RELAY CR72 AUXILIARY PLATFORM DOWN RELAY G6 HOUR METER H5 ALARM KS1 KEY SWITCH P1 EMERGENCY STOP BUTTON U5 ECU ...

Page 185: ... RD RD BK BL GY JC10 BN6 BN5 BN7 BN3 BN14 BN2 BN4 BN9 JC10 JC4 P2 BN20 LABEL DESCRIPTION BN2 ENGINE START BUTTON BN3 ENGINE GLOW PLUG BUTTON BN4 HIGH RPM BUTTON BN5 HORN BUTTON BN6 DRIVE SPEED BUTTON BN7 GENERATOR BUTTON OPTION BN9 PLATFORM UP DOWN ENABLE BUTTON BN14 NOT USED BN20 AUTO LEVEL ENABLE BUTTON OPTION H1 ALARM JC4 DRIVE STEER CONTROLLER JC10 PLATFORM UP DOWN OUTRIGGER UP DOWN SWITCH P2 ...

Page 186: ...November2014 Section 6 Schematics 6 26 6 25 Platform Control Box Layout GS 2669 RT and GS 3369 RT Diesel Models ANSI CSA ...

Page 187: ...Section 6 Schematics November2014 6 27 6 28 Electrical Schematic GS 2669 RT and GS 3369 RT Gas LPG Models AS ...

Page 188: ...BN23 BN91 J2 B9 J2 C4 30 86 CR4 87 85 87A J2 C1 J1 B1 Y29 GENERATOR OPTION PR2 STARTER RELAY D1 ALTERNATOR G6 ENGINE HOURMETER J2 A2 J1 B3 CR1 CR5 86 30 87A 87 85 30 86 87A 85 87 30 86 87 85 87A 30 86 87A 85 87 Y9 PROPORTIONAL FLOW CONTROL J1 A12 J2 A3 86 30 87A 87 85 J2 A4 J2 A5 CR71 CR62 J1 A6 J1 A4 J1 A5 Y6 DRIVE FORWARD Y5 DRIVE REVERSE Y27 2 SPEED COIL Y98 HI SPEED BYPASS J2 B7 H2 HORN KS1 CR...

Page 189: ...O NO HC NC HO NO HC J1 C12 J2 B5 R2 1k W R3 620W NO HC NC HO NC HO NO HC 30 86 87 85 87A J1 B8 CR10 CR9 JC4 JC10 P2 LS14 NO NO NO NO J1 B7 Y33 L R OUTRIGGER Y35 L F OUTRIGGER J1 B9 Y34 R R OUTRIGGER J1 B6 Y36 R F OUTRIGGER J1 C5 J1 C3 J1 C6 J1 C4 LS12 LS13 LS15 Y39 OUTRIGGER EXTEND Y40 OUTRIGGER RETRACT J1 B5 J1 B10 J1 B11 PLATFORM GND FROM PLAT J2 A11 J2 A12 J2 A10 DATA LINK DATA LINK 2 BL 1 WH 3...

Page 190: ...November2014 Section 6 Schematics 6 30 6 29 Electrical Schematic GS 2669 RT and GS 3369 RT Gas LPG Models AS ...

Page 191: ...Section 6 Schematics November2014 6 31 Ground Control Box Layout GS 2669 RT and GS 3369 RT Gas LPG Models AS 6 32 ...

Page 192: ...NE START RELAY CR2 IGNITION RELAY CR4 HIGH IDLE RELAY CR5 HORN RELAY CR9 OSCILLATE FLOAT ENABLE RELAY CR10 OSCILLATE FLOAT DISABLE RELAY CR17 OIL COOLER RELAY OPTION CR55 1 PLATFORM OVERLOAD RELAY CR62 EMERGENCY STOP CONTROL RELAY CR71 EMERGENCY STOP POWER RELAY CR72 AUXILIARY PLATFORM DOWN RELAY CR73 ENGINE CHOKE RELAY CR74 2 PLATFORM OVERLOAD RELAY G6 HOUR METER H5 ALARM KS1 KEY SWITCH P1 EMERGE...

Page 193: ...VE SPEED BUTTON BN7 GENERATOR BUTTON OPTION BN9 PLATFORM UP DOWN ENABLE BUTTON BN14 PROPANE SELECT BUTTON BN20 AUTO LEVEL ENABLE BUTTON OPTION H1 ALARM JC4 DRIVE STEER CONTROLLER JC10 PLATFORM UP DOWN OUTRIGGER UP DOWN SWITCH P2 EMERGENCY STOP BUTTON SW5 FUNCTION ENABLE SWITCH SW6 STEER RIGHT LEFT SWITCH U3 PLATFORM CONTROLS CIRCUIT BOARD J5 J3 J2 J1 5 1 4 1 1 14 1 6 1 2 NC P2 H1 JC4 U3 OR WH WH B...

Page 194: ...November2014 Section 6 Schematics 6 34 6 33 Platform Control Box Layout GS 2669 RT and GS 3369 RT Gas LPG Models AS ...

Page 195: ...Section 6 Schematics November2014 6 35 Electrical Schematic GS 2669 RT and GS 3369 RT Diesel Models AS 6 36 ...

Page 196: ...AY D1 ALTERNATOR G6 ENGINE HOURMETER J2 A2 J1 B3 CR1 CR5 86 30 87A 87 85 30 86 87A 85 87 30 86 87 85 87A 30 86 87A 87 85 30 86 87A 85 87 Y9 PROPORTIONAL FLOW CONTROL J1 A12 J2 A3 86 30 87A 87 85 J2 A4 J2 A5 CR71 CR62 CR54 J1 A6 J1 A4 J1 A5 Y6 DRIVE FORWARD Y5 DRIVE REVERSE Y27 2 SPEED COIL Y98 HI SPEED BYPASS J2 B7 H2 HORN KS1 CR72 J2 B11 J2 B8 J2 C12 B1 12 VOLT BATTERY M3 STARTER MOTOR P1 CB2 20A...

Page 197: ... NO HC NC HO NO HC J1 C12 J2 B5 R2 1k W R3 620W NO HC NC HO NC HO NO HC 30 86 87 85 87A J1 B8 CR10 CR9 JC4 JC10 P2 LS14 NO NO NO NO J1 B7 Y33 L R OUTRIGGER Y35 L F OUTRIGGER J1 B9 Y34 R R OUTRIGGER J1 B6 Y36 R F OUTRIGGER J1 C5 J1 C3 J1 C6 J1 C4 LS12 LS13 LS15 Y39 OUTRIGGER EXTEND Y40 OUTRIGGER RETRACT J1 B5 J1 B10 J1 B11 PLATFORM GND FROM PLAT J2 A11 J2 A12 J2 A10 DATA LINK DATA LINK 2 BL 1 WH 3 ...

Page 198: ...November2014 Section 6 Schematics 6 38 6 37 Electrical Schematic GS 2669 RT and GS 3369 RT Diesel Models AS ...

Page 199: ...Section 6 Schematics November2014 6 39 6 40 Ground Control Box Layout GS 2669 RT and GS 3369 RT Diesel Models AS ...

Page 200: ...T RELAY CR2 IGNITION RELAY CR4 HIGH IDLE RELAY CR5 HORN RELAY CR9 OSCILLATE FLOAT ENABLE RELAY CR10 OSCILLATE FLOAT DISABLE RELAY CR15 ENGINE GLOW PLUG RELAY CR17 OIL COOLER RELAY OPTION CR55 1 PLATFORM OVERLOAD RELAY CR62 EMERGENCY STOP CONTROL RELAY CR71 EMERGENCY STOP POWER RELAY CR72 AUXILIARY PLATFORM DOWN RELAY CR74 2 PLATFORM OVERLOAD RELAY G6 HOUR METER H5 ALARM KS1 KEY SWITCH P1 EMERGENCY...

Page 201: ... RD BK BL GY JC10 BN6 BN5 BN7 BN3 BN14 BN2 BN4 BN9 JC10 JC4 P2 BN20 LABEL DESCRIPTION BN2 ENGINE START BUTTON BN3 ENGINE GLOW PLUG BUTTON BN4 HIGH RPM BUTTON BN5 HORN BUTTON BN6 DRIVE SPEED BUTTON BN7 GENERATOR BUTTON OPTION BN9 PLATFORM UP DOWN ENABLE BUTTON BN14 NOT USED BN20 AUTO LEVEL ENABLE BUTTON OPTION H1 ALARM JC4 DRIVE STEER CONTROLLER JC10 PLATFORM UP DOWN OUTRIGGER UP DOWN SWITCH P2 EME...

Page 202: ...November2014 Section 6 Schematics 6 42 6 41 Platform Control Box Layout GS 2669 RT and GS 3369 RT Diesel Models AS ...

Page 203: ...Section 6 Schematics November2014 6 43 Electrical Schematic GS 2669 RT and GS 3369 RT Gas LPG Models CE 6 44 ...

Page 204: ...BN23 AUX ENABLE BN91 AUX DOWN J2 B9 J2 C4 30 86 CR4 87 85 87A J2 C1 J1 B1 Y29 GENERATOR OPTION PR2 STARTER RELAY D1 ALTERNATOR G6 ENGINE HOURMETER J2 A2 J1 B3 CR1 CR5 86 30 87A 87 85 30 86 87A 85 87 30 86 87 85 87A 30 86 87A 87 85 30 86 87A 85 87 Y9 PROPORTIONAL FLOW CONTROL J1 A12 J2 A3 86 30 87A 87 85 J2 A4 J2 A5 CR71 CR62 CR2 J1 A6 J1 A4 J1 A5 Y6 DRIVE FORWARD Y5 DRIVE REVERSE Y27 2 SPEED COIL ...

Page 205: ...O NO HC NC HO NO HC J1 C12 J2 B5 R2 1k W R3 620W NO HC NC HO NC HO NO HC 30 86 87 85 87A J1 B8 CR10 CR9 JC4 JC10 P2 LS14 NO NO NO NO J1 B7 Y33 L R OUTRIGGER Y35 L F OUTRIGGER J1 B9 Y34 R R OUTRIGGER J1 B6 Y36 R F OUTRIGGER J1 C5 J1 C3 J1 C6 J1 C4 LS12 LS13 LS15 Y39 OUTRIGGER EXTEND Y40 OUTRIGGER RETRACT J1 B5 J1 B10 J1 B11 PLATFORM GND FROM PLAT J2 A11 J2 A12 J2 A10 DATA LINK DATA LINK 2 BL 1 WH 3...

Page 206: ...November2014 Section 6 Schematics 6 46 Electrical Schematic GS 2669 RT and GS 3369 RT Gas LPG Models CE 6 45 ...

Page 207: ...Section 6 Schematics November2014 6 47 6 48 Ground Control Box Layout GS 2669 RT and GS 3369 RT Gas LPG Models CE ...

Page 208: ...9 RT Gas LPG Models CE G6 P1 CB7 CB2 J1 J2 U5 KS1 H5 CR72 CR9 CR4 CR10 CR73 CR2 CR17 CR5 CR74 CR1 CR55 CR71 CR62 1 2 3 4 5 6 7 8 9 10 11 12 13 14 15 16 17 18 19 20 21 22 23 24 25 26 27 28 29 30 31 32 33 34 35 36 37 38 39 40 41 42 43 44 45 46 47 48 49 50 51 52 53 54 55 56 57 58 D C B A J5 J6 J7 J8 J9 J10 J11 J12 C1 CB7 CB2 G6 P1 KS1 BN91 BN35 BN33 BN34 BN30 BN31 BN29 BN32 BN23 ...

Page 209: ...29753 GS 2669 RT GS 3369 RT GS 4069 RT 6 49 Platform Control Box Layout GS 2669 RT and GS 3369 RT Gas LPG Models CE J5 J3 J2 J1 5 1 4 1 1 14 1 6 1 2 NC P2 H1 JC4 U3 OR WH WH BL PP GY BR YL WH RD BK BL OR RD BK BK YL BL RD RD BK BL GY JC10 BN6 BN5 BN7 BN3 BN14 BN2 BN4 BN9 JC10 JC4 P2 BN20 ...

Page 210: ...November2014 Section 6 Schematics 6 50 Platform Control Box Layout GS 2669 RT and GS 3369 RT Gas LPG Models CE 6 49 ...

Page 211: ...Section 6 Schematics November2014 6 51 6 52 Electrical Schematic GS 2669 RT and GS 3369 RT Diesel Models CE ...

Page 212: ...TARTER RELAY D1 ALTERNATOR G6 ENGINE HOURMETER J2 A2 J1 B3 CR1 CR5 86 30 87A 87 85 30 86 87A 85 87 30 86 87 85 87A 30 86 87A 87 85 30 86 87A 85 87 Y9 PROPORTIONAL FLOW CONTROL J1 A12 J2 A3 86 30 87A 87 85 J2 A4 J2 A5 CR71 CR62 CR2 J1 A6 J1 A4 J1 A5 Y6 DRIVE FORWARD Y5 DRIVE REVERSE Y27 2 SPEED COIL Y98 HI SPEED BYPASS J2 B7 H2 HORN KS1 CR72 J2 B11 J2 B8 J2 C12 B1 12 VOLT BATTERY M3 STARTER MOTOR P...

Page 213: ... NO HC NC HO NO HC J1 C12 J2 B5 R2 1k W R3 620W NO HC NC HO NC HO NO HC 30 86 87 85 87A J1 B8 CR10 CR9 JC4 JC10 P2 LS14 NO NO NO NO J1 B7 Y33 L R OUTRIGGER Y35 L F OUTRIGGER J1 B9 Y34 R R OUTRIGGER J1 B6 Y36 R F OUTRIGGER J1 C5 J1 C3 J1 C6 J1 C4 LS12 LS13 LS15 Y39 OUTRIGGER EXTEND Y40 OUTRIGGER RETRACT J1 B5 J1 B10 J1 B11 PLATFORM GND FROM PLAT J2 A11 J2 A12 J2 A10 DATA LINK DATA LINK 2 BL 1 WH 3 ...

Page 214: ...November2014 Section 6 Schematics 6 54 Electrical Schematic GS 2669 RT and GS 3369 RT Diesel Models CE 6 53 ...

Page 215: ...Section 6 Schematics November2014 6 55 6 56 Ground Control Box Layout GS 2669 RT and GS 3369 RT Diesel Models CE ...

Page 216: ...69 RT Diesel Models CE G6 P1 CB7 CB2 J1 J2 U5 KS1 H5 CR72 CR9 CR4 CR10 CR15 CR2 CR17 CR5 CR74 CR1 CR55 CR71 CR62 C1 1 2 3 4 5 6 7 8 9 10 11 12 13 14 15 16 17 18 19 20 21 22 23 24 25 26 27 28 29 30 31 32 33 34 35 36 37 38 39 40 41 42 43 44 45 46 47 48 49 50 51 52 53 54 55 56 57 58 D C B A J5 J6 J7 J8 J9 J10 J11 J12 CB7 CB2 G6 P1 KS1 BN91 BN35 BN33 BN34 BN30 BN31 BN29 BN32 BN23 ...

Page 217: ...29753 GS 2669 RT GS 3369 RT GS 4069 RT 6 57 Platform Control Box Layout GS 2669 RT and GS 3369 RT Diesel Models CE J5 J3 J2 J1 5 1 4 1 1 14 1 6 1 2 NC P2 H1 JC4 U3 OR WH WH BL PP GY BR YL WH RD BK BL OR RD BK BK YL BL RD RD BK BL GY JC10 BN6 BN5 BN7 BN3 BN14 BN2 BN4 BN9 JC10 JC4 P2 BN20 ...

Page 218: ...November2014 Section 6 Schematics 6 58 Platform Control Box Layout GS 2669 RT and GS 3369 RT Diesel Models CE 6 57 ...

Page 219: ...Section 6 Schematics November2014 6 59 6 60 Electrical Schematic GS 4069 RT Gas LPG Models ANSI CSA ...

Page 220: ...AUX DOWN J2 B9 J2 C4 30 86 THROTTLE RELAY CR4 87 85 87A J2 C1 J1 B1 Y29 GENERATOR OPTION PR2 STARTER RELAY D1 ALTERNATOR G6 ENGINE HOURMETER J2 A2 J1 B3 ENGINE START RELAY CR1 HORN RELAY CR5 86 30 87A 87 85 30 86 87A 85 87 30 86 87 85 87A 30 86 87A 87 85 30 86 87A 85 87 Y9 PROPORTIONAL FLOW CONTROL J1 A12 J2 A3 86 30 87A 87 85 J2 A4 J2 A5 PWR E STOP RELAY CR71 CTRL E STOP RELAY CR62 IGNITION RELAY...

Page 221: ...HC NC HO NO HC J1 C12 J2 B5 R2 1k W R3 620W NO HC NC HO NC HO NO HC 30 86 87 85 87A J1 B8 CR10 CR9 JC4 JC10 P2 LS14 NO NO NO NO J1 B7 Y33 L R OUTRIGGER Y35 L F OUTRIGGER J1 B9 Y34 R R OUTRIGGER J1 B6 Y36 R F OUTRIGGER J1 C5 J1 C3 J1 C6 J1 C4 LS12 LS13 LS15 Y39 OUTRIGGER EXTEND Y40 OUTRIGGER RETRACT J1 B5 J1 B10 J1 B11 PLATFORM GND FROM PLAT J2 A11 J2 A12 J2 A10 DATA LINK DATA LINK 2 BL 1 WH 3 RD 4...

Page 222: ...November2014 Section 6 Schematics 6 62 6 61 Electrical Schematic GS 4069 RT Gas LPG Models ANSI CSA ...

Page 223: ...Section 6 Schematics November2014 6 63 6 64 Ground Control Box Layout GS 4069 RT Gas LPG Models ANSI CSA ...

Page 224: ...BN32 BN23 LABEL DESCRIPTION BN23 AUXILIARY PLATFORM DOWN ENABLE BUTTON BN29 HIGH RPM BUTTON BN30 ENGINE START BUTTON BN31 ENGINE CHOKE BUTTON BN32 PROPANE SELECT BUTTON BN33 FUNCTION ENABLE BUTTON BN34 PLATFORM UP BUTTON BN35 PLATFORM DOWN BUTTON BN91 AUXILIARY PLATFORM DOWN BUTTON CB2 CONTROLS ENGINE CIRCUIT BREAKER 20A CB7 HIGH IDLE CIRCUIT BREAKER 15A CR1 ENGINE START RELAY CR2 IGNITION RELAY C...

Page 225: ... GY JC10 BN6 BN5 BN7 BN3 BN14 BN2 BN4 BN9 JC10 JC4 P2 BN20 LABEL DESCRIPTION BN2 ENGINE START BUTTON BN3 ENGINE CHOKE BUTTON BN4 HIGH RPM BUTTON BN5 HORN BUTTON BN6 DRIVE SPEED BUTTON BN7 GENERATOR BUTTON OPTION BN9 PLATFORM UP DOWN ENABLE BUTTON BN14 PROPANE SELECT BUTTON BN20 AUTO LEVEL ENABLE BUTTON OPTION H1 ALARM JC4 DRIVE STEER CONTROLLER JC10 PLATFORM UP DOWN OUTRIGGER UP DOWN SWITCH P2 EME...

Page 226: ...November2014 Section 6 Schematics 6 66 6 65 Platform Control Box Layout GS 4069 RT Gas LPG Models ANSI CSA ...

Page 227: ...Section 6 Schematics November2014 6 67 6 68 Electrical Schematic GS 4069 RT Diesel Models ANSI CSA ...

Page 228: ...PR2 STARTER RELAY D1 ALTERNATOR G6 ENGINE HOURMETER J2 A2 J1 B3 CR1 CR5 86 30 87A 87 85 30 86 87A 85 87 30 86 87 85 87A 30 86 87A 87 85 30 86 87A 85 87 Y9 PROPORTIONAL FLOW CONTROL J1 A12 J2 A3 86 30 87A 87 85 J2 A4 J2 A5 CR71 CR62 CR2 J1 A6 J1 A4 J1 A5 Y6 DRIVE FORWARD Y5 DRIVE REVERSE Y27 2 SPEED COIL Y98 HI SPEED BYPASS J2 B7 H2 HORN KS1 CR72 J2 B11 J2 B8 J2 C12 B1 12 VOLT BATTERY M3 STARTER MO...

Page 229: ...C NC HO NO HC J1 C12 J2 B5 R2 1k W R3 620W NO HC NC HO NC HO NO HC 30 86 87 85 87A J1 B8 CR10 CR9 JC4 JC10 P2 LS14 NO NO NO NO J1 B7 Y33 L R OUTRIGGER Y35 L F OUTRIGGER J1 B9 Y34 R R OUTRIGGER J1 B6 Y36 R F OUTRIGGER J1 C5 J1 C3 J1 C6 J1 C4 LS12 LS13 LS15 Y39 OUTRIGGER EXTEND Y40 OUTRIGGER RETRACT J1 B5 J1 B10 J1 B11 PLATFORM GND FROM PLAT J2 A11 J2 A12 J2 A10 DATA LINK DATA LINK 2 BL 1 WH 3 RD 4 ...

Page 230: ...November2014 Section 6 Schematics 6 70 6 69 Electrical Schematic GS 4069 RT Diesel Models ANSI CSA ...

Page 231: ...Section 6 Schematics November2014 6 71 6 72 Ground Control Box Layout GS 4069 RT Diesel Models ANSI CSA ...

Page 232: ...IRCUIT BREAKER 15A CR1 ENGINE START RELAY CR2 IGNITION RELAY CR4 HIGH IDLE RELAY CR5 HORN RELAY CR9 OSCILLATE FLOAT ENABLE RELAY CR10 OSCILLATE FLOAT DISABLE RELAY CR15 ENGINE GLOW PLUG RELAY CR17 OIL COOLER RELAY OPTION CR62 EMERGENCY STOP CONTROL RELAY CR71 EMERGENCY STOP POWER RELAY CR72 AUXILIARY PLATFORM DOWN RELAY G6 HOUR METER H5 ALARM KS1 KEY SWITCH P1 EMERGENCY STOP BUTTON U5 ECU G6 P1 CB...

Page 233: ...K BL GY JC10 BN6 BN5 BN7 BN3 BN14 BN2 BN4 BN9 JC10 JC4 P2 BN20 LABEL DESCRIPTION BN2 ENGINE START BUTTON BN3 ENGINE GLOW PLUG BUTTON BN4 HIGH RPM BUTTON BN5 HORN BUTTON BN6 DRIVE SPEED BUTTON BN7 GENERATOR BUTTON OPTION BN9 PLATFORM UP DOWN ENABLE BUTTON BN14 NOT USED BN20 AUTO LEVEL ENABLE BUTTON OPTION H1 ALARM JC4 DRIVE STEER CONTROLLER JC10 PLATFORM UP DOWN OUTRIGGER UP DOWN SWITCH P2 EMERGENC...

Page 234: ...November2014 Section 6 Schematics 6 74 6 73 Platform Control Box Layout GS 4069 RT Diesel Models ANSI CSA ...

Page 235: ...Section 6 Schematics November2014 6 75 6 76 Electrical Schematic GS 4069 RT Gas LPG Models AS ...

Page 236: ...5 87A J2 C1 J1 B1 Y29 GENERATOR OPTION PR2 STARTER RELAY D1 ALTERNATOR G6 ENGINE HOURMETER J2 A2 J1 B3 CR1 CR5 86 30 87A 87 85 30 86 87A 85 87 30 86 87 85 87A 30 86 87A 85 87 Y9 PROPORTIONAL FLOW CONTROL J1 A12 J2 A3 86 30 87A 87 85 J2 A4 J2 A5 CR71 CR62 J1 A6 J1 A4 J1 A5 Y6 DRIVE FORWARD Y5 DRIVE REVERSE Y27 2 SPEED COIL Y98 HI SPEED BYPASS J2 B7 H2 HORN KS1 CR72 J2 B11 J2 B8 J2 C12 B1 12 VOLT BA...

Page 237: ...NC HO NO HC J1 C12 J2 B5 R2 1k W R3 620W NO HC NC HO NC HO NO HC 30 86 87 85 87A J1 B8 CR10 CR9 JC4 JC10 P2 LS14 NO NO NO NO J1 B7 Y33 L R OUTRIGGER Y35 L F OUTRIGGER J1 B9 Y34 R R OUTRIGGER J1 B6 Y36 R F OUTRIGGER J1 C5 J1 C3 J1 C6 J1 C4 LS12 LS13 LS15 Y39 OUTRIGGER EXTEND Y40 OUTRIGGER RETRACT J1 B5 J1 B10 J1 B11 PLATFORM GND FROM PLAT J2 A11 J2 A12 J2 A10 DATA LINK DATA LINK 2 BL 1 WH 3 RD 4 BK...

Page 238: ...November2014 Section 6 Schematics 6 78 Electrical Schematic GS 4069 RT Gas LPG Models AS 6 77 ...

Page 239: ...Section 6 Schematics November2014 6 79 6 80 Ground Control Box Layout GS 4069 RT Gas LPG Models AS ...

Page 240: ...T RELAY CR2 IGNITION RELAY CR4 HIGH IDLE RELAY CR5 HORN RELAY CR9 OSCILLATE FLOAT ENABLE RELAY CR10 OSCILLATE FLOAT DISABLE RELAY CR17 OIL COOLER RELAY OPTION CR55 1 PLATFORM OVERLOAD RELAY CR62 EMERGENCY STOP CONTROL RELAY CR71 EMERGENCY STOP POWER RELAY CR72 AUXILIARY PLATFORM DOWN RELAY CR73 ENGINE CHOKE RELAY CR74 2 PLATFORM OVERLOAD RELAY G6 HOUR METER H5 ALARM KS1 KEY SWITCH P1 EMERGENCY STO...

Page 241: ... JC10 BN6 BN5 BN7 BN3 BN14 BN2 BN4 BN9 JC10 JC4 P2 BN20 LABEL DESCRIPTION BN2 ENGINE START BUTTON BN3 ENGINE CHOKE BUTTON BN4 HIGH RPM BUTTON BN5 HORN BUTTON BN6 DRIVE SPEED BUTTON BN7 GENERATOR BUTTON OPTION BN9 PLATFORM UP DOWN ENABLE BUTTON BN14 PROPANE SELECT BUTTON BN20 AUTO LEVEL ENABLE BUTTON OPTION H1 ALARM JC4 DRIVE STEER CONTROLLER JC10 PLATFORM UP DOWN OUTRIGGER UP DOWN SWITCH P2 EMERGE...

Page 242: ...November2014 Section 6 Schematics 6 82 Platform Control Box Layout GS 4069 RT Gas LPG Models AS 6 81 ...

Page 243: ...Section 6 Schematics November2014 6 83 Electrical Schematic GS 4069 RT Diesel Models AS 6 82 ...

Page 244: ... J2 A2 J1 B3 CR1 CR5 86 30 87A 87 85 30 86 87A 85 87 30 86 87 85 87A 30 86 87A 85 87 Y9 PROPORTIONAL FLOW CONTROL J1 A12 J2 A3 86 30 87A 87 85 J2 A4 J2 A5 CR71 CR62 J1 A6 J1 A4 J1 A5 Y6 DRIVE FORWARD Y5 DRIVE REVERSE Y27 2 SPEED COIL Y98 HI SPEED BYPASS J2 B7 H2 HORN KS1 CR72 J2 B11 J2 B8 J2 C12 B1 12 VOLT BATTERY M3 STARTER MOTOR P1 CB2 20A CHASSIS PLAT CB7 15A RD WH B1 PR2 Y1OA AUXILIARY PLATFRO...

Page 245: ...C HO NO HC J1 C12 J2 B5 R2 1k W R3 620W NO HC NC HO NC HO NO HC 30 86 87 85 87A J1 B8 CR10 CR9 JC4 JC10 P2 LS14 NO NO NO NO J1 B7 Y33 L R OUTRIGGER Y35 L F OUTRIGGER J1 B9 Y34 R R OUTRIGGER J1 B6 Y36 R F OUTRIGGER J1 C5 J1 C3 J1 C6 J1 C4 LS12 LS13 LS15 Y39 OUTRIGGER EXTEND Y40 OUTRIGGER RETRACT J1 B5 J1 B10 J1 B11 PLATFORM GND FROM PLAT J2 A11 J2 A12 J2 A10 DATA LINK DATA LINK 2 BL 1 WH 3 RD 4 BK ...

Page 246: ...November2014 Section 6 Schematics 6 86 Electrical Schematic GS 4069 RT Diesel Models AS 6 85 ...

Page 247: ...Section 6 Schematics November2014 6 87 6 88 Ground Control Box Layout GS 4069 RT Diesel Models AS ...

Page 248: ... CR2 IGNITION RELAY CR4 HIGH IDLE RELAY CR5 HORN RELAY CR9 OSCILLATE FLOAT ENABLE RELAY CR10 OSCILLATE FLOAT DISABLE RELAY CR15 ENGINE GLOW PLUG RELAY CR17 OIL COOLER RELAY OPTION CR55 1 PLATFORM OVERLOAD RELAY CR62 EMERGENCY STOP CONTROL RELAY CR71 EMERGENCY STOP POWER RELAY CR72 AUXILIARY PLATFORM DOWN RELAY CR74 2 PLATFORM OVERLOAD RELAY G6 HOUR METER H5 ALARM KS1 KEY SWITCH P1 EMERGENCY STOP B...

Page 249: ...L GY JC10 BN6 BN5 BN7 BN3 BN14 BN2 BN4 BN9 JC10 JC4 P2 BN20 LABEL DESCRIPTION BN2 ENGINE START BUTTON BN3 ENGINE GLOW PLUG BUTTON BN4 HIGH RPM BUTTON BN5 HORN BUTTON BN6 DRIVE SPEED BUTTON BN7 GENERATOR BUTTON OPTION BN9 PLATFORM UP DOWN ENABLE BUTTON BN14 NOT USED BN20 AUTO LEVEL ENABLE BUTTON OPTION H1 ALARM JC4 DRIVE STEER CONTROLLER JC10 PLATFORM UP DOWN OUTRIGGER UP DOWN SWITCH P2 EMERGENCY S...

Page 250: ...November2014 Section 6 Schematics 6 90 Platform Control Box Layout GS 4069 RT Diesel Models AS 6 89 ...

Page 251: ...Section 6 Schematics November2014 6 91 Electrical Schematic GS 4069 RT Gas LPG Models CE 6 92 ...

Page 252: ...6 CR4 87 85 87A J2 C1 J1 B1 Y29 GENERATOR OPTION PR2 STARTER RELAY D1 ALTERNATOR G6 ENGINE HOURMETER J2 A2 J1 B3 CR1 CR5 86 30 87A 87 85 30 86 87A 85 87 30 86 87 85 87A 30 86 87A 87 85 30 86 87A 85 87 Y9 PROPORTIONAL FLOW CONTROL J1 A12 J2 A3 86 30 87A 87 85 J2 A4 J2 A5 CR71 CR62 CR2 J1 A6 J1 A4 J1 A5 Y6 DRIVE FORWARD Y5 DRIVE REVERSE Y27 2 SPEED COIL Y98 HI SPEED BYPASS J2 B7 H2 HORN KS1 CR72 J2 ...

Page 253: ...NC HO NO HC J1 C12 J2 B5 R2 1k W R3 620W NO HC NC HO NC HO NO HC 30 86 87 85 87A J1 B8 CR10 CR9 JC4 JC10 P2 LS14 NO NO NO NO J1 B7 Y33 L R OUTRIGGER Y35 L F OUTRIGGER J1 B9 Y34 R R OUTRIGGER J1 B6 Y36 R F OUTRIGGER J1 C5 J1 C3 J1 C6 J1 C4 LS12 LS13 LS15 Y39 OUTRIGGER EXTEND Y40 OUTRIGGER RETRACT J1 B5 J1 B10 J1 B11 PLATFORM GND FROM PLAT J2 A11 J2 A12 J2 A10 DATA LINK DATA LINK 2 BL 1 WH 3 RD 4 BK...

Page 254: ...November2014 Section 6 Schematics 6 94 Electrical Schematic GS 4069 RT Gas LPG Models CE 6 93 ...

Page 255: ...Section 6 Schematics November2014 6 95 6 96 Ground Control Box Layout GS 4069 RT Gas LPG Models CE ...

Page 256: ...s LPG Models CE G6 P1 CB7 CB2 J1 J2 U5 KS1 H5 CR72 CR9 CR4 CR10 CR73 CR2 CR17 CR5 CR74 CR1 CR55 CR71 CR62 J5 1 2 3 4 5 6 7 8 9 10 11 12 13 14 15 16 17 18 19 20 21 22 23 24 25 26 27 28 29 30 31 32 33 34 35 36 37 38 39 40 41 42 43 44 45 46 47 48 49 50 51 52 53 54 55 56 57 58 D C B A J6 J7 J8 J9 J10 J11 J12 C1 CB7 CB2 G6 P1 KS1 BN91 BN35 BN33 BN34 BN30 BN31 BN29 BN32 BN23 ...

Page 257: ...artNo 229753 GS 2669 RT GS 3369 RT GS 4069 RT 6 97 Platform Control Box Layout GS 4069 RT Gas LPG Models CE J5 J3 J2 J1 5 1 4 1 1 14 1 6 1 2 NC P2 H1 JC4 U3 OR WH WH BL PP GY BR YL WH RD BK BL OR RD BK BK YL BL RD RD BK BL GY JC10 BN6 BN5 BN7 BN3 BN14 BN2 BN4 BN9 JC10 JC4 P2 BN20 ...

Page 258: ...November2014 Section 6 Schematics 6 98 Platform Control Box Layout GS 4069 RT Gas LPG Models CE 6 97 ...

Page 259: ...Section 6 Schematics November2014 6 99 6 100 Electrical Schematic GS 4069 RT Diesel Models CE ...

Page 260: ...E HOURMETER J2 A2 J1 B3 CR1 CR5 86 30 87A 87 85 30 86 87A 85 87 30 86 87 85 87A 30 86 87A 87 85 30 86 87A 85 87 Y9 PROPORTIONAL FLOW CONTROL J1 A12 J2 A3 86 30 87A 87 85 J2 A4 J2 A5 CR71 CR62 CR2 J1 A6 J1 A4 J1 A5 Y6 DRIVE FORWARD Y5 DRIVE REVERSE Y27 2 SPEED COIL Y98 HI SPEED BYPASS J2 B7 H2 HORN KS1 CR72 J2 B11 J2 B8 J2 C12 B1 12 VOLT BATTERY M3 STARTER MOTOR P1 CB2 20A CHASSIS PLAT CB7 15A RD W...

Page 261: ...NC HO NO HC J1 C12 J2 B5 R2 1k W R3 620W NO HC NC HO NC HO NO HC 30 86 87 85 87A J1 B8 CR10 CR9 JC4 JC10 P2 LS14 NO NO NO NO J1 B7 Y33 L R OUTRIGGER Y35 L F OUTRIGGER J1 B9 Y34 R R OUTRIGGER J1 B6 Y36 R F OUTRIGGER J1 C5 J1 C3 J1 C6 J1 C4 LS12 LS13 LS15 Y39 OUTRIGGER EXTEND Y40 OUTRIGGER RETRACT J1 B5 J1 B10 J1 B11 PLATFORM GND FROM PLAT J2 A11 J2 A12 J2 A10 DATA LINK DATA LINK 2 BL 1 WH 3 RD 4 BK...

Page 262: ...November2014 Section 6 Schematics 6 102 Electrical Schematic GS 4069 RT Diesel Models CE 6 101 ...

Page 263: ...Section 6 Schematics November2014 6 103 6 104 Ground Control Box Layout GS 4069 RT Diesel Models CE ...

Page 264: ...iesel Models CE G6 P1 CB7 CB2 J1 J2 U5 KS1 H5 CR72 CR9 CR4 CR10 CR15 CR2 CR17 CR5 CR74 CR1 CR55 CR71 CR62 C1 1 2 3 4 5 6 7 8 9 10 11 12 13 14 15 16 17 18 19 20 21 22 23 24 25 26 27 28 29 30 31 32 33 34 35 36 37 38 39 40 41 42 43 44 45 46 47 48 49 50 51 52 53 54 55 56 57 58 D C B A J5 J6 J7 J8 J9 J10 J11 J12 CB7 CB2 G6 P1 KS1 BN91 BN35 BN33 BN34 BN30 BN31 BN29 BN32 BN23 ...

Page 265: ...artNo 229753 GS 2669 RT GS 3369 RT GS 4069 RT 6 105 Platform Control Box Layout GS 4069 RT Diesel Models CE J5 J3 J2 J1 5 1 4 1 1 14 1 6 1 2 NC P2 H1 JC4 U3 OR WH WH BL PP GY BR YL WH RD BK BL OR RD BK BK YL BL RD RD BK BL GY JC10 BN6 BN5 BN7 BN3 BN14 BN2 BN4 BN9 JC10 JC4 P2 BN20 ...

Page 266: ...November2014 Section 6 Schematics 6 106 Platform Control Box Layout GS 4069 RT Diesel Models CE 6 105 ...

Page 267: ...Section 6 Schematics November2014 6 107 Hydraulic Schematic GS 2669 RT and GS 3369 RT 6 108 ...

Page 268: ...850 psi 59 bar Y94 Y93 3500 psi 241 bar Y4 Y3 P OUT Y29 HIGH PRESSURE FILTER LOW PRESSURE FILTER TP2 T IN Y39 Y40 T OR BA LS 250 psi 17 bar Y97 Y96 T OUT TP3 P IN Y98 TP4 RIGHT REAR 54 1 53 cu in 8 8 25 cc 48 1 3500 psi 241 bar 4 5 1 76 24 50 50 Y5 0 060 in 1 5 mm 0 035 in 0 89 mm BRK LEFT FRONT 22 9 CU IN 375 cc M8 M1 M2 M4 M3 M7 M6 M5 B B B B A A A A 0 030 in 0 76 mm Y27 Y2 2SPD 2500 psi 172 bar...

Page 269: ...n Y8 Y95 1 gpm 4 L min Y9 2 gpm 7 6 L min 850 psi 59 bar Y94 Y93 3500 psi 241 bar Y4 Y3 P OUT Y29 HIGH PRESSURE FILTER LOW PRESSURE FILTER TP2 T IN Y39 Y40 T OR BA LS 250 psi 17 bar Y97 Y96 T OUT TP3 P IN Y98 TP4 3500 psi 241 bar 4 5 1 76 24 50 50 Y5 0 060 in 1 5 mm 0 035 in 0 89 mm BRK M8 M1 M2 M4 M3 M7 M6 M5 B B B B A A A A 0 030 in 0 76 mm Y27 Y2 2SPD 2500 psi 172 bar RETRACT LOWER LIFT CYLINDE...

Page 270: ...November2014 Section 6 Schematics 6 110 Hydraulic Schematic GS 4069 RT 6 109 ...

Page 271: ... 5600 Fax 55 22 4082 5630 Genie Holland Phone 31 183 581 102 Fax 31 183 581 566 Genie Scandinavia Phone 46 31 57 51 00 Fax 46 31 57 51 04 Genie France Phone 33 2 37 26 09 99 Fax 33 2 37 26 09 98 Genie Iberica Phone 34 93 572 5090 Fax 34 93 572 5091 Genie Germany Phone 0800 180 9017 Phone 49 4221 491 810 Fax 49 4221 491 820 Genie U K Phone 44 1476 584333 Fax 44 1476 584334 Genie Mexico City Phone 5...

Reviews:

Related manuals for GS-2669 RT