background image

GK330     15

Changing the accompaniment Split Point

If you want to increase or decrease the keyboard area dedicated to the Style chords,
you can change the Split Point setting to any note of the keyboard and memorize the
setting to a Performance.  The factory setting corresponds to note F#3.

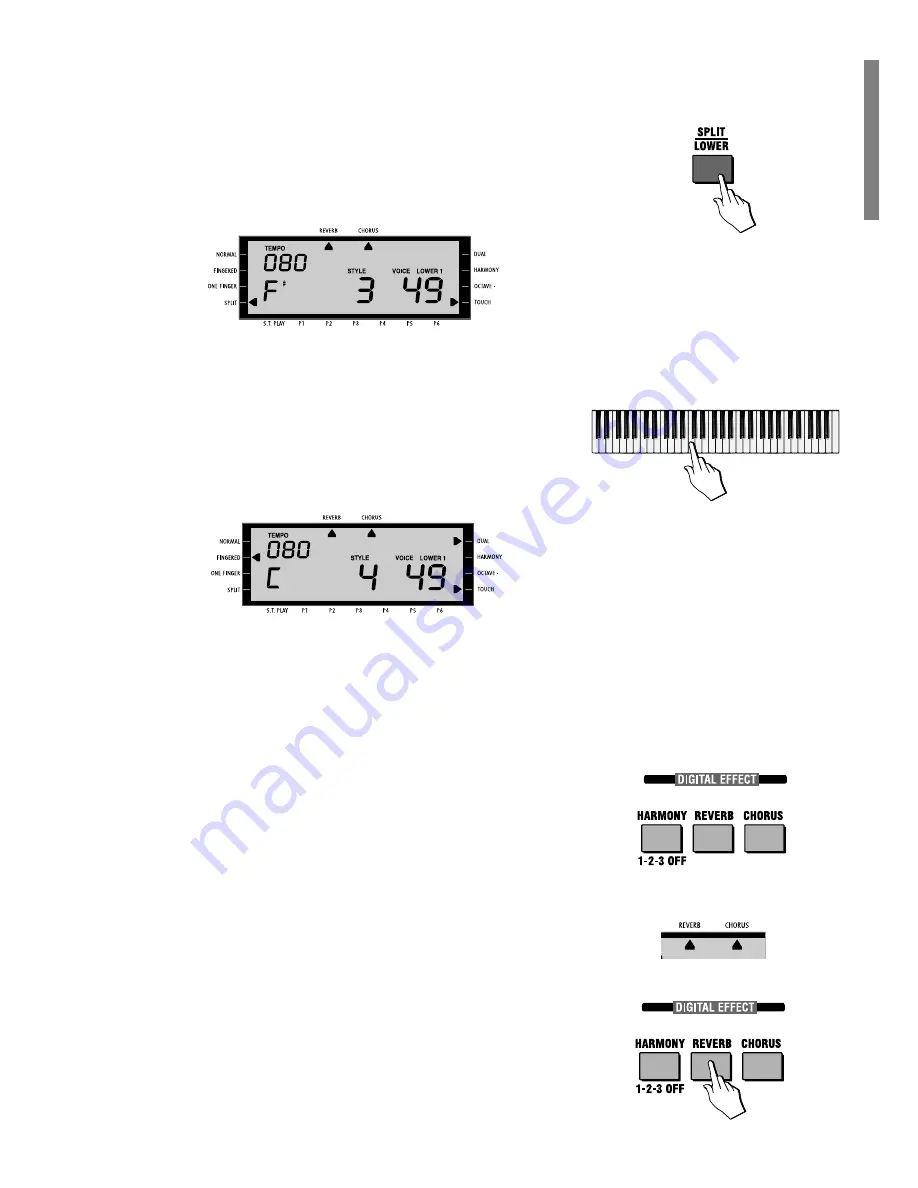
1. Press and hold the [SPLIT/LOWER] button.

The display will show the current Split Point setting expressed as a note of the
keyboard, together with the number of the Voice assigned to the LOWER sec-
tion.   In this example, the current Split Point is shown as note F#3.

(If you release the [SPLIT/LOWER] button, the display will return to the previous
situation.

2. While still holding down the [SPLIT/LOWER] button, press a key corresponding

to the new Split point.

(If you use the [+]/[–] buttons in this situation, you will change the voice of the
Lower section).

The new Split Point corresponding to the key you press will be shown in the
display.  For example, if you press note C4, the display will show the letter C on
the extreme left and the number 4 at the center.


3. Release the [SPLIT/LOWER] button to return to the previous display.

The new Split Point can be memorized to a Performance using the Store Per-
formance procedure, explained further ahead in the owner’s manual.

Digital Effects

The GK330 contains a Digital multi-effects processor which adds realism to your
playing.
The Digtal Signal Processor (DSP) consists of two units (REVERB and CHORUS)
which process the Performances with Reverb and/or Chorus effects.  Each unit has
an independent effect send control (level) which allows you to regulate the amount
of the effect for the current Performance.
The buttons which control the DSPs are the REVERB and CHORUS button in the
DIGITAL EFFECT section.

The Reverb and Chorus indicators

When the REVERB and/or CHORUS display indicators are on, all the voices of the
current Performance will play with their programmed effects.
When one or both the corresponding display indicators are off, the sounds will play
“dry” (without effects).

Selecting the effect types and Level

1. Hold down the [REVERB] or [CHORUS] button to gain access to the respective

DSP.   In the example, hold down the REVERB button to select a Reverb type.

Note:

The Split Point can be different for each Per-

formance, and the settings remain memorized even
after turning the instrument off.

Summary of Contents for GK 330

Page 1: ...Owner s manual ENGLISH ...

Page 2: ...part or in whole without prior written consent from Generalmusic S p A Generalmusic reserves the right to apply any aesthetic design or function modifications it considers necessary to any of its products without prior notice Generalmusic declines all liability for damage to property or persons resulting from improper use of the instrument Copyright Generalmusic 2000 All rights reserved The keyboa...

Page 3: ...ce play two layered voices 4 Keyboard percussion 4 Split keyboard 5 To change the voice of the Lower keyboard 5 Play in Split mode with a Dual option on the Upper keyboard 5 To cancel Split mode 5 The Performances 6 Selecting the Performances 6 Balancing the Lower and Upper sections 6 Muting the sections 7 Instant Piano Voice 7 Add Pitch Bend to your playing 7 Play with Effects or bypass them 8 To...

Page 4: ...g the Style tracks 14 Using the Single Touch Play settings in Style mode 14 Selecting the S T Play settings 14 Changing the accompaniment Split Point 15 Digital Effects 15 The Reverb and Chorus indicators 15 Selecting the effect types and Level 15 The Performance buttons and Store Performance 16 How to memorize a Performance 16 Panel Reset Restore Performance 17 The Sequencer 17 Listen to the play...

Page 5: ...op and 3 recordable tracks Accomp Melody 1 Melody 2 MIDI compatibility Power supply This keyboard can be powered by current from a standard household wall outlet using the specified AC adaptor or by batteries Using the AC adaptor Always ensure that the instrument is turned OFF when connecting or disconnecting the power adaptor Applying power while the power switch in depressed may dam age the comp...

Page 6: ...K330 plug a jack into the PHONES jack The MIDI IN MIDI OUT and MIDI THRU ports The GK330 is fitted with a standard MIDI interface consisting of In Out and Thru ports for MIDI connections The MIDI IN port receives MIDI data from an external MIDI device The MIDI OUT port transmits MIDI data to an external MIDI device The MIDI THRU port retransmits the same MIDI data received at the MIDI IN port to a...

Page 7: ...splay Selecting playing Voices The GK330 has 147 PCM voices including 7 percussion kits that you can select and play on the keyboard After turning on the GK330 sets to NORMAL VOICE mode with the display showing a black arrow pointing to the NORMAL mode in the top left hand corner of the display and the VOICE 1 message at the center In VOICE mode you can select and play voices Play a single Voice I...

Page 8: ...ano voice 01 together with Strings 49 In DUAL mode whatever voice selection you make will always be assigned to the second voice To return to NORMAL single voice play press the DUAL button again Keyboard percussion To play percussive instruments on the keyboard select one of the 7 available Drum Kits from the DRUMKIT group The DrumKits are recalled using exactly the same method used to recall a Vo...

Page 9: ... SPLIT LOWER button and make your selection by entering the digits of the voice on the numeric keypad or by using the and buttons For example with the SPLIT LOWER button held down press the button to select voice 50 Slow Strings for the Lower section It is possible to modify the Split point shown in the display and memorize the new setting to a Performance See the section entitled Changing the acc...

Page 10: ...ngered or One Finger to enable the Styles You will also see a change of Style number For more information about how to recall Styles by selecting the Performances refer to the section entitled The Styles on page 9 2 Repeat the selections for all the other Performance buttons observe the changes in the display and play on the keyboard to listen to the change of voices Balancing the Lower and Upper ...

Page 11: ...ime Instant Piano Voice Regardless of the current situation you can recall the Piano Voice instantly by pressing the PIANO button Pressing this button returns the keyboard to NORMAL single voice play with the PIANO voice active across the entire keyboard Press the PIANO button again to return to the previously selected situation Add Pitch Bend to your playing While you play you can add Pitch Bend ...

Page 12: ...fects the keyboard globally The GK330 keyboard is Velocity Sensitive in other words the harder you play on the keys the louder the sound becomes as occurs in an acoustic piano If you prefer to play on the keyboard without TOUCH RESPONSE you can disable the function by pressing the TOUCH button The small black arrow pointing to the Touch indicator will turn off Press the TOUCH button again to resto...

Page 13: ...the lower part of the keyboard below the split point Selecting Style Mode To select the Styles you must set the GK330 to STYLE mode 1 Press the STYLE button At the center of the display the message STYLE is shown to show that the instrument is ready to accept a STYLE selection To enable the Style auto accompaniments you must select one of the two chord recognition modes ONE FINGER or FINGERED 2 Pr...

Page 14: ...n automatic accompaniment will start to play generated by the Style sections Drums Bass and Accomp As you change chord from Major to minor or sev enth etc you will note a change of style pattern Each time you change key for example from C to F the Style pattern will transpose automatically The symbols of the recognized chords are displayed in the left hand corner For example if you play the chord ...

Page 15: ...inually until released Restoring the memorized Tempo To restore the Style s memorized Tempo press both ends of the TEMPO button at the same time About the Chord Recognition Modes The GK330 allows you to choose between two different Chord recognition modes FINGERED and ONE FINGER The chords that you play Fingered or One Finger type must be played on the lower part of the keyboard dedicated to the A...

Page 16: ... with an Intro pattern Before starting the Style press the INTRO button to place the keyboard on intro duction start stand by The LED of the current Style pattern Fill1 Normal or Fill2 Var starts to flash to indicate that the INTRO has been preset Now press the START STOP button and play a note or chord on the lower part of the keyboard The Style starts with an introductory pattern then proceeds w...

Page 17: ...mony type O3 play the same chord and single note once again Now you will hear two notes at octave intervals for every single note played 6 Pressing the HARMONY button again turns the function off Balancing the Style accompaniment tracks with the Mixer When playing with Styles you can adjust the volume of one section with respect to the others using the MIXER Volume controls You will be able to bal...

Page 18: ...les with the SINGLE TOUCH PLAY button on each Style you select recalls a panel configuration voices and volume settings for the accom paniment sections Drums Bass Accomp as well as for the Upper and Lower sec tions The S T PLAY settings are recalled using the first four buttons of the PERFORM ANCE section P1 P4 The GK330 provides a total of 96 x 4 384 different panel configurations for each Style ...

Page 19: ...WER button to return to the previous display The new Split Point can be memorized to a Performance using the Store Per formance procedure explained further ahead in the owner s manual Digital Effects The GK330 contains a Digital multi effects processor which adds realism to your playing The Digtal Signal Processor DSP consists of two units REVERB and CHORUS which process the Performances with Reve...

Page 20: ...splay will return to normal after about 2 seconds You can save the selected effect types and levels to the Performance using the STORE PERFORMANCE procedure explained afterwards Note Under the RECOMMENDED list above the display you will find some suggested Reverb Chorus settings type and level to obtain some interesting overall sound effects The Performance buttons and Store Performance You have s...

Page 21: ...nce settings is by means of the PANEL RESET operation This operation cancels all user pro grammed settings Turn the instrument off then while holding down both ends of the Tempo but ton turn the instrument on again Now release the Tempo buttons All the user programmed settings will be cancelled and the factory settings will be restored You will note that the display will return to the power up set...

Page 22: ...playback of a recorded Song 8 Press the PLAY STOP button to listen to the playback of your recording While the recorded sequence is playing you can play along using any voice Simply select the one you want and play Before starting you can deactivate one or more recorded tracks For example if you have recorded the Accomp and Melody 1 tracks you can deactivate the Melody 1 track to playback the Acco...

Page 23: ... of the beat The Metronome is useful to practice keeping time or when you have to practice a study piece To stop the Metronome tick press the START STOP button The Beat function The BEAT function allows you to set a time signature number of beats in a meas ure for the Metronome The factory setting corresponds to 4 beats for every meas ure If you press the BEAT button the display will show the fact...

Page 24: ...ly the display shows the normal pitch setting 00 Press the INC or DEC TRANSPOSE buttons repeatedly to raise or lower the pitch in semitone steps until you reach the value required The cancel the Transpose setting and restore normal pitch press both INC and DEC TRANSPOSE buttons at the same time Tune The TUNE function allows you to fine tune the instrument in steps on one cent at a time cent one hu...

Page 25: ...tion channels to any value from 1 16 or OFF If you press the MIDI TX button the display will show the factory set MIDI Trans mission channel If you press the MIDI RX button the display will show the factory set MIDI Recep tion setting in this case All channels Use the button of the numeric keypad to increase the Transmission or Reception channel or the button to decrease it Control Change filter T...

Page 26: ...l Control Pitch Bend Mixer Octave Split Lower Pan Tune Transpose Sequencer Record Play Stop Accomp Melody 1 Melody 2 Other controls Single Touch Play settings Store Performance Per formances MIDI MIDI channel control for Transmission TX and Re ception RX with Control Change on off filter Connectors DC 9 12 V Aux Out Damper Phones jack MIDI In Out Thru ports Dimensions 955 x 330 x 130 mm Music Stan...

Page 27: ...percussion 4 L Layered voices 4 Lower keyboard 5 M Memorize e Performance 16 Metronome 19 MIDI 21 Midi channel 21 MIDI interface 2 Mixer Volume controls 6 Music Stand 22 Muting the sections 7 Muting the Style tracks 14 N NBumeric keypad 4 Normal mode 3 Numeric keypad 10 O Octave transposer 8 One Finger chords 11 P Pan 20 Panel Reset 17 Performance 16 Performances 6 Phones jack 2 Piano button 7 Pia...

Page 28: ...24 GK330 Owner s manual T Touch Response 8 Transmission channel Midi 21 Transpose 20 Tune 20 U Using batteries 1 Utility 20 V Variation 12 Voices 3 ...

Page 29: ...GK310 A 1 Appendix ...

Page 30: ...ella accordi One Finger C C Db D D Eb E Cm C m Dbm Dm D m Ebm Em C7 C 7 Db7 D7 D 7 Eb7 E7 Cm7 C m7 Dbm7 Dm7 D m7 Ebm7 Em7 F Fm F7 Fm7 B F Gb G G Ab A Bm F m Gbm Gm G m Abm Am B7 F 7 Gb7 G7 G 7 Ab7 A7 Bm7 F m7 Gbm7 Gm7 G m7 Abm7 Am7 A Bb A m Bbm A 7 Bb7 A m7 Bbm7 ...

Page 31: ...3 Appendix B Fingered chords chart Table 1 Appendice B Tabella 1 accordi Fingered MAJOR C MINOR Cm DOMINANT 7th C7 MINOR 7th Cm7 MAJOR 7th Cmaj7 DIMINISHED Cdim AUGMENTED Caug 6th C6 MINOR 6th Cm6 C C D Eb E F ...

Page 32: ...0 MAJOR C MINOR Cm DOMINANT 7th C7 MINOR 7th Cm7 MAJOR 7th Cmaj7 DIMINISHED Cdim AUGMENTED Caug 6th C6 MINOR 6th Cm6 F G Ab A Bb B Appendix B Fingered chords chart Table 2 Appendice B Tabella 2 accordi Fingered ...

Page 33: ...oup 65 S SAX 66 A SAX 67 T SAX 68 B SAX 69 OBOE 70 En HORN 71 BASSOON 72 CLARINET PIPE group 73 PICCOLO 74 FLUTE 75 RECORD 76 PANFLUTE 77 BOTTLE 78 SHAKU 79 WHISTLE 80 OCARINA SYN LEAD group 81 SQUARE 82 SAWTH 83 CALLIOPE 84 CHIFFER 85 CHARANG 86 SOLOVOX 87 5th SAW 88 BASSLEAD SYN PAD group 89 FANTASY 90 WARM PAD 91 POLYSYNTH 92 SPACEVCE 93 BOWEDGLS 94 METAL PAD 95 HALO PAD 96 SWEEP PAD SYN SFX gr...

Page 34: ... U S TRAD 53 BLUES 54 SL BLUES 55 GOSPEL 56 WESTERN 57 R B 58 B GRASS 59 COUNTRY 60 MARCH USA TRAD 1 61 SL WALTZ 62 WEINER W 63 FRENCH W 64 ROMAGNA 65 MAZURKA 66 POLKA 67 BOEHMISCH 68 ITALY MARCH TRAD 2 69 PASO DOBLE 70 GERM POLKA 71 TARANTELLA 72 BAJON 73 H GULLY 74 TWIST 75 CHARLEST 76 REGGAE LATIN 1 77 SOFT BOSSA 78 SAMBA 79 DISCO SAMBA 80 CHA CHA 81 BOLERO 82 TANGO 83 RHUMBA 1 84 BEGUINE LATIN...

Reviews: