Helpful Hints on blade tension
Determining correct blade tension is somewhat sub-
jective. It is learned through experience and is some-
what dependant on personal preference. A properly
tensioned blade will last longer and be much less like-
ly to break prematurely. If the blade tension is too
loose, you will notice that the blade will have a ten-
dency to drift or slip off-line when cutting and you may
also experience excessive vibration or unusual noise.
A blade that is too tight will break prematurely.
Assuming the blade has been properly installed in the
blade mounts, when the blade tension lever is pushed
fully back towards the rear of the saw, the blade should be properly tensioned.
Test the blade tension by lightly plucking on the blade, like you would a guitar string, with your finger. If the
blade is tight and tensioned correctly you will get a clear and even note. If so, you are ready to proceed to
operating and cutting with the saw. If not, for some cases after double checking that the blade is properly
installed in the blade mounts, further blade tension fine tuning can be made by adjusting the rear knob to raise
the upper arm slightly.
Note: this is not the main function of the adjustment knob (see following paragraph) and using
this knob as the primary blade tensioner will cause premature wear and damage to the machine.
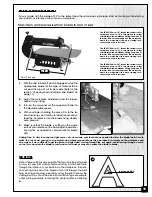
This saw has an adjustment knob
I
in the rear that can raise the blade mount up to 1” (25 mm). This allows you
to fine tune blade tension when needed, as well as to reposition the saw blade at a point where you can use
a different part of the blade in the cutting area. This also allows you to use a piece of band saw blade, cut to
a length of 5”- 6” (127-150 mm) in your saw, and gives you up to 3 inch cutting capacity when needed.
Note: Do not over tension the knob as this can cause premature wear and damage to the machine.
INSTALLING OR CHANGING BLADES
ALWAYS TURN OFF AND UNPLUG THE MACHINE
BEFORE REMOVING, HANDLING OR CHANGING
BLADES.
1.
Remove an installed, worn or broken blade by flip-
ping the blade tension lever forward (position
1
), then
loosening the thumbscrews
A
and
B
on the upper
and lower blade mounts.
2.
Remove the blade.
3.
Verify that the upper arm is more or less parallel (with-
in 1/8”) to the saw table. If necessary, use the upper
arm adjuster
I
(section in gray below) to raise or
lower the arm as needed.
4.
With the blade teeth facing forward and downward
slip the bottom of the blade down through the hole in
the table. Then slip the upper end of the blade into
the slot in the upper blade mount and position the
top of the blade above the set screw
C
but no higher
than the top of the shoulder
D
on the blade mount.
Then tighten the thumbscrew only enough to secure
the blade in the mount and prevent it from slipping
out.
5.
The bottom portion of the blade may protrude be-
yond the bottom of the lower blade mount, this is
normal and will not affect performance. Only the up-
per portion of the blade requires proper positioning
in the upper blade mount.
Note: Overtightening the blade clamp thumbscrews can cause
premature wear to the blades gripping surface and result in blade
slippage or cause premature wear of the threads in the blade
clamp housing.
To avoid kinking or damaging the blade in the holder,
E,
when
making adjustments make sure the set screw
F
(opposite the
thumbscrew G) is threaded into the holder to protrude slightly
beyond the blade slot
H
.
6.
Push the blade tension lever back (position
2
) to apply
tension on the blade.
G
F
H
E
C
D
Position
blade
between
these points
Upper arm must be parallel
(approx. 1/8”) to the table
1
2
RAISE
I
LOWER
13
A
B


