background image

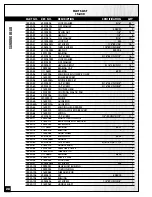
ELECTRICAL CONTROLS

PARTS LIST

15-030

PART. NO.

REF. NO.

DESCRIPTION

SPECIFICATION

QTY

15030-10

S0030307

PHILLIPS HEAD SCREW

3/16"-24 UNC-1"

2

15030-33

20900073

PC BOARD

1

15030-34

40501018

PC BOARD MOUNTING PLATE

1

15030-36

S0030304

PHILLIPS HEAD SCREW

3/16"-24 UNC-1/4"

21*

15030-37

L0000035A

POWER CORD

1

15030-40

S0040510M

FLAT HEAD SCREW

M5X0.8X10L

2

15030-41

LC1430101

PC BOARD POWER CORD

1

15030-43

20701011

ELECTRICAL INSULATION BOARD

1

15030-45

J2090004

INDICATOR LABEL

1

15030-46

40501019

SPEED CONTROL KNOB

1

15030-47

21600022

SWITCH BOX

1

15030-48

21600023

SWITCH BOX COVER

1

15030-52

W2092301

MAGNETIC SWITCH

1

15030-85

W0000001

SWITCH

1

15030-102

S0110300

NUT 3/16"-24 

UNC

2

15030-154

L2090002A

T CORD

2

15030-189

S100PG13

STRAIN RELIEF

2

15030-190

S1017W-2

STRAIN RELIEF

1

15030-191

S1006P-4

STRAIN RELIEF

1

15030-195

JG000002

LABEL

1

ELECTRICAL CONTROL

S

22

*: T

otal 

quantity

Summary of Contents for 15-030 M1

Page 1: ...trol Totally enclosed stand with storage com partment Ability to sand up to 30 material in two passes Finish sanding may be required SPECIFICATIONS MAXIMUM SANDING WIDTH 15 380 MM 30 IN 2 PASSES MIN MAX SANDING THICKNESS 1 4 6 MM 4 102 MM MINIMUM SANDING LENGTH 5 127 MM FEED RATE 3 TO 20 FPM VARIABLE SANDING BELT SIZE 15 X 39 1 2 381 X 1003 MM CONTACT ROLLER DIAMETER 2 1 2 82 MM OVERALL DIMENSIONS...

Page 2: ...or future reference Disclaimer The information and specifications in this manual pertain to the unit as it was supplied from the factory at the time of printing Because we are commit ted to making constant improvements General International reserves the right to make changes to components parts or features of this unit as deemed necessary without prior notice and without obligation to install any ...

Page 3: ...nder our Standard 2 year Limited Warranty or under our Limited Lifetime Warranty all defective parts components or machinery must be returned freight or postage prepaid to General International or to a nearby distributor repair center or other location designated by General International For further details call our service department at 1 888 949 1161 or your local distributor for assistance when...

Page 4: ...DUST COLLECTOR 12 BASIC ADJUSTMENTS CONTROLS 12 Connecting to a power source 12 Drum motor magnetic safety switch 12 Conveyor motor switch with safety key 13 Overload protection 13 Sanding belt tension adjustment 14 Sanding belt tracking adjustment 14 Adjusting the sanding head height 15 Changing feed speed 16 RECOMMENDED ADJUSTMENTS 16 Adjusting the pressure roller height 16 OPERATING INSTRUCTION...

Page 5: ...rating 10 Keep hands well away from the sanding belts and all moving parts Use a brush not hands to clear away sanding dust 11 Be sure sanding belts are securely installed on the sanding drums 12 Do not operate the sander if the sanding belts are damaged or badly worn 13 Do not push or force the workpiece into the sander The machine will perform better and more safely when working at the feed rate...

Page 6: ...F YOUR POWER SUPPLY CORRE SPONDS WITH THE VOLTAGE SPECIFIED ON THE MOTOR I D NAMEPLATE A POWER SOURCE WITH GREATER VOLTAGE THAN NEED ED CAN RESULT IN SERIOUS INJURY TO THE USER AS WELL AS DAMAGE TO THE MACHINE IF IN DOUBT CONTACT A QUALIFIED ELECTRICIAN BEFORE CONNECTING TO THE POWER SOURCE THIS TOOL IS FOR INDOOR USE ONLY DO NOT EXPOSE TO RAIN OR USE IN WET OR DAMP LOCATIONS EXTENSION CORDS The u...

Page 7: ...TORAGE CABINET FRONT WINDOW MAIN MOTOR MAGNETIC SAFETY SWITCH HAND WHEEL SANDING HEAD HEIGHT ADJUSTMENT HAND WHEEL SANDING HEAD HEIGHT LOCKING HANDLE MAIN MOTOR CONVEYOR MOTOR CONVEYOR ON OFF SWITCH WITH SAFETY KEY FEED SPEED ADJUSTMENT KNOB SANDING HEAD IDLER ROLLER SANDING BELT SANDING BELT TENSION ADJUSTING HAND WHEEL SANDING HEAD DRIVE ROLLER LEFT SIDE VIEW 7 INSIDE VIEW ...

Page 8: ...workpiece length capacity is 5 long Note As with any other drum or belt sander depending on the final finish quality you require some final hand sanding may be required LIST OF CONTENTS QTY SANDER 1 REAR EXTENSION TABLE 1 SIDE EXTENSION TABLE 1 SANDING BELT 2 3 MM T WRENCH 1 19 MM COMBINATION WRENCH 1 10 12 MM OPEN END WRENCH 1 2 MM ALLEN KEY 1 5 MM ALLEN KEY 1 6 MM ALLEN KEY 1 The sanding belts a...

Page 9: ...es safety zone Take steps to ensure that all operators and shop visitors are aware that these areas are off limits whenever a machine is running for everyone but the individual operating the unit LIFTING AND HANDLING THE MACHINE A forklift with steel cable or a hydraulic hand pallet truck will be required to lift the sander Note Before lifting the sander unscrew the hex head wood screws securing t...

Page 10: ...t pipes by rubbing with a rag dipped in kero sene mineral spirits or paint thinner Note Handle and dispose of potentially flammable sol vent soaked rags according to manufacturers safety re commendations The extension rods are covered with a protective coa ting that helps prevent rust from forming during shipping and storage 2 Remove the two lock nuts and washers from the extension rods located at...

Page 11: ...shown Tip To extend belt life and avoid premature breakage take note of the direction arrows printed on the inside of the sanding belt to make sure you install the belt in the correct direction LARGER VIEW TOP COVER REMOVED ONLY FOR CLARITY 8 Position the belt roughly centered on the sanding head rollers Note Refer to section Basic Adjustments and Controls for Sanding Belt Tension Adjustment instr...

Page 12: ...TURNING OFF THE DUST COLLECTOR BASIC ADJUSTMENTS CONTROLS CONNECTING TO A POWER SOURCE Once the assembly steps have been completed plug the power cord into an appropriate outlet Refer back to the section entitled ELECTRICAL REQUIREMENTS and make sure all requirements and grounding instructions are fol lowed When sanding operations have been completed unplug the sander from the power source TO AVOI...

Page 13: ...t is too long or not the correct gauge of wire which can also cause an increase in amperage draw If an electric extension cord must be used follow the instructions and refer to the chart in the electri cal requirements section at the beginning of this manual 3 Overworked circuit caused by operating on a circuit that is close to its amperage draw capacity Make sure the cir cuit being used is capabl...

Page 14: ...ed through experience and is somewhat dependant on personal preference A properly ten sioned belt will last longer and be much less likely to break prematurely If the belt is too loose it will slip off during operation A belt that is too tight will break prematurely Though not essential proper belt tracking having the belt running straight and oscillating as evenly on the rollers as possible can p...

Page 15: ...IMUM MAXIMUM WORKPIECE THICK NESS CAPACITY IS 1 4 4 AND THE MINIMUM WORK PIECE LENGTH CAPACITY IS 5 RIGHT SIDE VIEW To adjust the sanding head height 1 Loosen the locking handle located beside the main motor to unlock the sanding head height adjustment hand wheel 2 Put the workpiece on the conveyor belt and rotate the hand wheel Clockwise to lower the sanding head Counter lockwise to raise the san...

Page 16: ...oth pressure rollers must be set 1 mm below the drive roller with sanding belt installed If the pressure rollers are even with or higher than the drive roller there is a high risk of workpiece kickback which could lead to serious personal injuries The 2 pressure rollers are factory set to provide ade quate amount of downward pressure to the workpiece However to prevent the risk of a kickback it is...

Page 17: ...The top of the gauge block should be in full contact with the pressure roller 4 If needed adjust the height of the pressure roller with the supplied 2 mm allen key by turning the adjustment screw CLOSE UP 5 Repeat step 3 and if needed step 4 for the right end of the rear pressure roller then for both ends of the front pressure roller Verify and if needed adjust the height of the pressure rollers a...

Page 18: ... the sanding head 2 Remove the workpiece from the conveyor belt 3 Turn on your dust collector 4 Press the green ON button on the control box to start the sanding head motor 5 Insert the safety key into the conveyor belt switch 6 Set the feed speed to minimum before starting the conveyor belt then lift the switch up to start the conveyor motor Gradually increase the speed until you reach the desire...

Page 19: ...that should be readily available in most areas The use of any other size is not recommended and can lead to seri ous injury and or damage to the machine LUBRICATION The motor and sanding head rollers bearings are sealed and permanently lubricated no further lubrication is required Keep the sanding head height adjustment mechanism as well as the bevel gears well lubricated and free of dust or debri...

Page 20: ... 15 334 60 Grit 15 336 80 Grit 15 337 100 Grit Dust Collector Dust collectors contribute to a cleaner and more healthful workshop envi ronment We have a wide selection of dust collectors to suit all your shop needs Mobile base 50 025 Easily roll your sander anywhere in your shop Load capacity 500 lbs Wheels lock when equi pment is in use Flexible expandable 2 way roller stand Model 50 167S Ideal f...

Page 21: ...4 15030 83 21600047 CABINET 1 15030 87 S0070301 SELF TAPPING SCREW 5 32 32 UNCX1 2 4 15030 88 10401029 RUBBER FOOT 4 15030 89 21600046 BASE 1 15030 90 20101064 DOOR LATCH 2 15030 125 21600049 DOOR 1 15030 159 21600081 SIDE EXTENSION TABLE 1 15030 160 21600082 SIDE EXTENSION ROD 4 15030 171 JG000001 HANDLE LABEL 1 15030 173 JG000006 LABEL 1 15030 179 JG000011 WARNING LABEL 1 15030 181 21600098 REAR...

Page 22: ... 8X10L 2 15030 41 LC1430101 PC BOARD POWER CORD 1 15030 43 20701011 ELECTRICAL INSULATION BOARD 1 15030 45 J2090004 INDICATOR LABEL 1 15030 46 40501019 SPEED CONTROL KNOB 1 15030 47 21600022 SWITCH BOX 1 15030 48 21600023 SWITCH BOX COVER 1 15030 52 W2092301 MAGNETIC SWITCH 1 15030 85 W0000001 SWITCH 1 15030 102 S0110300 NUT 3 16 24 UNC 2 15030 154 L2090002A T CORD 2 15030 189 S100PG13 STRAIN RELI...

Page 23: ...23 UPPER ROLLER AND COVER ASSEMBLY ...

Page 24: ...1 15030 124 21600045G TOP COVER DUST HOOD 1 15030 134 C5151100 BEARING 51100 2 15030 140 C1106003 BEARING 6003 2 15030 141 S0210622 FLAT WASHER 3 8 X22 1 15030 142 S0400540 KEY 5X5X40 1 15030 143 C1106202 BEARING 6202 8 15030 144 S0050305 SET SCREW 3 16 24 UNC 5 16 2 15030 145 S0230401 LOCK WASHER 3 15030 146 S0010412M CAP SCREW M4 3 15030 167 21600091 TRACKING BLOCK BRACKET LEFT 1 15030 168 21600...

Page 25: ...25 CONVEYOR ...

Page 26: ...SCREW M6 4 15030 20 S0010503a CAP SCREW 5 16 18 UNC 4 2 15030 21 S0120200 NYLON NUT 1 4 12 15030 23 21600005 REAR CONVEYOR ROLLER 1 15030 24 21600050 CONVEYOR BELT 1 15030 25 20900054 SHAFT JOINT 2 15030 26 S0210516 FLAT WASHER 5 16 10 15030 28 S0110500 HEX NUT 5 16 18UNC 10 15030 29 20900055 GEAR BOX 1 15030 30 20900056 BOTTOM COVER 1 15030 31 S0050404N SET SCREW 1 4 20 UNC 15 15030 36 S0030304 P...

Page 27: ...27 SANDING HEAD ...

Page 28: ...15030 62 30102007 COUPLING PLASTIC PAD 1 15030 63 30102006 COUPLER 1 15030 64 M0000000 MOTOR 1 15030 65 21600010 GUIDE ROD 2 15030 65G 21600010G GUIDE ROD 2 15030 66 21600011 SANDING HEAD FRAME 1 15030 67 21600015 FRONT GUIDE ROD BRACKET 1 15030 68 21600013 SPRING 2 15030 69 S0010409 CAP SCREW 1 4 20 UNC X1 2 11 15030 71 20900086 RIGHT POSITION PLATE 2 15030 72 21600012 REAR GUIDE ROD BRACKET 1 15...

Page 29: ...ial number of the machine and part number Also a brief description of each item and quantity desired 8360 Champ d Eau Montreal Quebec Canada H1P 1Y3 Tel 514 326 1161 Fax 514 326 5565 Parts Service Fax 514 326 5555 Order Desk orderdesk general ca www general ca MODEL 15 030 M1 ...

Reviews: