background image

Chapter 3 - Setup

61

© 2017 Geist

GM1157 

NOTE

Any changes you make to the Network settings will take effect once the
Save button is clicked!  If you have changed the IP address or
HTTP/HTTPS ports, it will appear as if the unit is no longer responding
because the browser will not be able to reload the web page.  Just stop
or close the browser window, then type in the new IP address into the
browser's address bar, and the unit will be accessible.

Web Server

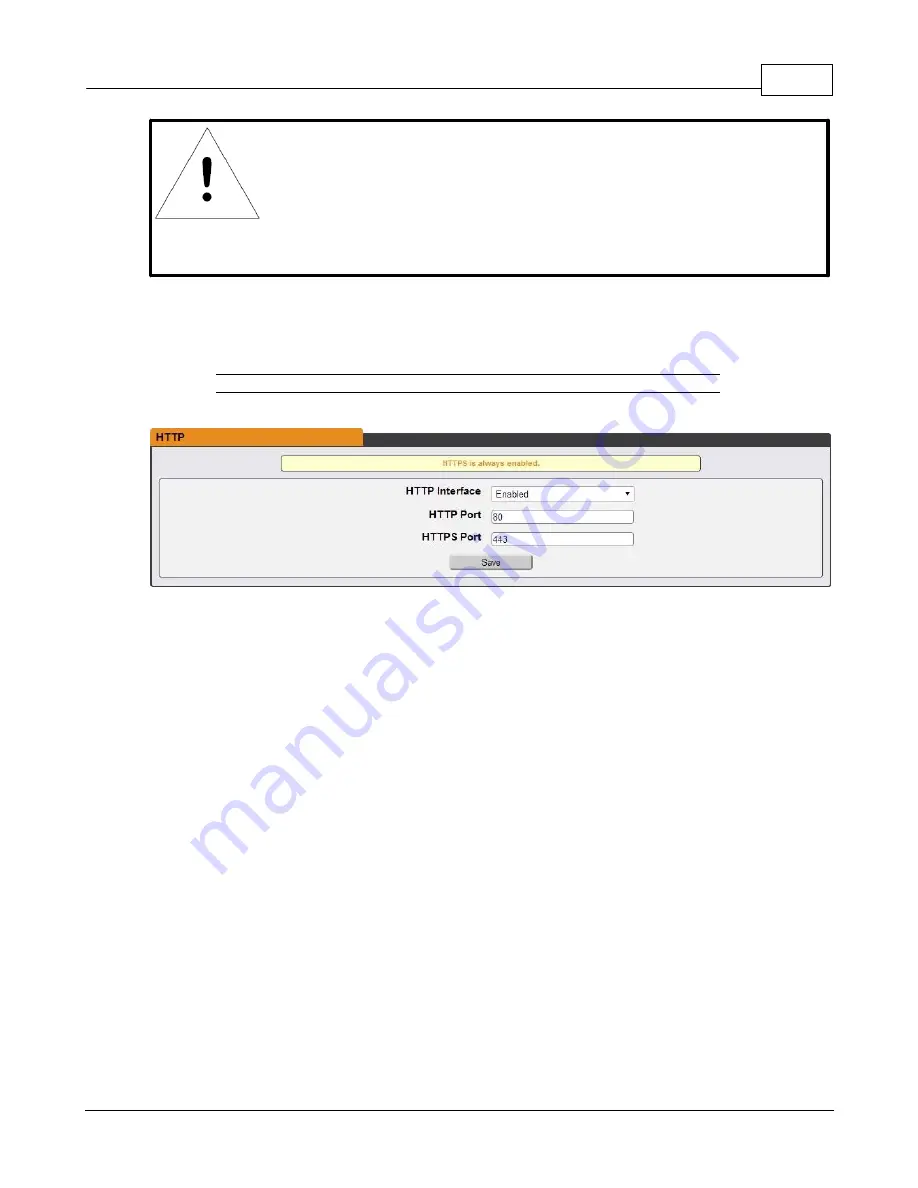
The unit’s Web Server configuration can be updated on the Web Server tab of the System menu. 

Figure 3-29

HTTP Configuration Page

·

HTTP Interface

: Enables/disables access via HTTP.  HTTPS interface will always be enabled. 

Available options are: Enabled or Disabled.  It is not possible to disable the web interface
completely.

·

HTTP/HTTPS Server Port:

 Allows you to change the TCP ports which the HTTP and HTTPS services

listen to for incoming connections.  The defaults are port 80 for HTTP and 443 for HTTPS.

Display

The unit's display configuration can be changed via the Display tab of the System menu.  Settings
pertaining to the unit’s display are:

Summary of Contents for Upgradable PDU

Page 1: ...Upgradable PDU Instruction Manual geistglobal com ...

Page 2: ...s 11 11 Product Specifications 11 Overview 11 Environmental 11 Temperature 11 Humidity 12 Elevation 12 Electrical 12 Receptacle Ratings 12 Networking 12 Ethernet 12 Protocols 12 User Interfaces 13 Regulatory Compliance 13 Underw riters Laboratories UL 13 Federal Communications Commission FCC 13 RoHS WEEE Chapter 2 Installation 15 15 Pre Installation 16 Installation 17 Mounting 17 Full Length Brack...

Page 3: ...9 Sensors Page 49 Overview 50 Configuration and Operation 52 Alarms Warnings 54 Add Modify Alarms Warnings 57 System 57 Users 60 Network 61 Web Server 61 Display 62 Email 64 SNMP 65 Syslog 66 Admin 66 Locale 67 Utilities 69 Help 69 Info 69 Support Site Chapter 4 Final Checkout 70 70 Final Checkout 70 Technical Support 70 Resetting PDU 70 Service and Maintenance 70 More Technical Support 71 Using M...

Page 4: ...mentation contained in this publication are copyrighted materials Recovery Act Buy American Geist products adhere to the Buy American provisions of the American Recovery and Reinvestment Act of 2009 Recovery Act All Geist goods manufactured in our Lincoln Nebraska plant have undergone substantial transformation during production Trade Agreements Act TAA Geist goods manufactured in our Lincoln Nebr...

Page 5: ... an adequate number of smelters has been reliably identified and audited by The Electronic Industry Citizenship Coalition EICC and the Global e Sustainability Initiative GeSI to service the electronic industry supply chain Mandating a conflict free supply chain before an adequate number of smelters has been identified will prohibit the use of all tin tantalum tungsten and gold originating in the D...

Page 6: ... Manual This document provides an overview of Geist product s the major topics covered include Copyright Trademarks and Disclosure Restrictions Instructions for installing powering and using the equipment Information that will aid in managing and maintaining the equipment Revision History Revision Date Notes Approved By 0 0 3 2 2017 Initial Version JB Organization of the Manual This Geist document...

Page 7: ...e obtained on line from the RMA Form link located within the Geist Support site Reporting Document Errors Should you discover any error or identify a deficiency in this document please take time to contact us at the following email address Geist Documents geistglobal com Please be sure to provide us with the document name part number and page number s Also please provide us with description of the...

Page 8: ...assification o Power Distribution Unit Basic Monitored only Switched only Monitored Switched o Environmental Monitoring o Cooling o Data Center Infrastructure Management DCIM Figure 1 Overlay Symbiology Guide Figure 1 The chart above depicts the symbols used on Geist overlays ...

Page 9: ... DANGER INDICATES AN IMMINENT HAZARDOUS SITUATION WHICH IF NOT AVOIDED WILL RESULT IN DEATH OR SERIOUS INJURY WARNING INDICATES A POTENTIAL HAZARDOUS SITUATION WHICH IF NOT AVOIDED COULD RESULT IN DEATH OR SERIOUS INJURY CAUTION INDICATES A POTENTIAL HAZARDOUS SITUATION WHICH IF NOT AVOIDED COULD RESULT IN PRODUCT DAMAGE AND MINOR TO MODERATE INJURY NOTE Provides useful information that is benefic...

Page 10: ...apter Image Example Figure 1 1 Name and or Title goes here Tables Tables presented in this document are identified and designated as follows Table Chapter Image Example Table 1 1 Name and or Title goes here Column 1 Column 2 Column 3 Column 4 Column 5 Text Text Text Text Text Text Text Text Text Text Text Text Text Text Text Text Text Text Text Text ...

Page 11: ...ring Device IMD Geist PDUs last for many years and with the IMD design businesses will be able to upgrade their PDUs to newer monitoring technologies in the future without having to replace the entire PDU The hot swappable IMD can be changed out in a few simple steps without interrupting power to critical servers Environmental The operational environmental limits pertaining to Temperature Humidity...

Page 12: ...5Vac 15A NEMA 5 20R or L5 20R 125Vac 20A NEMA 6 20R or L6 20R 250Vac 20A NEMA L5 30R 125Vac 30A NEMA L6 30R 250Vac 30A IEC 60320 C13 250Vac 10A UL CSA 15A 250Vac IEC 60320 C19 250Vac 16A UL CSA 20A 250Vac Networking The product communications requirements are identified below Ethernet The Ethernet link speed for this product is 10 100 Mb full duplex Protocols The communications protocols supported...

Page 13: ...C Rules Operation is subject to the following two conditions 1 This device may not cause harmful interference and 2 this device must accept any interference received including interference that may cause undesired operation This Class A digital apparatus complies with Canadian ICES 003 Cet appareil numérique de la classe A est conforme à la norme NMB 003 du Canada WARNING Changes or modifications ...

Page 14: ...Mercury Hg 100 ppm Cadmium Cd 100 ppm Hexavalent Chromium Cr VI 1000 ppm Polybrominated Biphenyls PBB 1000 ppm Polybrominated Diphenyl Ethers PBDE 1000 ppm Bis 2 Ethylhexyl phthalate DEHP 1000 ppm Benzyl butyl phthalate BBP 1000 ppm Dibutyl phthalate DBP 1000 ppm Diisobutyl phthalate DIBP 1000 ppm See product label for RoHS WEEE compliance marks ...

Page 15: ...eration the effect that overloading of the circuits might have on overcurrent protection and supplied wiring The PDU relies on the building installation for protection from overcurrent A certified overcurrent protection device is required in the building installation The overcurrent protection device should be sized according to the PDU s nameplate ratings and local national electrical code Reliab...

Page 16: ...hardware mount unit to rack See next section for examples 2 Plug PDU into an appropriately rated and protected branch circuit receptacle 3 Plug in the devices to be powered by the PDU 4 Turn on each device connected to the PDU Sequential power up is recommended to avoid high inrush current ...

Page 17: ...Chapter 2 Installation 17 2017 Geist GM1157 Mounting Optional brackets sold separately Full Length Brackets Figure 2 1 Full Length Bracket ...

Page 18: ...Upgradeable PDU Instruction Manual 18 2017 Geist GM1157 Mini L Brackets SLB 4 Figure 2 2 Mini L Brackets Vertical Extension Brackets VCB 1 Figure 2 3 Vertical Extension Brackets ...

Page 19: ...Chapter 2 Installation 19 2017 Geist GM1157 Toolless Mounting Hardware 11621 Figure 2 4 Toolless Mounting Hardware Toolless Full Length Brackets TLFL Figure 2 5 Toolless Full Length Brackets ...

Page 20: ...deable PDU Instruction Manual 20 2017 Geist GM1157 Single Side Mount 2 Unit Brackets TSMX2 Figure 2 6 Single Side Mount 2 Units Brackets Offset Side Mount Brackets EZB 1 Figure 2 7 Offset Side Mount Brackets ...

Page 21: ...Chapter 2 Installation 21 2017 Geist GM1157 7 Extension Brackets XB 7 Figure 2 8 7 Extension Brackets Flush Mount Brackets FM Figure 2 9 Flush Mount Brackets ...

Page 22: ...Upgradeable PDU Instruction Manual 22 2017 Geist GM1157 Adjustable Mount Brackets AM Figure 2 10 Adjustable Mount Brackets Panel Mount Brackets PM Figure 2 11 Panel Mount Brackets ...

Page 23: ...Chapter 2 Installation 23 2017 Geist GM1157 23 Conversion Mounting Brackets 23 RM Figure 2 12 23 Conversion Mounting Brackets Cable Mount Brackets CMB 1 Figure 2 13 Cable Mount Brackets ...

Page 24: ...Upgradeable PDU Instruction Manual 24 2017 Geist GM1157 19 Horizontal Panel Mount Brackets 7938 Figure 2 14 19 Horizontal Panel Mount Brackets ...

Page 25: ...able 2 15 Default IP Address IP Address 192 168 123 123 Subnet Mask 255 255 255 0 Gateway 192 168 123 1 To access the unit for the first time you will need to temporarily change your computer s network settings to match the 192 168 123 xxx subnet To set up the unit connect it to your computer s Ethernet port then follow the appropriate instructions for your computer s operating system Windows Wind...

Page 26: ...perties button to open the Local Properties window Figure 2 16 Local Area Connection Properties Find the entry titled Internet Protocol Version 4 TCP IPv4 in the list then click the Properties button to open the Internet Protocol Properties window If you see more than one TCP IP entry as in the example above the computer may be configured for IPv6 support as well as IPv4 make sure to select the en...

Page 27: ...u to create an Admin account and password before you can proceed Once you have created an Admin account and have logged into it the unit s default Sensors page should come up by default Navigate to the System tab then the Network page to configure the device s network properties The unit s IP Address Subnet Mask Gateway and DNS settings can either be assigned manually or acquired via DHCP Note tha...

Page 28: ...t Mask to 255 255 255 0 The Router and DNS Server settings can be left blank for this initial setup Click Apply when finished Once the NIC settings are configured properly you should be able to access the unit by typing http 192 168 123 123 into the address bar of your web browser If you are setting up the unit for the first time or if the unit has been reset back to factory defaults via the netwo...

Page 29: ...ked so the browser will no longer be able to reload the web page from the 192 168 123 123 address and will probably display a page not found or host unavailable message This behavior is normal Once you have finished configuring the unit s IP address simply repeat the steps above and change the computer s Ethernet NIC card settings back to the ones you wrote down prior to changing them to restore i...

Page 30: ...ally metered option for the GU line of products It is built with the IMD 01D module and provides a local display for viewing current draw Amps and power Kilowatts with the option to upgrade to add monitoring and other features in the future Figure 3 1 IMD 01D Module 1 Local Display The local display will display the phase line and circuit current values in Amperes 2 Display Buttons There are three...

Page 31: ...ng for multiple devices to be daisy chained 2 Hard Reboot Button Pressing the hard reboot button reboots the IMD This acts as a power cycle for the IMD and does not change or remove any user information 3 Network Reset Button Holding the network reset button for 15 seconds during normal operation will restore the default IP address and reset the user accounts Holding the network reset button durin...

Page 32: ...uilt with the IMD 02E module which provides dual Ethernet ports a local display and a RJ12 port for remote sensors Highlighted in Red above 6 Remote Sensor Port RJ12 port for connecting a Geist plug and play remote digital sensor sold separately Each digital sensor has a unique serial number and is automatically discovered GU Enhanced Monitored PDUs support one sensor at a time The optional Geist ...

Page 33: ...via the unit s display and all without physically connecting to the PDU Using a smart device such as a smart phone or tablet with the Geist Mobile app installed it is possible to capture data from the LED display when running in VLC mode which can be enabled disabled easily by using the display buttons on the device or using the GUI on monitored units By default the Geist Upgradeable LED display w...

Page 34: ...re version 3 3 0 or newer for VLC feature to be available Latest firmware updates can be found at http www geistglobal com support firmware NOTE Geist Mobile app currently available via the App Store for iOS devices Android version is under development and will be available in the Play Store at a later date ...

Page 35: ...vice scan or export data via csv file Figure 3 3 Mobile App Home Screen Scan Turns on scan mode to allow the app to capture VLC data from Geist Upgradeable PDU Export Pressing the export button will launch the smart device s email app and attach the Database csv file to be emailed to desired recipients ...

Page 36: ...the bottom of the screen The app will begin to capture data as soon as it can see the LED characters inside the horizontal lines Scan progress is displayed as a percentage If the scan percentage is increasing slowly or resetting the device is having trouble reading the data properly In this case try repositioning the device to improve results After the scan reaches 100 the app will load the Readin...

Page 37: ...going through the lens of the smart device is not optimal then the OCR Optical Character Recognition will struggle to capture the data When looking at the smart device screen during capture you can see if the characters of the LED display are in focus and bright if they are blurred with a surrounding glow or are faint then the VLC capture will fail to work quickly and may be unable to scan at all ...

Page 38: ... Manual 38 2017 Geist GM1157 Proper capture methods Figure 3 6 Mobile App Capture Screen High Contrast between LED display and background No glow around LED display characters LED display characters between horizontal guidelines ...

Page 39: ...up 39 2017 Geist GM1157 Improper capture methods Figure 3 7 Mobile App Capture Misalignment Blurry image Over exposed image Glow around LED display characters LED display characters not between horizontal guidelines ...

Page 40: ...nable to correctly capture all the VLC data correctly If the app cannot properly capture the data it will retry twice or display one of the following messages Figure 3 8 Mobile App Scan Fail Scan failed Incorrect set configuration Scan failed Incorrect data sequence Scan failed Please adjust your position or the exposure and try again Press cancel to return to the Home screen or retry to return to...

Page 41: ...VLC Figure 3 9 Mobile App Readings Screen 1 Pressing the Settings button will enable the user to customized the data that is displayed in the scan results NOTE The unit serial number is displayed in the title bar of the Readings page This serial number will match the serial number located on the surface of the PDU ...

Page 42: ...ows user to collapse or expand the Readings page to help properly display data on smart devices with smaller screens Unit Data to Display Selects which data is shown on the Readings page All data is stored within the database regardless of settings here These settings are global and will apply to any scanned unit ...

Page 43: ...igured on the smart device to utilize the Export function The Geist Mobile app does not directly support email functionality Geist cannot troubleshoot email errors as this would be an issue with either the device or email service being used Each PDU you scan adds a new entry to the database there is no limit to the number of individual PDU s that can be added but the database has a limit of 10 sca...

Page 44: ...l number This is the same serial number present on the units label Part of the VLC configuration data and used for debugging Timestamp of when the scan occurred The IPv4 address of the unit Locally Metered units will show Null IP address Power Data 1 Volts 1 Amps 1 Watts 1 VA 1 kWh Input Phase for Single Phase units Phase A or Phase AB if 3 Phase Phase Amperes Phase Real Power Phase Apparent Power...

Page 45: ...ts 6 VA 6 kWh Secondary Phase C or Phase AC if 3 Phase Phase Amperes Phase Real Power Phase Apparent Power Phase Kilowatt Hours Breakers Circuits Breaker 1 Breaker 2 Breaker 3 Breaker 4 Breaker 5 Breaker 6 Breaker Circuit 1 Amps Breaker Circuit 2 Amps Breaker Circuit 3 Amps Breaker Circuit 4 Amps Breaker Circuit 5 Amps Breaker Circuit 6 Amps Total s Total Watts Real Power Total VA Apparent Power T...

Page 46: ... the new IMD module ready for installation immediately after removal of the old IMD 1 Remove disposable ESD wrist strap from package remove adhesive backing and attach to PDU put wrist strap on arm 2 Insert Geist IMD Removal Tool as shown Be sure to press tool in level and press in until tool is flush with face of IMD Some older versions may require overlays to be removed prior to inserting tool 3...

Page 47: ...Chapter 3 Setup 47 2017 Geist GM1157 Figure 3 12 IMD Removal Steps ...

Page 48: ...ct the cable to the replacement IMD module 2 Place cable into the strain relief slot in the IMD s housing as shown 3 Tuck the excess cable back into the PDU and slide the IMD straight in 4 Press with both thumbs until the IMD snaps into place Figure 3 13 IMD Installation Steps ...

Page 49: ...o from any page will reload the Sensors Overview page 2 Sensors System and Help Tab Mouse over to show sub menus Sensors available options are Overview this page and Alarms Warnings see next section System available options are Users Network Email SNMP Syslog Admin Locale Restore Defaults and Firmware Update Refer to the appropriate section under System Help available options are Info and Support ...

Page 50: ...and cannot be changed May be required for technical support 7 Total and Individual Phase Monitor Displays AC current voltage and power statistics for each individual phase and for the total of all phases combined 8 Current Monitor Displays AC current draw statistics for each individual circuit on the PDU Figure 3 15 Icons Configuration Icon Operation Icon NOTE You must log in before making any cha...

Page 51: ... PDU s factory name or model and cannot be changed 2 Once done click Save Figure 3 16 Device Labeling Phase and Circuit Labels Naming 1 Click the desired Configuration icon and change the phase or circuit s Label Name is the physical phase or circuit and cannot be changed 2 Once done click Save Figure 3 17 Phase and Circuit Labeling ...

Page 52: ...ons based on the device or measurement the Event is associated with Each Event can have one or more Actions to be taken when the Event occurs Figure 3 19 Alarms and Warnings Page 1 State Shows the status of each Event Empty No alert condition This symbol indicates that this particular Warning Event has been tripped A tripped Warning Event displays in orange This symbol indicates that this particul...

Page 53: ...wledge button When a Warning or Alarm Event has occurred the user can click on this symbol to acknowledge the Event and stop the unit from sending any more notifications about it Note Clicking this symbol does not clear the Warning or Alarm Event it just stops the notifications from repeating 4 The actual conditions for the various Alarms Warnings settings are shown here ...

Page 54: ...es below the threshold e Type in the desired Threshold Value any number between 999 0 999 0 is valid f Type in the desired Clear Delay time in seconds Any value other than 0 means once this Event is tripped the measurement must return to normal for this many seconds before the Event will clear and reset Clear Delay can be up to 14400 seconds 4 hours g Type in the desired Trip Delay time in seconds...

Page 55: ...ist and then the appropriate Enabled box checked on each alarm See screen shot below for example Figure 3 22 Target Page Delay determines how long this Event must remain tripped for before this Action s first notification is sent This is different from the Trip Delay above Trip Delay determines how long the threshold value has to be exceeded before the Event itself is tripped This delay determines...

Page 56: ... or Warning Event Click the Modify icon next to the Alarm or Warning Event you wish to change then modify its settings as above Figure 3 23 Modify Action Page Once an Action has been added each Action has its own checkbox in the enabled column at the far left The default is unchecked disabled when you first add each Action set the checkbox to enable it This allows you to selectively turn different...

Page 57: ...re are three buttons available on the User Accounts page 1 Add New User Account 2 Modify User s Account 3 Delete User s Account NOTE Only an Administrator level account can Add Modify or Delete users Control level and View Only accounts can change their own passwords via the Modify button but cannot Add or Delete accounts or Modify other accounts The Guest account cannot Add Delete or Modify any a...

Page 58: ...this to False makes the account a View Only account d New Password account passwords may be up to 24 characters long are case sensitive and may not contain spaces e Account Status set the account to Enabled or Disabled Disabling an account prevents it from being used to log in but does not delete it from the account list 3 Click the Save button when finished Account Types Administrator Administrat...

Page 59: ...ging in will automatically be viewing the unit as Guest By default the Guest account is a View Only account and cannot make changes to any settings although the Administrator can elevate the Guest account to Control level access if desired allowing anyone to make changes to names labels alarm events and notifications without logging in The Guest account cannot be deleted but can be disabled to req...

Page 60: ...twork This is required if the unit needs to reach any services on the internet such as a public email or NTP server If DHCP is Enabled this field will automatically be filled in when the DHCP service assigns the unit an IP address IP Address Displays the IPv4 and IPv6 addresses currently being used by the unit Clicking on the Modify icon will allow you to change the unit s IPv4 address and Netmask...

Page 61: ... Server The unit s Web Server configuration can be updated on the Web Server tab of the System menu Figure 3 29 HTTP Configuration Page HTTP Interface Enables disables access via HTTP HTTPS interface will always be enabled Available options are Enabled or Disabled It is not possible to disable the web interface completely HTTP HTTPS Server Port Allows you to change the TCP ports which the HTTP and...

Page 62: ...ent or Total Power displayed as kW on the local LED display VLC Allows user to enable or disable VLC mode from GUI default is disabled Email The unit is capable of sending email notifications to up to five email addresses when an Alarm or Warning Event occurs Figure 3 31 Email Configuration Page Target email addresses can be configured as follows ...

Page 63: ...and then switches to encrypted partway through the session is not supported If using a service that utilizes StartTLS such as Office365 please leave this option Disabled From Email Address The address which the unit s emails should appear to come from Note that many hosted email services such as Gmail will require this to be the email account of a valid user Username and Password The login credent...

Page 64: ...d or disabled independently as desired The service will normally listen for data read requests a k a GET requests on Port 161 which is the usual default for SNMP services this can also be changed if desired The Management Information Base MIB can be downloaded from the unit if needed via the MIB link at the top of the web page Clicking this link will download a ZIP archive containing both the MIB ...

Page 65: ... the Host field change the Port number if required select the trap Version to be used v1 v2c or v3 and click Save A test trap may be sent by clicking on the Test icon next to the Host IP address Trap settings can also be updated changed by clicking the Modify icon next to the Host IP address Syslog Syslog data can be captured remotely but must first be setup and enabled via the Syslog page NOTE Th...

Page 66: ...r on the browser tab s currently viewing the device NOTE This information is strictly for the users and administrator s convenience The unit will not attempt to send emails to the Administrator Email address and this address cannot be chosen as the Target of an Event Action when configuring an Alarm or Warning Event Figure 3 38 Admin Configuration Page Locale The Locale page sets the default Langu...

Page 67: ... settings effectively reverting the entire unit back to its original out of the box state All Non Network Settings erases all settings except the Network and User Accounts Figure 3 40 Restore Default Page The Reboot section allows the user to perform a system reboot This function will not affect power delivery to connected equipment Figure 3 41 Reboot Page Use the Firmware Update section to load f...

Page 68: ...pdates will typically come in a ZIP archive file containing several files including the firmware package itself a copy of the SNMP MIB a readme text file explaining how to install the firmware and various other support files as needed Be sure to un ZIP the archive and follow the included instructions ...

Page 69: ...e unit s current firmware versions and network information Manufacturer support information is also here Figure 3 43 Info Page Support Site Technical support can be found at http www geistglobal com support Americas 1 888 630 4445 Europe and Middle East From within the UK 0845 026 3853 From abroad 44 845 026 3853 Asia English 1 888 630 4445 US number Chinese 86 755 8663 9505 ...

Page 70: ...e parts inside the PDU other than the field replaceable Interchangeable Monitoring Device IMD It is recommended that power be removed from the unit before installing or removing any equipment The Interchangeable Monitoring Device is designed to be field replaceable by qualified service personnel only The IMD is designed to be replaced while the PDU is still connected to AC Mains power Please refer...

Page 71: ... can be found at this Microsoft TechNet article http technet microsoft com en us library dd277329 aspx The SMTP AUTH PLAIN and AUTH LOGIN authentication methods also known as Basic Authentication for logging in to the server are often no longer enabled by default in Exchange only Microsoft s proprietary NTLM authentication method is enabled The AUTH LOGIN method which the IMD PDU requires can be r...

Page 72: ...s no liability for failure to comply with these requirements Live Circuits Safety DANGER HAZARDOUS VOLTAGE CURRENT AND ENERGY LEVELS ARE PRESENT IN THIS PRODUCT POWER SWITCHED CIRCUITS CAN HAVE HAZARDOUS VOLTAGES PRESENT EVEN WHEN THE SWITCH IS IN THE OFF POSITION DO NOT OPERATE THE PRODUCT WITH ANY COVER PLATE REMOVED ALWAYS MAKE SURE THAT PRODUCT IS FULLY ENCLOSED PRIOR TO USE Operating personne...

Page 73: ...ty to Electro Static Discharge ESD Handling of such components should be done only after proper anti static workspace conditions have been established Any static producing packing materials such as plastic Styrofoam and some cardboards should be removed and discarded in a timely manner Explosive Environment Do not operate this equipment in the presence of flammable gases or fumes Operation of any ...

Page 74: ...Thank You For Purchasing Geist geistglobal com ...

Reviews: