background image

Société des Anciens Etablissements 

L.GEISMAR

113 bis, avenue Charles de Gaulle
92200 NEUILLY SUR SEINE

Tél : +33 (0)1 41 43 40 40

 - Fax : 33 (0) 1 46 40 71 70 

E-mail : [email protected]

Société des Anciens Etablissements 

L.GEISMAR

Boite Postale 50327 5 rue d’Altkirch

68006 COLMAR CEDEX FRANCE

Tél : +33 (0) 3 89 80 41 90 - Fax : 33 (0) 3 89 80 42 28 

E-mail : [email protected]

OPERATION & MAINTENANCE INSTRUCTIONS

Model

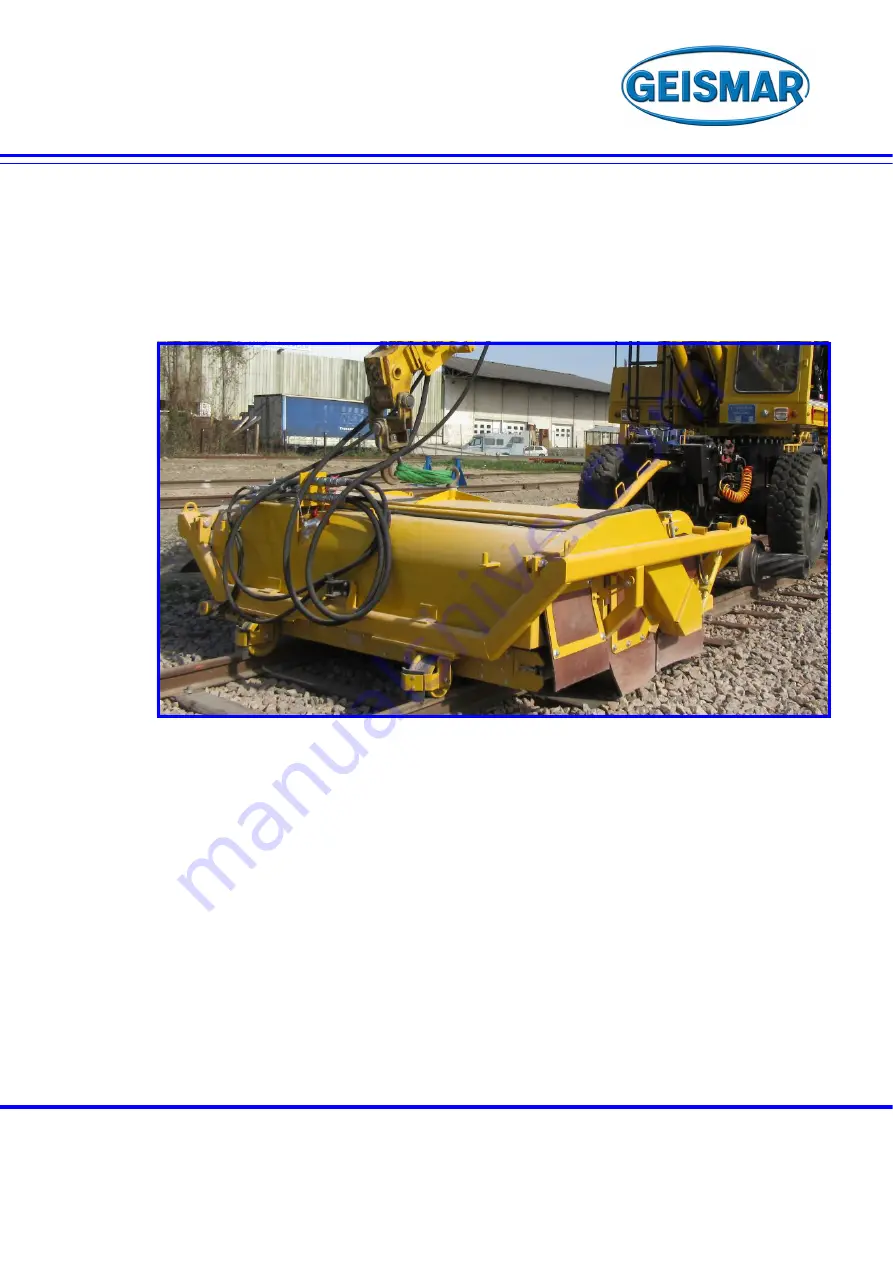
TRACK BRUSHING TOOL

Type

BRV

GB

Code :

H110200_0118

Summary of Contents for BRV

Page 1: ...0 40 Fax 33 0 1 46 40 71 70 E mail geismar geismar com Société des Anciens Etablissements L GEISMAR Boite Postale 50327 5 rue d Altkirch 68006 COLMAR CEDEX FRANCE Tél 33 0 3 89 80 41 90 Fax 33 0 3 89 80 42 28 E mail sav geismar com OPERATION MAINTENANCE INSTRUCTIONS Model TRACK BRUSHING TOOL Type BRV GB Code H110200_0118 ...

Page 2: ......

Page 3: ...TMENT WITHIN LOADING GAUGES 18 CHAPTER 4 EQUIPMENT 4 1 MAIN COMPONENTS 19 4 1 1 FITTED ROTATING BRUSH 19 4 1 2 CONVEYOR 20 4 1 3 MANUAL PARKING BRAKES STANDARD 20 4 1 4 RAIL BRUSH 21 4 1 5 COUPLING BAR 21 CHAPTER 5 OPERATING INSTRUCTIONS 5 1 HANDLING INSTRUCTIONS 23 5 2 CHECKS TO BE CARRIED OUT BEFORE START UP ON A RAILWAY WORK SITE 23 5 2 1 CHECKING MACHINE WELDED ASSEMBLIES 23 5 2 2 CHECKING THE...

Page 4: ...TION 35 CHAPTER 7 OPTIONAL EQUIPMENT 7 1 INSTALLING THE NEGATIVE BRAKE 37 7 2 VERIFICATION PROCEDURE 38 7 3 BRAKE ADJUSTMENT 38 7 4 MAXIMUM WEAR 40 7 5 MAINTENANCE 40 7 6 GREASE EQUIVALENCE TABLE 40 CHAPTER 8 STORAGE AND RECYCLING 8 1 GENERAL STORAGE INSTRUCTIONS 41 8 1 1 CHOICE OF STORAGE CONDITIONS 41 8 1 2 STORAGE PREMISES 41 8 1 3 PUTTING INTO STORAGE 41 8 2 DECOMMISSIONING DISASSEMBLY DISPOSA...

Page 5: ...Page 5 Société des Anciens Établissements L GEISMAR Prohibited Reproduction Marking STRIP OF PICTOGRAMS CODE H100572 STICKER H36803 STICKER H111862 LIFTING POINT HOOK H83014 ...

Page 6: ......

Page 7: ...cessary information for correct use of the work equipment as intended by the manufacturer The manual provides operation and maintenance instructions for the work equip ment It does not exempt the staff using the equipment from a proper training The operation and maintenance manual is an integral part of the work equipment It must be kept until the decommissioning of the machine The operating and m...

Page 8: ...re this equipment continues to provide satisfaction care should be taken to use and maintain it in accordance with the instructions in this manual GEISMAR draws your attention to these essential points Respect the maintenance periods and use the lubricants recommended Use only original parts and do not make any modifications Failure to do so may affect your warranty rights Furthermore modification...

Page 9: ...s of the accident This Operation and Safety Instructions Manual is intended for users and persons in charge of the equipment and its maintenance It might refer to various options of the machine and illustrations included in this handbook may differ from actual details and accessories of your equipment Basic equipment features may be similar but the GEISMAR Group reserves the right to make improvem...

Page 10: ... basis liquid or grease in excess shall be removed All safety signs shall be kept clean and readable at all times missing or illegible sign plates shall immediately be replaced STARTUP AND OPERATION MAINTENANCE REPAIRS Maintenance work must be performed by qualified personnel in control of the safety requirements applying to the operations to carry out Establish a progcylinder of inspection and re...

Page 11: ...f spillage clean the tank with dry clean cloths Always perform refill of fuel or maintenance liquids with the combustion engine switched off and cold and abide by the label warnings and safety precautions These operations must be carried out far from any heat source mobile phones must be switched off A spark could trigger an explosion and cause grievous bodily harm or death Fuel splatters or fuel ...

Page 12: ...ents danger of whiplash injury or fluid splatters 1 4 4 Lifting equipment TESTS AND CONTROLS The regulation in force stipulates checks and controls under load when the equipment is brought into service and periodical checks later on The persons in charge of intervening onto lifting equipment must be trained and authorized for this type of equipment Prior to any use of the machine they have to cont...

Page 13: ...R Prohibited Reproduction Chapter 2 Presentation 2 1 General presentation Manufacturer Société des Anciens Établissements L GEISMAR Boîte Postale 50327 5 rue d Altkirch 68006 COLMAR CEDEX FRANCE Name of the equipmentt Model TRACK BRUSHING TOOL Type BRV ...

Page 14: ... road digger and pushed along by it The tool is controlled directly via the digger controls When going over level crossings and other track equipment the digger will need to lift the BRV to avoid damaging the rubber tubes The BRV is fitted with a lifting bail to simplify handling operations and facilitate inspections The standard version of the BRV is designed to run on a track with gauge 1435 mm ...

Page 15: ...ndard 1435 mm Other track gauges on request between 950 and 1676 mm Number of wheels 4 not insulated Wheel diameter 190 mm Coupling bar length 2 2 m Operating speed 0 5 to 1 km h Coupling bar weight 41 kg Assembly weight 2400 kg Measured performance 6 cm of ballast swept at 1km h BRUSH Brush width 2750 mm Brush diameter 825 mm Brush rotation speed 260 rpm Brush rotation speed 250 mm Standard brush...

Page 16: ...d Reproduction Speed with Forward Reverse inversion 3 m s Maximum flow rate 65 m3 h HYDRAULICS Operating pressure motors 180 bar Useful hydraulic oil flow rate motors 120 l min Operating pressure cylinders 150 bar Useful hydraulic oil flow rate cylinders 30 l min ...

Page 17: ...Page 17 Société des Anciens Établissements L GEISMAR Prohibited Reproduction 3 2 Dimensions ...

Page 18: ...g it off the rails it may exceed the loading gauge Special safety measures must be defined in agreement with the rail network operator prior to placing or removing the BRV on or off the rails Lower section The BRV exceeds the temporary storage loading gauge NF 58 002 Appendix D When passing over track equipment the digger driver must raise the BRV ...

Page 19: ...ating brush 1 one conveyor 2 two manual parking brakes 3 two rail brushes 4 one coupling bar 5 4 1 1 Fitted rotating brush The rotating brush is made up of rubber tubes 55 mm in diameter The rotating brush is driven by a hydraulic motor It sweeps the track and throws the ballast onto the conveyor by means of the tubes and as a result of its speed of rotation 2 1 4 5 3 ...

Page 20: ...conveyor is driven by a hydraulic motor The direction in which the ballast is ejected is reversed by means of a manual inverter on the hydraulic control valve 4 1 3 Manual parking brakes standard Two screw brakes hold the BRV in position while it is being placed on the track or when parked on its own or coupled Option Negative brake see Chapter 7 Optional equipment CONVEYOR INVERTER ...

Page 21: ...rail fasteners There are a number of configurations for the position of these brushes see 5 3 1 and 5 3 2 4 1 5 Coupling bar The coupling bar connects the rail road digger and the BRV As supplied it is designed for a Rockinger dia 40 mm type coupling on the digger with a height of between 1 1 and 1 3 metres above the rail It is 2 2 metres in length ...

Page 22: ......

Page 23: ... transport and storage 5 2 1 Checking machine welded assemblies Visually check that there are no external faults deformations superficial cracks areas of wear or corrosion marks Inspect the condition of welds check there are no cracks If in doubt carry out a check of a suspect weld by liquid penetrant inspection Check the attachments bolts screws retighten if necessary If necessary grease the vari...

Page 24: ... than 2700 kg A central lifting bail a has been installed on the chassis for this purpose It is also fitted with 4 tie down rings b There must be no one in front of and or behind the machine while it is being handled Maintain a distance of 3 metres on each side of the machine Never lean on the BRV Never push a load with the BRV Avoid balancing the BRV During handling and transport the coupling bar...

Page 25: ... into the two tubes d located on the chassis Put the safety shaft pins e in place 5 3 2 Transporting by rail The BRV is towed by the rail road digger at two levels the central lifting bail a of the BRV and the end of the rail road digger boom the drawbar f of the BRV with the coupling bar of the rail road digger When travelling on rail ensure that the brushes 4 are in travelling position Slide the...

Page 26: ...il road digger will need to lift the BRV to avoid damaging the rubber tubes 5 3 3 Placing on track under live overhead wire The BRV can be placed on or taken off the track with a rail road loader by lifting the machine 200 mm above the track while complying with the clearance height under overhead wires of 4280 mm NF F 58 003 For all other rail road diggers uncouple the towbar while placing on or ...

Page 27: ...d namely 1 x supply P continuous flow rate of 120l min with pressure of 180 bar tube end swivel nut connector M42x2 in accordance with DIN3865 1 x primary return T flow rate of 120 l min tube end swivel nut connector M42x2 in accordance with DIN3865 2 x control valves A and B flow rate of 30 l min with pressure of 150 bar tube end swivel nut connector M36x2 24 cones in accordance with DIN3865 To s...

Page 28: ...so it stays in posi tion Option Negative brake see Chapter 7 Optional equipment Couple the BRV and the rail road digger using the coupling bar 5 Place the rail brushes 4 in working position Remove the safety shaft pins a pull the brush out and turn it over Put the safety shaft pins back in place Start the BRV running and leave it running for 5 minutes without moving to allow the hydraulic oil to f...

Page 29: ...st the height of the brush 1 using the joystick which controls the hydraulic cylinders Move forward with the rail road digger Speed must be between 0 5 and 1 km h HATCH POSITIONS left or right hand side CLOSED HALF OPEN FULLY OPEN MANUAL INVERTER PULSE KNOB WITH LOCKING TO THE RIGHT 1st pulse the belt turns in one direction 2nd pulse the belt turns in the other direction TO THE LEFT Locks the inve...

Page 30: ... des Anciens Établissements L GEISMAR Prohibited Reproduction The ballast is fed onto the whole of the conveyor 2 by the movement of brush 1 and is then ejected depending on which direction the belt is rotating OR 1 2 ...

Page 31: ... operating time of 5 to 10 minutes Periodically and in particular during intensive use lubricate the mechanical parts 6 3 Preventive maintenance EVERY 50 OPERATING HOURS IMPERATOR LC 3002 grease with grease pump with hydraulic nozzles Hydraulic cylinder 2 x 1 points Wheel dia 190 4 x 1 points Joint 2 x 1 points Clean and grease the transmission chain MECHANICAL PARTS Check the general condition of...

Page 32: ...his advice is not restrictive Continuous monitoring and well organised preventive maintenance can only extend the service life of the device It is absolutely essential to record and report all anomalies or deteriorations observed 6 4 Grease equivalence table Grease used IMPERATOR LC 3002 multifunction grease Brand Grease 1st fill IMPERATOR LC 3002 CASTROL LM GREASE SHELL ALBIDA HD 2 BP ENERGREASE ...

Page 33: ...lissements L GEISMAR Prohibited Reproduction 6 5 Wheel removal procedure To remove the wheel only one person required proceed as follows Unscrew M20 nut 4 Remove washer 9 Drift out shaft 2 holding wheel 1 to prevent it falling 2 4 9 1 ...

Page 34: ...Procedure for replacing a brake shoe If the lining is less than or equal to 1 mm thick it should be changed To change the shoe only one person required proceed as follows Release the brake fully Remove pin 6 Retrieve washer 7 Remove shoe 2 Minimum thickness of the lining 1 mm 7 6 5 ...

Page 35: ...his procedure One person at each end of the conveyor and one to release it To do this proceed as follows Unscrew the M16 nuts framed in red 6 8 Wear on the inner rubber protection Carry out a visual check as this governs the acoustic comfort of the BRV If faulty please contact out after sales service to carry out a repair UNDERSIDE VIEW OF THE BRV ...

Page 36: ......

Page 37: ...emove the wheel housings Loosen the M16 screws making sure not to lose the washers framed in red Gently loosen the M16 nuts framed in red so as to move the conveyor in wards by 10 mm red arrow When the conveyor has been moved tighten the nuts back up Install the new housings fitted with brakes Loosen the springs and tighten the M16 screws with their washers framed in red UNDERSIDE VIEW OF THE BRV ...

Page 38: ...essurised measure the distance between the outer surface of the washer and base of the shoe This must measure 67 mm If not carry out the brake adjust ment procedure see 7 3 If once the cylinder is depressurised the brake shoe is up against the bottom of the slot this indicates maximum wear see 7 4 7 3 Brake adjustment A system is provided to check whether a brake adjustment is needed The position ...

Page 39: ...g the M12 locknuts framed in red It is essential to comply with the dimension of 67 mm Replace the spring holder stops after setting Gently loosen the M6 screws framed in red so as to move the stops red arrow These must come lightly into contact with the pin when a pressure of 100 bar is applied to the cylinder note the stops may be turned round if needed ...

Page 40: ... reached return the wheel housings to our workshops 7 5 Maintenance Greasing the brake blocks 1 and rods 2 7 6 Grease equivalence table Grease used IMPERATOR LC 3002 multifunction grease Brand Grease 1st fill IMPERATOR LC 3002 CASTROL LM GREASE SHELL ALBIDA HD 2 BP ENERGREASE LC 2 ELF MULTIPLEX MAXIMUM WEAR POSITION 2 1 ...

Page 41: ...Putting into storage The condition of the work equipment when put to work after storage depends on how well it was prepared and protected before being placed in storage Before resuming work after storage clean the equipment when cleaning protect the moving parts with grease A technical inspection should be carried out to uncover any possible anomalies 6 2 Decommissioning Disassembly Disposal When ...

Page 42: ......

Page 43: ...coded plates comprising a list and a drawing IN THIS EXAMPLE We wish to replace Cylinder 8 1 of subassembly H82607_NO You will find the code for this cylinder V10016_NO in parts list 2 Enter this information on your parts replacement request 7 2 After sales service contact details Tel 33 0 3 89 80 41 90 Fax 33 0 3 89 80 42 28 e mail sav geismar com 1 2 ...

Page 44: ......

Page 45: ...lissements L GEISMAR Boite Postale 50327 5 rue d Altkirch 68006 COLMAR CEDEX FRANCE Tél 33 0 3 89 80 41 90 Fax 33 0 3 89 80 42 28 E mail sav geismar com SPARE PARTS CATALOG Model TRACK BRUSHING TOOL Type BRV Code H110200_0118 ...

Page 46: ......

Page 47: ...0222_NO 18 BASEPLATE BRUSH H110123_NO 20 MANUAL PARKING BRAKE H111183_NO 22 HYDRAULIC CONNECTION H110213_NO 24 SECTION B HYDRAULIC COMPONENTS HYDRAULIC EQUIPMENT H110203_NO 28 HYDRAULIC DIAGRAM H110217_NO 30 MOTOR HYDRAULIC CIRCUIT H110218_NO 34 BRUSH RAISE LOWER HYDRAULIC CIRCUIT H110219_NO 36 BRUSH RAISE LOWER CYLINDER V10084_NO 38 OPTIONAL COMPONENTS NEGATIVE BRAKE ASSEMBLY WITH WHEELS H111583_...

Page 48: ......

Page 49: ...Section A Mechanical Components ...

Page 50: ... and n of the machine Serial number Order n and description of spare parts Page 6 Item Qty Description Code RAIL BRUSH H110200_NO 1 1 MECHANICAL ASSEMBLIES H110202_NO 2 1 HYDRAULIC EQUIPMENT H110203_NO 6 1 COUPLING BAR H103160 7 1 HYDRAULIC CONNECTION H110213_NO 79 2 SHAFT PIN D01074 ED 07 17 ...

Page 51: ......

Page 52: ... 1 LEFT COVER H111857 12 2 BASEPLATE BRUSH H110123_NO 13 1 DEFLECTOR H110320 14 1 KEY H110189 15 2 FLAP HOOK H110236 17 1 BODY H110332 18 2 PLATE H110294 19 2 DEFLECTOR ROD H110287 20 1 PROTECTION PANEL H111860 21 1 PROTECTION PANEL H110363 22 1 PROTECTION PANEL H110364 24 1 TENSIONER SUPPORT H110366 50 2 BRUSH SHAFT BEARING D20369 51 1 MANOEUVRING CLEVIS D17443 52 1 LIFTING BAIL D10707 53 2 GAS C...

Page 53: ......

Page 54: ...te Fabrication year and n of the machine Serial number Order n and description of spare parts Page 10 Item Qty Description Code BRUSH SHAFT H110216_NO 1 1 BRUSH SHAFT D20355 2 240 RUBBER TUBE D20356 3 240 HOSE CLIP D20354 OPTION 240 HIGH STRENGTH RUBBER TUBE D20435 ED 07 17 ...

Page 55: ......

Page 56: ... Order n and description of spare parts Page 12 Item Qty Description Code RUBBER PROTECTION H110155_NO 2 1 FRONT RIGHT SIDE SKIRT H110116 3 1 FRONT SKIRT H110119 4 1 REAR RIGHT SIDE SKIRT H110115 9 1 FRONT LEFT SIDE SKIRT H110160 10 1 REAR LEFT SIDE SKIRT H110158 11 100 BOLT C02662 12 4 SCREW C00341 13 4 WASHER C01022 ED 09 17 ...

Page 57: ......

Page 58: ... year and n of the machine Serial number Order n and description of spare parts Page 14 Item Qty Description Code FRONT WHEEL HOUSING H110220_NO 1 1 FRONT HOUSING H110128 2 1 FITTED NON INSULATED WHEEL D190 H00108 2 1 1 INNER SECTION KIT H21851 3 2 SCREW C00396 4 2 WASHER C01818 ED 07 17 ...

Page 59: ......

Page 60: ...and description of spare parts Page 16 Item Qty Description Code REAR RIGHT WHEEL HOUSING H110221_NO 1 1 REAR RIGHT HOUSING H110199 2 1 FITTED NON INSULATED WHEEL D190 H00108 2 1 1 INNER SECTION KIT H21851 3 2 SCREW C00396 4 2 WASHER C01818 5 1 SUPPORT H110201 6 1 PILOT H110224 7 2 SCREW C00343 8 2 NUT C02608 9 4 WASHER C01036 ED 07 17 ...

Page 61: ......

Page 62: ... and description of spare parts Page 18 Item Qty Description Code REAR LEFT WHEEL HOUSING H110222_NO 1 1 REAR LEFT HOUSING H110198 2 1 FITTED NON INSULATED WHEEL D190 H00108 2 1 1 INNER SECTION KIT H21851 3 2 SCREW C00396 4 2 WASHER C01818 5 1 SUPPORT H110201 6 1 PILOT H110224 7 2 SCREW C00343 8 2 NUT C02608 9 4 WASHER C01036 ED 07 17 ...

Page 63: ......

Page 64: ...on year and n of the machine Serial number Order n and description of spare parts Page 20 Item Qty Description Code BASEPLATE BRUSH H110123_NO 1 1 SUPPORT H110124 2 4 RUBBER TUBE H111370 3 4 HOSE CLIP D20354 4 2 SHAFT PIN D01075 5 3 QUICK LINK D06929 6 1 CHAIN LEN 1000 D01197 ED 06 17 ...

Page 65: ......

Page 66: ... of the machine Serial number Order n and description of spare parts Page 22 Item Qty Description Code MANUAL PARKING BRAKE H111183_NO 2 1 KNOB H38290 3 1 BRAKE SHAFT H37715 4 1 SPLIT PIN C01179 5 1 BRAKE SHOE H82317 6 1 WASHER C01040 7 1 SPLIT PIN C01158 8 4 SCREW C00331 9 4 WASHER C01816 ED 04 17 ...

Page 67: ......

Page 68: ...D483910 2 2 PLUG DD483911 3 2 QUICK RELEASE HALF COUPLER 3 4 DD483810 4 2 PLUG DD483811 5 2 1 FEMALE COUPLER DD483931 6 1 PLUG DD483930 7 2 1 MALE COUPLER DD483830 8 2 PLUG DD483829 9 4 MALE UNION D00210 10 4 THREADED REDUCER D00253 11 2 HYDRAULIC HOSE LEN 3000 D15634 12 2 HYDRAULIC HOSE LEN 3200 D19914 13 4 MALE UNION D00213 14 4 THREADED REDUCER D13642 15 2 DOUBLE UNION D00147 16 2 BLANKING PLAT...

Page 69: ......

Page 70: ......

Page 71: ...Section B Hydraulic Components ...

Page 72: ... parts Page 28 Item Qty Description Code HYDRAULIC EQUIPMENT H110203_NO 1 1 HYDRAULIC DIAGRAM H110217_NO 2 1 MOTOR HYDRAULIC CIRCUIT H110218_NO 3 1 BRUSH RAISE LOWER HYDRAULIC CIRCUIT H110219_NO 10 2 BRUSH RAISE LOWER CYLINDER V10084_NO 11 1 HYDRAULIC MOTOR D20351 12 1 HYDRAULIC MOTOR D20352 13 1 FITTED HYDRAULIC UNIT D20360 14 1 CONTROL UNIT D19878 ED 07 17 ...

Page 73: ......

Page 74: ...ate Fabrication year and n of the machine Serial number Order n and description of spare parts Page 30 Item Qty Description Code HYDRAULIC DIAGRAM H110217_NO IF YOUR BRV IS FITTED WITH NEGATIVE BRAKES REFER TO THE HYDRAULIC DIAGRAM H111868 FOR OPTIONAL COMPONENTS ED 04 17 ...

Page 75: ......

Page 76: ......

Page 77: ......

Page 78: ...ER DD483830 4 1 PLUG DD483829 5 3 SWIVELLING COUPLING D00074 6 2 DOUBLE UNION D12211 7 5 SWIVELLING BRACKET D00119 8 1 MALE UNION D00210 9 2 THREADED REDUCER D13643 10 1 EQUAL T D00308 11 1 REDUCER D00281 12 1 THREADED REDUCER D00255 13 5 SWIVELLING COUPLING D00045 14 2 MALE UNION D00201 15 2 HYDRAULIC HOSE LEN 1700 D09703 16 1 HYDRAULIC HOSE LEN 1200 D13482 17 2 SWIVELLING BRACKET D00123 18 1 HYD...

Page 79: ......

Page 80: ...PLER DD483910 2 1 PLUG DD483911 3 1 COUPLING DD483810 4 1 PLUG DD483811 5 2 SWIVELLING COUPLING D00071 6 2 DOUBLE UNION D11520 7 2 REDUCER D10362 8 2 EQUAL T D00301 9 4 MALE UNION D09858 10 2 HYDRAULIC HOSE LEN 2500 D15566 11 2 SWIVELLING COUPLING D00042 12 2 SWIVEL COUPLING D00061 13 5 SWIVELLING BRACKET D00116 14 2 REVERSED SWIVELLING TEE D00563 15 2 PRESSURE TAP D04849 16 2 HYDRAULIC HOSE LEN 3...

Page 81: ......

Page 82: ... description of spare parts Page 38 Item Qty Description Code BRUSH RAISE LOWER CYLINDER V10084_NO NOTA for cylinders spare parts give the indication of the code number incrusted on the cylinder body then refer to the following table for reference batches of parts A B C HYDRAULIC CYLINDER CODE SET OF SEALS D20376 D20379 CODE DE L ARTICLE ...

Page 83: ......

Page 84: ......

Page 85: ...Optional Components ...

Page 86: ...r n and description of spare parts Page 42 Item Qty Description Code NEGATIVE BRAKE ASSEMBLY WITH WHEELS H111583_NO 1 2 PILOT H110224 2 4 NUT C02608 3 4 SCREW C00343 4 8 WASHER C01036 5 1 NEGATIVE BRAKE ASSEMBLY B H111826_NO 6 1 NEGATIVE BRAKE ASSEMBLY A H111831_NO 7 2 SUPPORT H110201 8 1 HYDRAULIC BRAKE DIAGRAM H111868_NO ED 12 17 ...

Page 87: ......

Page 88: ...2 2 SCREW C00393 3 2 WASHER C01818 4 1 CYLINDER D20468 5 2 SPLIT PIN C02667 6 4 ADJUSTABLE STOP H111830 7 8 WASHER C01035 8 8 SCREW C00330 9 1 ADAPTER COUPLING D20465 10 2 COMPRESSION SPRING D20469 11 4 WASHER C01038 12 2 NUT C00121 13 2 NUT C00085 14 1 NEGATIVE BRAKE GUIDANCE ASSEMBLY H111829 15 1 PILOT A H111828 18 1 ROD BLOCK ASSEMBLY H111847 36 1 CONVEX BLOCK ASSEMBLY H111844 37 1 SCREW C00757...

Page 89: ......

Page 90: ...CYLINDER D20468 3 2 COMPRESSION SPRING D20469 4 2 NUT C00121 5 4 WASHER C01038 6 2 SPLIT PIN C02667 8 2 WASHER C01818 9 2 SCREW C00393 10 8 WASHER C01035 11 8 SCREW C00330 12 2 NUT C00085 13 1 ADAPTER COUPLING D20465 14 1 NEGATIVE BRAKE GUIDANCE ASSEMBLY H111832 15 1 PILOT B H111833 17 1 ROD BLOCK ASSEMBLY H111822 18 4 ADJUSTABLE STOP H111830 39 2 GREASE FITTING D00584 40 2 SCREW C02043 43 1 CONCA...

Page 91: ......

Page 92: ...and description of spare parts Page 48 Item Qty Description Code HYDRAULIC BRAKE DIAGRAM H111868_NO 1 1 HYDRAULIC HOSE WITH FITTINGS LEN 2500 D15566 2 1 HYDRAULIC HOSE WITH FITTINGS LEN 4500 D16213 4 1 REVERSED T D00563 5 1 SWIVELLING BRACKET D00116 6 1 MALE UNION D00190 7 1 PLUG D19598 8 10 PIPE CLAMP D00606 9 10 SCREW C00339 ED 01 18 ...

Page 93: ......

Page 94: ......

Reviews: