6
How to Connect the 2x4 Switcher for HDMI 1.3
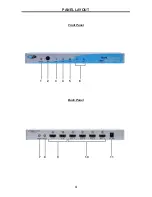
1. Connect up to two HDMI source devices to the 2x4 Switcher for HDMI 1.3
using the supplied HDMI cables.
2. Connect up to four HDMI capable devices to the 2x4 Switcher for HDMI 1.3
using the supplied HDMI cables.
NOTE:
The display connected to the port labeled OUT 1 will have its EDID
used when the external EDID mode is active. If there are displays with different
resolutions in the setup it is recommended that the display with the lowest
resolution be placed on the HDMI port labeled OUT 1. This way, all of the
displays should be able to display an image when the external EDID mode is
active.
3. Connect the included 5V DC power adapter to the 2x4 Switcher for HDMI
1.3 power input port.
4. Power on the displays fi rst and then the source.
How to Operate the 2x4 Switcher for HDMI 1.3
Use the included RMT2-IR remote control to switch between HDMI inputs.
Please see page 7 for a description of the RMT2-IR remote control.
EDID Modes and Reset Buttons
The EDID source is selectable between the display connected to the HDMI
output port labeled OUT 1 or the built-in internal EDID. These 2 modes are
selectable by toggling the EDID button located on the back panel. To switch
modes, follow the instructions below.
1. Note the current EDID mode by viewing the front panel’s LED array. If the
INT LED is active the internal EDID mode is in use. If the EXT LED is active
the external EDID mode is in use.
2. If the currently selected EDID mode is not the desired EDID mode, press the
EDID button on the rear panel once. The active LED will now switch and the
new EDID mode will become active once the unit is reset.
3. Press the reset button to cycle power and initiate the newly selected EDID
mode.
The EDID carries import information that the source reads to determine what
resolutions and features are supported. The internal EDID has support for
resolutions up to 1080p and includes Dolby TrueHD and DTS-HD features.
CONNECTING AND OPERATING THE 2X4 SWITCHER FOR HDMI 1.3


