10
Chapter 5 Using of Touch Monitor
Section 1 Notices
1. Windows 10/7 computer supports On
-
Lap 1102I touch function. If the
computer doesn’t adopt Windows 10/7, it may not be able to use
touchscreen function on 1102I monitor.
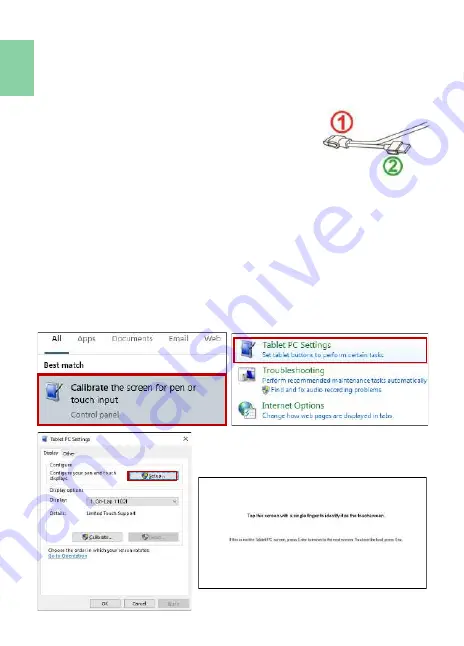
2. USB power and touch cable
①
transmits both pow-
er and touch signals at the same time;
②
can only
transmit power. If
①
connector does not connect
to a USB port on the computer, the touch function
will be no longer available.
Section 2 Touch Screen Settings on Windows 10/7
If the computer doesn’t enable touchscreen function automatically or the
monitor doesn’t sense touch position accurately, please use Windows 10/7
[Tablet PC Settings]
in [Control Panel] to start touch screen setting.
In Windows 10, search “Calibrate” and select
“Calibrate the screen for pen
or touch input”
.
In Windows 7, click
[Tablet PC Settings]
in [Control Panel] to start touch
screen settings.
In the Fig. shown, please select “Setup”. When the display shows on
-
screen
instructions on On
-
Lap 1102I, touch On
-
Lap 1102I to complete touch screen
setting.
Summary of Contents for 1102I
Page 1: ...ユーザーガイド On Lap 1102I ...
Page 7: ...Chapter 1 Parts of On Lap Product Accessories Section 1 Parts Description 1 ...
Page 19: ...IV ...
Page 20: ...V ...
Page 21: ...13 ...
Page 22: ...14 ...
Page 23: ...横置き表示の最低角度は 40 です 吸着面 をブルーの線より高いところに置かないでくださ い それよりも高いところにおくと倒れることがあ ります 15 ...
Page 24: ... 16 ...
Page 25: ...17 ...
Page 26: ...18 LED OSD LED ...
Page 27: ... 19 ...
Page 28: ...20 3 ...
Page 29: ...8 21 ...
Page 30: ... R53848 RoHS 22 ...


