Gear4music DP-6 User Manual Download Page 11

11

RECORDING

The DP-6 features an in-built 2 track recorder, 
allowing you to record, playback and overdub one 
part on top of another, using the same or a different 
voice. 

Before recording, set the desired voice, tempo, 
reverb level and other functions.

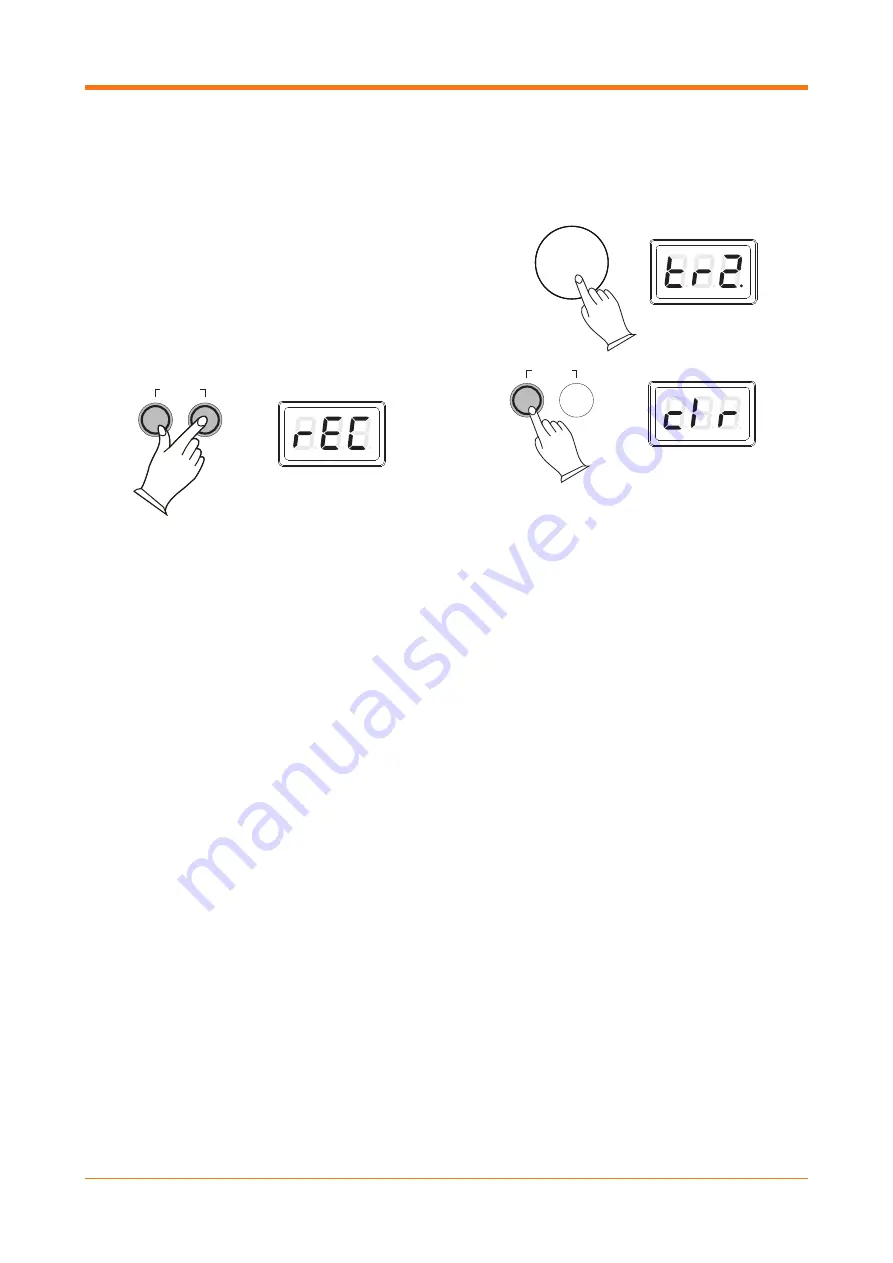
To select the track you want to record on, press 
the [TRACK] button and then use the data control 
wheel to select between track 1 or track 2. (If either 
of the tracks contain recorded data, the display will 
show a “.” after the track number.)

Once you are ready to record, press the [TRACK] 
and [PLAY] buttons together to enter the recording 
mode. The display will flash “rEC” and then show 
the track selected.

The metronome can be turned on/off as required 
by pressing the [METRONOME] button. The 
metronome sound acts as a guide and will not be 
recorded.

Recording will begin as soon as you start to play.

To stop recording, press the [TRACK] button. 
Recordings will be stored even when the piano is 
turned off/on.

PLAYBACK

To listen to your recorded tracks, press the [TRACK] 
button when in normal performance mode.

Use the data control wheel to select from the 
following playback options:

TR1: playback the audio recorded to track 1.

TR2: playback the audio recorded to track 2.

SNG: playback the audio from both tracks 
simultaneously.

Press the [PLAY] button to begin playback.

To stop playback and return to performance mode, 
press the [PLAY] button again.

CLEARING RECORDED TRACKS

To erase the recorded tracks, when in record mode, 
select the track you want to clear with the data 
control wheel and then press the [TRACK] button 
twice quickly to delete the recording.

When recording a new track, any previous 
recording on that track will automatically be 
deleted.

TRACK

PLAY

TRACK

PLAY

TRACK

PLAY

TRACK

PLAY

METRONOME TRANSPOSE

STANDBY/ON

RECORD

RECORD

DATA CONTROL

DATA CONTROL

RECORD

RECORD

DEMO

TRACK

PLAY

TRACK

PLAY

TRACK

PLAY

TRACK

PLAY

METRONOME TRANSPOSE

STANDBY/ON

RECORD

RECORD

DATA CONTROL

DATA CONTROL

RECORD

RECORD

DEMO

TRACK

PLAY

TRACK

PLAY

TRACK

PLAY

TRACK

PLAY

METRONOME TRANSPOSE

STANDBY/ON

RECORD

RECORD

DATA CONTROL

DATA CONTROL

RECORD

RECORD

DEMO

TRACK

PLAY

TRACK

PLAY

TRACK

PLAY

TRACK

PLAY

METRONOME TRANSPOSE

STANDBY/ON

RECORD

RECORD

DATA CONTROL

DATA CONTROL

RECORD

RECORD

DEMO

TRACK

PLAY

TRACK

PLAY

TRACK

PLAY

TRACK

PLAY

METRONOME TRANSPOSE

STANDBY/ON

RECORD

RECORD

DATA CONTROL

DATA CONTROL

RECORD

RECORD

DEMO

TRACK

PLAY

TRACK

PLAY

TRACK

PLAY

TRACK

PLAY

METRONOME TRANSPOSE

STANDBY/ON

RECORD

RECORD

DATA CONTROL

DATA CONTROL

RECORD

RECORD

DEMO

Summary of Contents for DP-6

Page 1: ...USERMANUAL DP 6 DP 6 WH DIGITAL PIANO...

Page 2: ...DIGITAL PIANO...

Page 3: ...en Tischdecken Vorh ngen usw blockiert werden AVVERTIMENTO IT Non aprire il coperchio Se fosse necessario riferirsi ad un esperto Non esporre il prodotto a fonti di calore luce del sole diretta polver...

Page 4: ...1 x Power supply unit PSU 1 x Sustain pedal 1 x User manual 1 x USB cable FEATURES Full sized keyboard with 88 hammer action keys Achieve a wide range of sounds thanks to 16 instrument voices and 64 n...

Page 5: ...utton to commence playback 12 LED DISPLAY Use this screen to view the voice you re using 13 DATA CONTROL WHEEL Use this wheel to scroll through various options 14 VOICE Use these buttons to select you...

Page 6: ...is to play an external sound source from the DP 6s speakers 20 LINE OUT Use this to connect the DP 6 to an external amplifier interface or mixer 21 12v DC POWER INPUT Use this input to connect the DP...

Page 7: ...l Auto Power Off after 30 minutes of not being used except when playing demo songs To de activate the Auto Power Off function hold the first white key and first black key from the left side of the key...

Page 8: ...ignature of the metronome can also be set To do this press and hold the METRONOME button until the display shows the default time signature 4 4 Release the button and then use the data control wheel t...

Page 9: ...REVERB CHORUS EQ REVERB REVERB CHORUS EQ CHORUS DATA CONTROL CHORUS REVERB TRANSPOSE BRIGHT PIANO E PIANO 2 FMEP CHURCH ORGAN CLAVINET CHOIR BANK WARM PAD ELECTRIC BASS GRAND PIANO E PIANO 1 VIBES ROC...

Page 10: ...EP CHURCH ORGAN CLAVINET CHOIR BANK WARM PAD ELECTRIC BASS GRAND PIANO E PIANO 1 VIBES ROCK ORGAN HARPSI STRINGS FANTASIA UPRIGHT BASS BRIGHT PIANO E PIANO 2 FMEP CHURCH ORGAN CLAVINET CHOIR BANK WARM...

Page 11: ...to select from the following playback options TR1 playback the audio recorded to track 1 TR2 playback the audio recorded to track 2 SNG playback the audio from both tracks simultaneously Press the PL...

Page 12: ...down both the METRONOME and TRANSPOSE buttons whilst powering on the piano The display will show Rst When the METRONOME and TRANSPOSE buttons are released the piano will return to performance mode an...

Page 13: ...VOICE NAMES Pno GRAND PIANO EP1 E PIANO 1 u16 VIBES ro9 ROCK ORGAN hAr HARPSI Str STRINGS FAn FANTASIA UP8 UPRIGHT BASS bno BRIGHT PIANO EP2 E PIANO 2 FEP FM EP Ch9 CHURCH ORGAN CLA CLAV Chr CHOIR PAd...

Page 14: ...Line In 1 4 Jack Line Out MIDI Out USB to Host 1 4 Jack Sustain Pedal Input 2 x 1 4 Jacks Headphones Outputs Speakers 2 x 10W Dimensions Height 420mm x Width 1390mm x Depth 780 mm Weight 26 1kg piano...

Page 15: ......

Page 16: ...o not hesitate to contact the Gear4music Customer Service Team on 44 0 330 365 4444 or info gear4music com KETTLESTRING LANE YORK YO30 4XF UNITED KINGDOM METALLV GEN 45A 195 72 ROSERSBERG STOCKHOLM SV...

Reviews: