background image

19

RECORDING

The DP-12 features an in-built 2 track recorder, 
allowing you to record, playback and overdub one 
part on top of another, using the same or a different 
voice. 

Before recording, set the desired voice, tempo, 
reverb level and metronome functions.

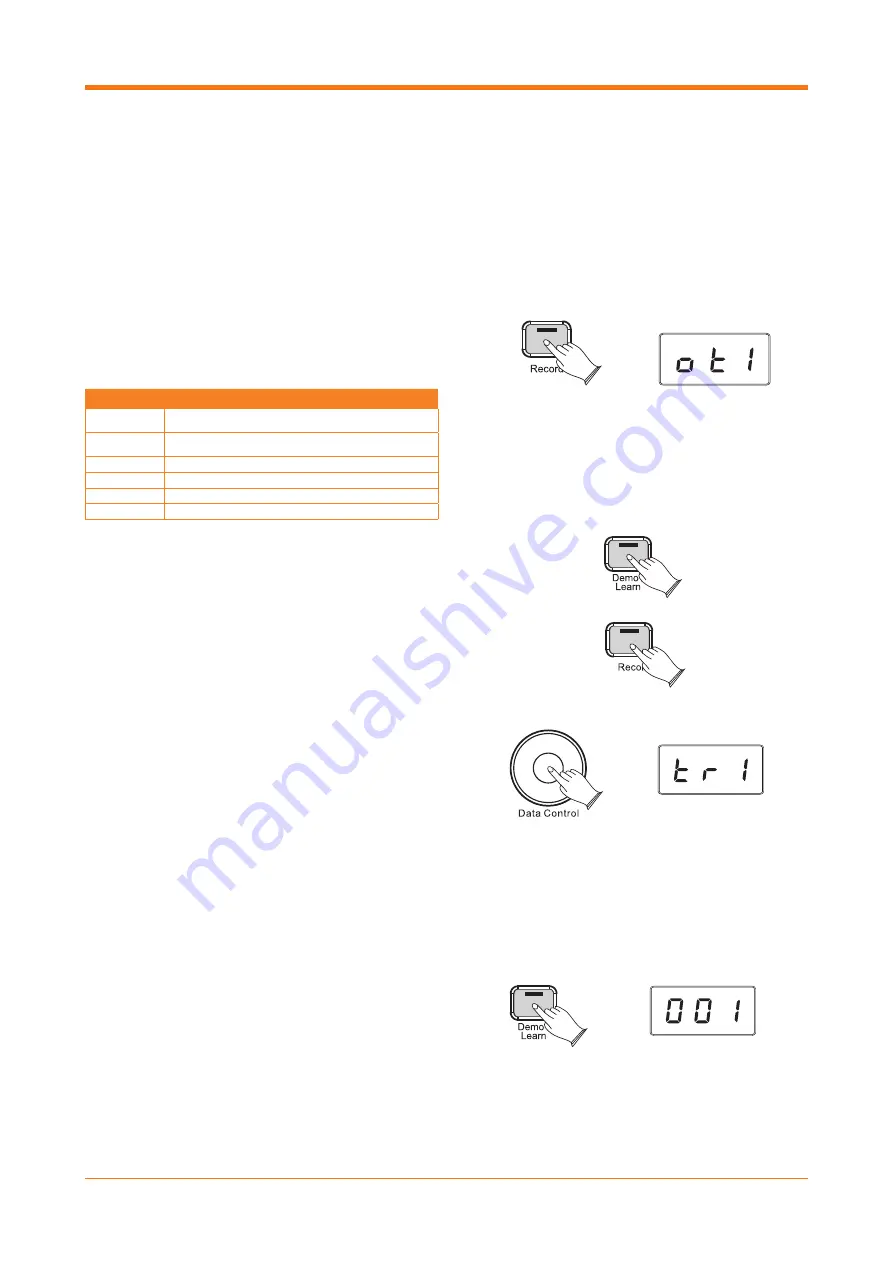
Press the [RECORD] button to enter record mode, 
and then use the data control wheel to select from 
the following options:

Once you have selected the required track settings, 
recording can be started by either by pressing the 
[DEMO/LEARN] button, or begins automatically as 
soon as you start to play.

To stop recording, press the [RECORD] button. 
Recordings will be stored even when the piano is 
turned off/on.

PLAYBACK

To listen to your recorded tracks, press the 
[RECORD] and [DEMO/LEARN] buttons at the same 
time.

Use the data control wheel to select from the 
following playback options:

 tr1:

 playback the audio recorded to track 1.

 tr2:

 playback the audio recorded to track 2.

SnG:

  playback the audio from both tracks 

simultaneously.

Press the [DEMO/LEARN] button to begin playback. 
During playback of the song, the display will show 
“001.” If there is nothing recorded on tracks 1 or 
2, the display will momentarily show “Err” and the 
piano will return to performance mode, with the 
display then showing the selected voice number.

To stop playback and return to performance mode, 
press the [DEMO/LEARN] button again.

DISPLAY

RECORDING FUNCTION

ot1

Record to only Track 1 (Track 2 will not be played during 
recording)

ot2

Record to only Track 2 (Track 1 will not be played during 
recording)

tr1

Record to Track 1 (Track 2 will be played during recording)

tr2

Record to Track 2 (Track 1 will be played during recording)

CL1

Use this setting to clear recordings on Track 1

CL2

Use this setting to clear recordings on Track 2

Summary of Contents for DP-12

Page 1: ...DIGITAL PIANO DP 12 USERMANUAL ...

Page 2: ...empli de liquide tel qu un vase ne doit être posé dessus Ne placer aucune source de flamme nue telle qu une bougie allumée sur l appareil Assurer une circulation d air suffisante et éviter d obstruer les fentes le cas échéant afin d éviter une surchauffe interne La ventilation ne doit pas être bloquée en couvrant l appareil avec des objets tels que des journaux des nappes des rideaux etc La prise ...

Page 3: ...tranje toplote Ventilacijo se ne sme ovirati s prekrivanjem naprave s predmeti kot so časopisi prti zavese itn Omrežni vtič se uporablja za izklop naprave iz električnega omrežja Poskrbite da je omrežna vtičnica zlahka dostopna in izvlecite vtikač iz vtičnice če opazite kakršno koli nepravilnost pri napravi ADVERTENCIA ES No abra la tapa No intente reparar el aparato usted mismo Llévelo a reparar ...

Page 4: ...IDI 9 FUNCTION MODE 10 VOICE SELECT 11 SPLIT MODE 12 LAYER MODE 13 TWIN MODE 14 PITCH ADJUSTMENT 15 Octave 15 Transpose 15 Master Tuning 15 TOUCH 16 REVERB CHORUS EFFECTS 16 17 EQ ADJUSTMENT 17 METRONOME 18 RECORDING 19 20 Playback 19 Clearing Recorded Tracks 20 LEARNING FUNCTION 20 MIDI FUNCTIONS 21 FACTORY RESET 21 MIDI IMPLEMENTATION CHART 22 DEFAULT SETTINGS TABLE 23 ADVANCED FUNCTIONS KEYBOAR...

Page 5: ...DP 12 Digital Piano Power Supply Unit PSU Set Up Guide User Manual FEATURES 88 Hammer Action Keys 32 Instrument Voices 64 Note Polyphony Sounds Include Grand Upright Electric Pianos Organs Strings and More Internal Speakers and 2 x Headphone Outputs Record and Overdub Function Learning Mode In Built Reverb and Chorus USB MIDI Stereo Line In Out Connections ...

Page 6: ...O LEARN BUTTON 8 DATA CONTROL WHEEL 6 REAR PANEL 9 PEDAL INPUT 10 USB TO HOST 11 MIDI OUTPUT 12 AUX INPUT 3 5MM JACK 13 LINE INPUT 1 4 JACK 14 LINE OUTPUTS 1 4 JACK L R 15 12V DC POWER INPUT 16 HEADPHONES 1 2 OUTPUTS Note Headphone outputs situated under the left hand side of the piano 2 3 4 6 7 5 1 8 9 10 11 12 13 14 15 16 ...

Page 7: ...button The display will light up AUTO POWER OFF The unit will Auto Power Off after 30 minutes of no operation except when playing demo songs To de activate the Auto Power Off function press the FUNCTION RIGHT button to enter edit mode Then press piano key Eb0 The display will show oFF Repeat this process to re activate the Auto Power Off function the display will this time show on SETTING THE VOLU...

Page 8: ...otes played after the pedal is pressed held down will not sustain SOFT PEDAL LEFT Pressing the soft pedal will change the character of the notes played making them softer and quieter DEMO SONGS The DP 12 has 55 in built demo songs To enter the demo song mode press the DEMO LEARN button The button will flash Press the DEMO LEARN button again to listen to demo song 1 The display will show 001 The de...

Page 9: ...uilt speakers or headphone output There are 1 4 Jack and 3 5mm Jack connection options The volume of these inputs are controlled by the external devices connected MIDI OUTPUT Use the MIDI OUTPUT to transfer MIDI data including note and touch velocity via a 5 pin MIDI cable not included from the piano to the MIDI INPUT of a compatible external device USING USB MIDI The DP 12 allows the transfer of ...

Page 10: ...rresponding piano key and then use the data control wheel to set the parameter value as desired Please refer to the advanced functions keyboard chart for the full list of functions and corresponding keys on page 24 To re assign the data control wheel to select the piano s different voices press the FUNCTION RIGHT button then press piano key C 2 The display will show the current voice number ...

Page 11: ...0 EP 1 006 G0 EP 2 007 A0 Clavinet 008 B0 Harpsichord 009 C1 Rock Organ 010 D1 Church Organ 011 E1 Vibraphone 012 F1 Violin 013 G1 Harp 014 A1 Strings 1 015 B1 Strings 2 slow strings 016 C2 Choir 017 D2 Trumpet 018 E2 French Horns 019 F2 AltoSax 020 G2 Oboe 021 A2 Bassoon 022 B2 Acoustic Guitar 023 C3 Jazz Guitar 024 D3 Upright Bass 025 E3 Electric Bass 026 F3 Brass 027 G3 Synth Brass 028 A3 Flute...

Page 12: ...iano key or use the data control wheel to select the split point key number The volume of the left and right hand voices can be individually controlled To adjust the left hand voice volume press the FUNCTION RIGHT button to enter edit mode followed by the Bb0 piano key The display will show the volume setting default volume is 127 The data control wheel can now be used to adjust the volume between...

Page 13: ...t layer voices with the main voice remaining the same Please note that polyphony may be reduced when using layer mode The individual volumes of the two layered voices can be adjusted if required To do this press the FUNCTION RIGHT button to enter edit mode followed by either piano key F 0 to select the main voice or Ab0 to select the layer voice The data control wheel can now be used to adjust the...

Page 14: ...ame notes simultaneously Press the FUNCTION RIGHT button to enter edit mode Then press piano key C 0 to activate twin mode The display will show on and the two sections will be keys A 1 to C3 for the left hand section and C 3 to C7 for the right hand section To exit twin mode press the FUNCTION RIGHT button to enter edit mode then press piano key C 0 The display will momentarily show oFF ...

Page 15: ...SE To transpose the piano s key press the FUNCTION RIGHT button to enter edit mode then press piano key F 1 The display will momentarily show 000 and the data control wheel can now be used to raise or lower the pitch in semitone increments from 12 to 12 MASTER TUNING To adjust the fine tuning of the piano press the FUNCTION RIGHT button to enter edit mode then press piano key Bb1 The display will ...

Page 16: ...played The display will show the selected sensitivity setting REVERB CHORUS EFFECTS The DP 12 has 10 reverb and 13 chorus built in effects to add extra depth and expression to your performances REVERB To select the reverb type press the FUNCTION RIGHT button to enter edit mode followed by piano key Eb2 The data control wheel can now be used to choose the desired reverb type from the list below To ...

Page 17: ... wheel can be used to set the bass level from 12 to 12 as desired TO CHANGE THE TREBLE LEVEL Press the FUNCTION RIGHT button to enter edit mode followed by piano key Eb4 Grand piano 1 Grand piano 2 Bright Piano Honky Tonk Piano Accordion Grand piano 1 Grand piano 2 Bright Piano Honky Tonk Piano Accordion Grand piano 1 Grand piano 2 Bright Piano Honky Tonk Piano Accordion Grand piano 1 Grand piano ...

Page 18: ...enter edit mode followed by piano key Eb1 The display will show the default 4 4 and the data control wheel can now be used to select the required time signature from the following options 2 2 1 4 2 4 3 4 4 4 5 4 6 4 3 8 6 8 7 8 9 8 12 8 Please note the data control wheel will now be assigned to control metronome time signatures To re assign the data control wheel to select the piano s different vo...

Page 19: ...ntrol wheel to select from the following playback options tr1 playback the audio recorded to track 1 tr2 playback the audio recorded to track 2 SnG playback the audio from both tracks simultaneously Press the DEMO LEARN button to begin playback During playback of the song the display will show 001 If there is nothing recorded on tracks 1 or 2 the display will momentarily show Err and the piano wil...

Page 20: ...r the learning mode then use the data control wheel to select the required song The song number will be shown on the display and both the METRONOME LEFT and FUNCTION RIGHT buttons will light up Select from the following options Press RECORD to listen to the full demo song both left and right hand sections together Press METRONOME LEFT to mute the left hand song section Pressing RECORD will now pla...

Page 21: ...RIGHT button to enter function mode Press piano key C 3 to turn this function on off as required The selected option will be indicated on the display FACTORY RESET Performing a factory reset will clear all memory settings and restore all functions to their factory default settings To perform a factory reset firstly turn the piano power off Then hold down both the METRONOME LEFT and FUNCTION RIGHT ...

Page 22: ...0 Control Change 0 127 0 1 5 6 7 10 11 32 64 65 66 67 80 81 91 93 100 101 121 000 Program Change True 0 127 0 23 000 System Exclusive O O The controller will recognize and respond to GM Device inquiries Master Tune supported Master Volume supported System Common Song Position Pointer Song Select Tune Request X X X X X X Normal System Real Time Clock Commands X X X X 127 Aux Messages All Sounds Off...

Page 23: ...0 No Octave Shift 0 No Transpose 0 No Local On No Data Control Assignment Data Voice Select Reverb On No Reverb On Off Reverb On Yes Reverb Depth 18 Yes Chorus On Off Chorus Off Yes Chorus Depth 36 Yes Velocity Curve Selected NORMAL No Split Point F 2 No Voice Volume 127 Yes Layer Volume 100 Yes Split Volume 127 Yes Metronome Volume 100 Yes Master Tune 0 No Tempo 120 No Layer Mode Voice 15 STRINGS...

Page 24: ...24 ADVANCED FUNCTIONS KEYBOARD CHART ...

Page 25: ... Effects Reverb Chorus EQ Demo Songs 55 Feature 2 Track Recording Function and In Built Metronome Connections USB to Host MIDI Out Stereo 1 4 Jack Line Outputs 1 4 Jack and 3 5mm Jack Inputs 2 x Headphones Outputs Pedal Unit 12V DC Power Input Speakers 2 x 10W 4 Ohm 2 x 5W 4 Ohm Dimensions Height 780mm x Width 1390mm x Depth 350mm Weight 44Kg ...

Page 26: ......

Page 27: ......

Page 28: ...do not hesitate to contact the Gear4music Customer Service Team on 44 0 330 365 4444 or info gear4music com KETTLESTRING LANE YORK YO30 4XF UNITED KINGDOM METALLVÄGEN 45A 195 72 ROSERSBERG STOCKHOLM SVERIGE LAHNSTRAßE 27 45478 MÜLHEIM AN DER RUHR DEUTSCHLAND ...

Reviews: