background image

About the dispenser.* 

GEAppliances.com

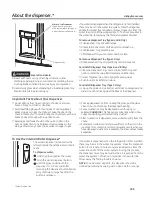
Dispenser tray

Important Facts About Your Dispenser

Do not add ice from trays or bags to the door ice maker

bucket. It may not crush or dispense.
Avoid overfilling glass with ice and use of narrow glasses.

Backed-up ice can jam the chute or cause the door in the

chute to freeze shut. If ice is blocking the chute remove the ice

bucket, poke it through with a wooden spoon.
Beverages and foods should not be quick-chilled in the

door ice maker bin. Cans, bottles or food packages in the

storage drawer may cause the ice maker or auger to jam.

To keep dispensed ice from missing the glass, put the glass

close to, but not touching, the dispenser opening.
Some crushed ice may be dispensed even though you

selected 

CUBED ICE. 

This happens occasionally when a few

cubes accidentally get directed to the crusher.
After crushed ice is dispensed, some water may drip from the

chute.
Sometimes a small mound of snow will form on the door in the

ice chute. This condition is normal and usually occurs when you

have dispensed crushed ice repeatedly. The snow will eventually

evaporate.

If no water is dispensed when the refrigerator is first installed, 

there may be air in the water line system. Press the dispenser 

paddle for at least five minutes to remove trapped air from the 

water line and to fill the water system. To flush out impurities in 

the water line, throw away the first six full glasses of water.

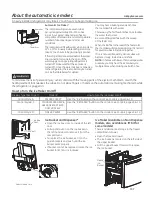
To remove Dispenser Tray (Type A and B Only)

Pull Dispenser Tray out until it stops.
Locate tab in the center on the bottom and push up.
Pull Dispenser Tray assembly out.
Lift Dispenser Tray out at center notch to clean.

To remove Dispenser Tray (Type C Only)

Grasp Dispenser Tray and pull firmly until it comes out.

To reinstall Dispenser Tray (Type A and B Only)

Place the Dispenser Tray cover on top of catch tray and

position under the two plastic retainers on either side.
Center Dispenser tray, and align with center guides.
Push in until it locks firmly in place.

To reinstall Dispenser Tray (Type C Only)

Line up the guide on tray bottom with track on dispenser and

slide it in until it stops against the back of the dispenser.

Water & Ice Dispenser

(See About the controls 

with temperature settings & 

About the control features)

To Use the Internal Water Dispenser*

The water dispenser is located on the 
left wall inside the refrigerator compart-
ment.

To dispense water:

 Hold the glass against the recess.
 Push the water dispenser button.
Hold the glass underneath the 
dispenser for 2–3 seconds after 
releasing the dispenser button. Water 
may continue to dispense after the 
button is released.

If no water is dispensed when the refrigerator is first installed, 
there may be air in the water line system. Press the dispenser 
button for at least 5 minutes to remove trapped air from the 
water line and to fill the water system. During this process, 
the dispenser noise may be loud as the air is purged from the 
water line system. To flush out impurities in the water line, 
throw away the first 6 glassfuls of water.

NOTE:


To avoid water deposits, the dispenser should be 

cleaned periodically by wiping with a clean cloth or sponge.


Laceration Hazard

 Never put fingers or any other object into ice crusher

discharge opening. Doing so can result in contacting the ice

crushing blades and lead to serious injury or amputation

 Use a sturdy glass when dispensing ice. A delicate glass may

break and result in personal injury.

*Select Models Only

098

Summary of Contents for PFE28P

Page 1: ...modelos Manual del Propietario e Instrucciones de Instalaci n Los modelos que comienzan con las letras DFE PFE GFE DFE PFH y GNE son Modelos con Profundidad Est ndar SD Los modelos que comienzan con l...

Page 2: ...our items Freezer ice maker Ice bin An ice maker in both compartments gives you more ice whenever you need it Available on Non Dispense models also available as a kit for some models QuickSpace shelf...

Page 3: ...ter is toward the interior of the refrigerator Close the cover making sure the indent snaps into position Drop down tray tray open Ice bucket Latch About the features Select Models Only Push in and pu...

Page 4: ...ystem on press either the Fridge or Freezer Control Style B C Press and hold Fridge and Ice Maker simultaneously for 3 seconds to turn the cooling system off To turn cooling system on press either the...

Page 5: ...open Reset Filter Hold for 3 seconds after replacing filter Lock Controls Press and hold 3 seconds to lock out ice and water dis penser and all feature and temperature buttons Freezer temp control Ad...

Page 6: ...ter notch to clean To remove Dispenser Tray Type C Only Grasp Dispenser Tray and pull firmly until it comes out To reinstall Dispenser Tray Type A and B Only Place the Dispenser Tray cover on top of c...

Page 7: ...y liquid or cleaners directly on sensors AUTOFILL works best with household water pressure of 60 to 100 psi Ice in container may affect fill volume If issues are experienced use less ice About Autofil...

Page 8: ...icular installation If this equipment does cause harmful interference to radio or television reception which can be determined by turning the equipment off and on the user is encouraged to try to corr...

Page 9: ...d fully seated within the cartridge holder Close the filter door 3 Run two gallons of water through the cold water dispenser about 5 minutes to remove air from the system A newly installed filter cart...

Page 10: ...shelf locks into place Spillproof Shelves Spillproof shelves have special edges to help prevent spills from dripping to lower shelves Shelves in the refrigerator compartment are adjustable Quick Space...

Page 11: ...e carried from refrigerator to work area To remove Lift bin straight up then pull out To replace or relocate Slide in the bin just above the molded door supports and push down The bin will lock in pla...

Page 12: ...ss water that may accumulate in the bottom of the drawers or under the drawers should be wiped dry D Select Models Only 32 34 36 Note Temperatures indicate the appropriate tem peratures for the food a...

Page 13: ...own to seat on slide Push the drawer in to closed position How to Remove and Replace the Adjustable Deli Produce Drawer To remove Pull the drawer out to the stop position Raise the front side of the d...

Page 14: ...door to the stop position Remove freezer door bin by pushing plastic tab on either left or right side to release bin hinge pin Remove freezer basket by lifting up the rear of the basket and moving bas...

Page 15: ...pressure you may hear the ice maker cycle multiple times when making one batch of ice Feeler Arm Ice maker Display Type See Page 7 Model How to turn the ice maker on off Control Style A PFE28P PYE22P...

Page 16: ...front of the refrigerator Pull the refrigerator straight out and return it to position by pushing it straight in Moving the refrigerator in a side direction may result in damage to the floor covering...

Page 17: ...bout the Water Filter for more information Handle is loose handle has a gap Handle needs adjusting See Attach Fresh Food Handle and Attach the Freezer Handle sections for detailed instructions Refrige...

Page 18: ...ner Freezer cooling fresh food not cooling Normal when refrigerator first plugged in or after extended power outage Wait 24 hours for temperature in both compartments to reach selected temperatures Ic...

Page 19: ...After brewing my powdered beverage is not fully cleared from the used pod Depending on size selected the powder may not dissolve fully Some powdered beverages develop into clumps when left sitting fo...

Page 20: ...cold water for at least 5 minutes to remove air from the water line and flush the filter To fill the ice bucket to the maximum capacity I should dispense 12 and 18 hours after installation TRUE Dispe...

Page 21: ...the refrigerator Leveling legs are used to make initial fresh food door adjustment Check for leaks after all water connections are made TRUE While purging the air from the water system check all water...

Reviews: