background image

 YOUR 

Before Using Your Oven

1. Look at the controls. Be sure you understand how to

set them properly. Read over the directions for the

Oven Controls so you understand how to use them.

2. Check the oven interior. Look at the shelves.

Take a practice run at removing and replacing them
properly, to give sure, sturdy support.

3. Read over the information and tips that follow.

4. Keep this guide handy so you can refer to it,

especially during the first weeks of using your
new oven.

NOTE:

● 

A fan may automatically turn on and off to cool

internal parts. This is normal, and the fan may
continue to run even after the oven is turned off.

● 

You may notice a “burning” or “oily” smell the first

few times you turn your oven on. This is normal in 
new oven and will disappear in a short time. To 
the process, set a self-clean cycle for a minimum of
hours. See the Self-Cleaning Oven section.

Oven Light

The light comes on when the oven door is opened or when the control panel
light switch is turned on.

Oven Vent

When the oven is on, heated air moves through a vent
above the door or between door and air grille.

The vent area could get hot during oven use.

The vent is needed for proper air flow in the oven and
good baking results. Do not block this vent.

Summary of Contents for JTP13

Page 1: ...l5 16 Timed Baking 12 13 Self Cleaning Instructions 19 22 Care and Cieaning 23 24 Broiler Pan and Rack 23 Lift Off Oven Door 24 Self Cleaning Instructions 19 22 Shelves 23 Problem Solver 25 26 Thermostat Adjustment Do It Yourself 14 More questions call GE Answer Center 800 626 2000 Consumer Services 27 Appliance Registration 2 Important Phone Numbers 27 Model and Serial Number Location 2 Removal o...

Page 2: ... baked on These numbers are also on the Consumer Product Ownership Registration Card that came with your oven Before sending in this card please write these numbers here Model Number Serial Number Use these numbers in any correspondence or service calls concerning your oven Save time and money Before you request service Check the Problem Solver in the back of this guide It lists causes of minor op...

Page 3: ... BE STORED IN CABINETS ABOVE AN OVEN CH DREN CLIMB G ON THE OVEN TO REACH ITEMS COULD BE SERIOUSLY JURED Do not store flammable materials in an ov n Teach children not to play with the controls or any other part of the oven Never leave the oven door open when you are not watching the oven Always keep combustible wdl covering curtains or drapes a safe dis ce from your oven Never wear loose fitting ...

Page 4: ...i ing out the shelf to the shelf stop is a conveni nce in lifting heavy foods It is aisa a precautiofi against burns from touching the hot surfaces of the door or the oven walls When using cooking or roasting bags in tke oven follow the tianufacturer s directions Q Do not leave paper products cooking utensils or food in the oven when not in use Do not use oven for storage area Items stored in an o...

Page 5: ...ing sections 6 Oven Shelves with Stop Locks Explained on page 7 8 19 3 4 17 19 24 9 9 10 23 Explained Feature Index on page 8 Lift Off Oven Door 24 with Broil Stop position Easily removed for oven cleaning 9 Oven Door Gasket 4 19 24 10 Model and Serial Numbers 2 11 Bake Element 3 4 May be lifted gently for wiping 19 24 oven floor 12 Automatic Oven Door Latch I 19 21 13 Oven Interior Light 14 Oven ...

Page 6: ...e operations 9 TIMER Press this pad to select the timer function To set timer first press the TIMER pad Then press the INCREASE or DECREASE pad to change the time To cancel the timer press and hold the TIMER pad until the word TIMER disappears from the display Q Q bo TIMER COOK TIME TIMER l STOP TIME CLOCK I 10 CLOCK To set clock first press the CLOCK pad Then press the INCREASE or DECREASE pad to...

Page 7: ...imer To Cancel the Timer If TIMER is displayed press the INCREASE or Press and hold the TIMER pad until the word DECREASE pad until the desired time is reached TIMER disappears from the display If TIMER is not displayed press the TIMER pad first then follow the instructions above to set the timer End of Cycle Tones Display Messages The end of cycle tone is 3 short beeps followed by If door appears...

Page 8: ... off to cool internal parts This is normal and the fan may continue to run even after the oven is turned off You may notice a burning or oily smell the first few times you turn your oven on This is normal in z new oven and will disappear in a short time To spee the process set a self clean cycle for a minimum of hours See the Self Cleaning Oven section Oven Light The light comes on when the oven d...

Page 9: ...f out Be sure the shelf is cool before touching it To replace place the shelf on the shelf support with the stop locks curved extension of shelfl facing up and toward the rear of the oven Tilt up the front and push the shelf toward the back of the oven until it goes past the bump on the shelf support Then lower the front of the shelf and push it all the way back 1 Shelf Positions The oven has six ...

Page 10: ...he BA pad and then the INCREASE or DECREASE pad to get the new temperature Oven Shelves Arrange the oven shelf or shelves in the desired locations while the oven is cool The correct shelf position depends on the kind of food and the browning desired As a general rule place most foods in the middle of the oven on either shelf positions C or D See the chart for suggested shelf positions NOTE To bake...

Page 11: ...baking mixes follow package recipe or instructions for the best baking results Cookies When baking cookies flat cookie sheets without sides produce better looking cookies Cookies baked in a jelly roll pan short sides all around may have darker edges and pale or light browning may occur Do not use a cookie sheet so large that it touches the walls or the door of the oven Never entirely cover a shelf...

Page 12: ... Time the oven will turn off automatically n 1 Press the COOK TIME pad COOK NOTE If your recipe requires TIME preheating you may need to add additional time to the length of the Cook Time 2 Press the INCREASE pad until the desired length of baking time appears in the display 3 Press the BAKE pad BAKE L J 4 Press the INCREASE or DECREASE pad until the desired temperature is displayed An attention t...

Page 13: ... on automatically The word ON and v 100 will be displayed The Cook Time will begin to count down As the oven heats up the display will show the changing temperature The oven will continue to cook for the programmed 3 hours and shut off automatically at 7 00 D 7 Press the CLEAWOFF pad to clear CLEAR the display if necessary Remove the OFF food from the oven Remember even though the oven shuts off a...

Page 14: ...tores to check the temperature setting of your new oven These thermometers may vary 2040 degrees To Adjust the Thermostat n 1 Press the BAKE pad BAKE 2 Select an oven temperature between 500 F and 550 F 3 Immediately before ON is displayed press and hold the BAKE pad for about four seconds The display will change to the oven adjustment displa A 4 The oven temperature can be adjusted t up to 35 F h...

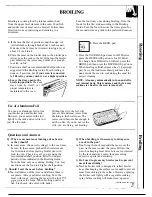
Page 15: ...weight of the meat Place the meat fat side up or poultry breast side up on roasting rack in a shallow pan The melting fat will baste the meat Select a pan as close to the size of the meat as possible The broiler pan with rack is a good pan for this D 3 Press the BA pad BAKE A 4 Press the INCREASE or DECREASE pad until the t desired temperature is displayed The oven will start automatically v The w...

Page 16: ...hawed poultry often does not cook evenly pound additional time 10 minutes per pound for Some commercial frozen poultry can be cooked roasts under 5 pounds more time for larger roasts successfully without thawing Follow the directions given on the package label Type Meat Tender cuts rib high quality sirloin tip ramp or top round Lamb leg or bone in shoulder Veal shoulder leg or loin Pork loin rib o...

Page 17: ...un after the oven is turned off Use of Aluminum Foil You can use aluminum foil to line Without the slits the foil will your broiler pan and broiler rack prevent fat and meat juices from However you must mold the foil draining to the broiler pan The tightly to the rack and cut slits in it juices could become hot enough to just like the rack catch on fire If you do not cut the slits you are frying n...

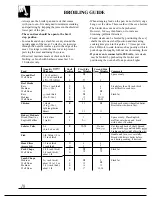
Page 18: ...ecue sauce last 5 to 10 minutes only Quantity andor Thickness Shelf Position First Side me Minutes Second Side Time Minutes 7 Comments Space evenly Food Ground Beef Well Done 1 lb 4 patties 1 2 to 3 4 inch thick 4 Ibs 16 uatties E E 10 10 9 Beef Steaks Rare Medium Well Done Rare Medium Well Done Chicken 3 4 to 1 inch thick 1 to lfi lbs E E E E E E c c F F 8 10 12 10 15 6 8 10 8 1416 20 25 Steaks l...

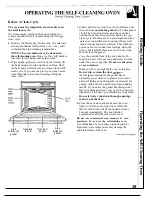
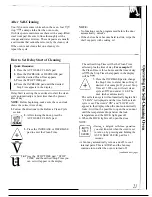
Page 19: ...l wool pad Rinse well with a vinegar and water solution This will help prevent a brown residue from forming when the oven is heated Buff these areas with a dry cloth Do not clean the gasket Clean the outside front of the oven door with soap and water Also use soap and water to clean under the oven vent grille Do not use abrasives or oven cleaners Make sure the oven light bulb cover is in place Do ...

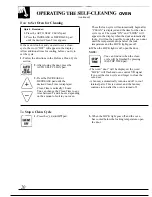
Page 20: ...he self clean cycle will automatically begin after CLEAN is displayed and the time for the clean cycle is set The words ON and LOCK will appear in the display when the door automatically locks It will not be possible to open the oven door until the temperature drops below the lock temperature and the LOCK light goes off 4 When the LOCK light is off open the door NOTE n You can find out when the cl...

Page 21: ... SELF CLEAN pad CLEAN A 3 Press the INCREASE or DECREASE t pad to enter the Clean Time v 4 Press the STOP TIME pad STOP u STOP TIME and the earliest Stop Time you TIME can set will appear in the display The earliest Stop Time will be the Clean Time selected plus the time of day For example If the Clean Time is three hours and the time of day is 6 00 the Stop Time that appears in the display will b...

Page 22: ... Q Is the crackling or popping sound I hear during cleaning normal A Yes This is the sound of the metal heating and cooling during both the cooking and cleaning functions Q Should there be any odor during the cleaning A Yes there will be an odor during the first few cleanings Failure to wipe out excessive soil might also cause a strong odor when cleaning Q What causes the hair like lines on the en...

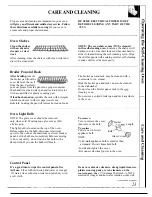
Page 23: ...leaned with a commercial oven cleaner Both the broiler pan and rack can also be cleaned in the dishwasher Do not clean the broiler pan or rack in the self cleaning oven Do not store a soiled broiler pan and rack anywhere in the oven Oven Light Bulb NOTE The glass cover should be removed only when cold Wearing latex gloves may offer a better grip The light bulb is located on the top of the oven Bef...

Page 24: ...f clean cycle you do not need to clean this b hand Any soap left on the liner causes additional stains when the oven is heated The area outside the gasket can be cleaned with a scouring pad Do not rub or clean the door gasket the fiberglass material of the gasket has an extremely low resistance to abrasion An intact and well fitting oven door gasket is essential for energy efficient oven operation...

Page 25: ...iling Q Low voltage See the Broiling s tion Aluminum foil used on the broiler pan and rack has not been fitted properly and slit as rwommended Q Oven controls not set properly See the B flg or Roasting section Shelf position is incorrect See the Roasting or Baking section Incorrect cookware or cookware of improper size is being used Oven thermostat needs adjustment See the Adjust the Oven Therrnos...

Page 26: ...should b clemed up fore starting clean cycle 1 door APPEARS Oven door not clostd after self clean cycle is selected IN E DISPLAY Door is stiIl lwked and you are trying to enter an oven cooting operation FAN NOISE A fm may turn on and off to COOI iuted parts is is normal md the fan may contiuue to mn even after the oven is turned off If you need more help call toll free GE Answer Center 800 626 200...

Page 27: ...hearing or speech who have Braille controls for a variety of GE access to a TDD or a conventional teletypewriter may appliances and a brochure to call 800 TDD GEAC 800 833 4322 to request assist in planning a barrier free information or service kitchen for persons with limited mobility To obtain these items free of charge call 800 626 2000 Service Contrac 80M2 2224 You can have the secure feeling ...

Page 28: ...nd Care material f you then have any questions about operating the product please contact your dealer or our Consumer Affairs office at the address below or call toll free GE Answer Cente 800 626 2000 consumer information service Failure of the product if it is used for other than its intended purpose or used commercially Damage to product caused by accident fire floods or acts of God WARRANTOR IS...

Reviews: