background image


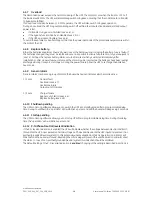
3.3.2  Rackmount installation - preparations 


Place the UPS horizontally on a table or 

desk. 

1  2 


2. 

Re-position the operating panel: remove 

the 2 screws that hold the panel and rotate 

the panel 90 degrees counterclockwise. 

Don’t pull out the panel! Tighten the 2 

screws again. 


3. 

Install the two mounting brackets that 

came with the unit using the screws 

provided. 


4. 

Connect the DC connector of the internal 

batteries. 


5. 

Assemble the front panel: insert the two 

metal clamps at the rear of the panel into 

the holes at the right side of the UPS, then 

click the front panel into position. 


6. 

Install the UPS into a 19’ rack. The UPS 

cabinet must be supported by mounting 

rails, do not mount it by using the 

mounting brackets only. Fix the mounting 

brackets on the 19 inch enclosure with 

screws. 


The VH Series UPS is now ready for further 

connections, please proceed with section 3.3.3. 


fig. 3.3.2: installation preparations - rackmount 


modifications reserved 

OPM_VHE_XXX_0K7_3K0_XGB_V010


7


User manual VH Series 700-3000 UPS 1.0 (GB)


Summary of Contents for VH Series 700

Page 1: ...tal Energy Uninterruptible Power Supply On line VH Series UPS 700 1000 1500 2000 3000 VA GE Consumer Industrial SA General Electric Company CH 6595 Riazzino Locarno Switzerland T 41 0 91 850 51 51 F 41 0 91 850 51 44 www gedigitalenergy com ...

Page 2: ...onsumer Industrial SA All rights reserved reproduction without permission prohibited The content of this manual may be subject to change without prior notice no liability can be accepted for any error or omission The illustrations and plans describing the equipment are intended as general reference only and are not necessarily complete in every detail modifications reserved OPM_VHE_XXX_0K7_3K0_XGB...

Page 3: ...t up 4 2 1 Start up mains available 4 2 2 Start up mains not available battery start 4 3 Use normal operation 4 3 1 Normal operation conditions 4 3 2 No load shutdown 4 3 3 Switching off 4 4 Use status and alarm indications 4 4 1 Standby 4 4 2 Normal operation 4 4 3 On bypass 4 4 4 On battery 4 4 5 Battery low end of runtime 4 4 6 Bypass out of limits 4 4 7 Overload 4 4 8 Replace battery 4 4 9 Gen...

Page 4: ...this document This document shall not be copied nor reproduced without the permission of GE Due to technical improvements some of the information contained in this manual may be changed without notice 1 2 Safety rules CAUTION RISK OF ELECTRIC SHOCK The UPS contains batteries The appliance outlets may be electrically live even when the UPS is disconnected from the mains The UPS contains potentially...

Page 5: ...packaging Store the UPS in a dry location with the batteries in a fully charged state Storage temperature must be within 20 45 C If the unit is stored for a period exceeding 3 months optimal battery lifetime is obtained if the storage temperature does not exceed 25 C If the unit is stored for an extended period of time the batteries must be recharged periodically Connect the unit to a wall outlet ...

Page 6: ... UPS shows the model chapter 9 the ratings 3 2 Installation rules The UPS is intended to be used in normal domestic and office situations Protect the UPS according to the wiring rules with a 16A D type fuse The UPS must be powered from a single phase grounded wall outlet Do not use extension cords Avoid locations that are excessively humid near water near heat sources or in direct sunlight The amb...

Page 7: ... the four parts of the plastic supports and metal rails in case of VH Series 2000 and 3000 VA at the bottom side of the UPS cabinet using the 4 screws provided 4 Connect the DC connector of the internal batteries 5 Place the UPS upright and insert the two black plastic plugs to cover the holes in the top panel of the UPS cabinet 6 Assemble the front panel insert the two metal clamps at the rear of...

Page 8: ...batteries 5 Assemble the front panel insert the two metal clamps at the rear of the panel into the holes at the right side of the UPS then click the front panel into position 6 Install the UPS into a 19 rack The UPS cabinet must be supported by mounting rails do not mount it by using the mounting brackets only Fix the mounting brackets on the 19 inch enclosure with screws The VH Series UPS is now ...

Page 9: ... VA 6 outlets 3a Appliance outlet max rating 16A 4 VH Series 3000 VA only To connect a heavy load to the UPS An output cord to connect a load to this outlet is not shipped with the unit 1 2 4 DC connector not on VH Series 700 VA To connect a battery extension pack for extended battery runtime 3a 5 Fan s 6 Electronically controlled cooling fan s Make sure ventilation air can move freely around and ...

Page 10: ...battery pack can be mounted together in one set of mounting supports 3 At the rear side the UPS and battery pack can be coupled using the coupling bracket that came with the battery pack 4 Connect the DC connector of the battery pack to the DC socket of the UPS 4 fig 3 3 3 You will hear a click when the cable is properly connected Block the DC connector install the small locking plate that came wi...

Page 11: ...d position 6 7 Assemble the plastic front panel like in 3 3 2 step 5 8 Using the DC socket of the battery pack you can install a second third etc pack See chapter 6 for more information 8 fig 3 3 4b installing battery extension pack s to the UPS modifications reserved OPM_VHE_XXX_0K7_3K0_XGB_V010 10 User manual VH Series 700 3000 UPS 1 0 GB ...

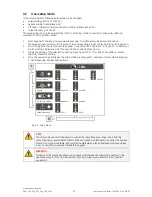
Page 12: ...vent that an overload situation will happen 4 Using the output cords provided connect the load to the appliance outlets 3 3a fig 3 3 3a b of the unit Spread the loads over the appliance outlets as equally as possible If you use a distribution box to connect more than one appliance per outlet please note that the maximum AC current rating of each appliance outlet is 10A outlet 3 or 16A outlet 3a Se...

Page 13: ...y to the load 5 LED on battery on in case of battery operation the mains power fails and the internal batteries supply the required power until either they are depleted or mains power returns 6 LED alarm blinks in case of an alarm 7 LED bar runtime capacity the remaining available battery runtime for the actual load in of the maximum runtime with the actual load 8 LED bar load indicates to what ex...

Page 14: ...e is below alarm level 4 3 2 No load shutdown If this function is activated the UPS will switch off during a mains failure when the load is less than 5 of the maximum load In this way unnecessary discharging of the batteries is avoided The unit will automatically turn on again when mains power is restored The default setting of the no load shutdown function is activated The setting can be changed ...

Page 15: ...nding 4 4 11 o Normal operation 4 4 2 0 4 0 3 On bypass 4 4 3 0 4 0 4 hi o On battery 4 4 4 0 4 0 4 lo Battery low 4 4 5 25 0 4 hi Bypass out of limits 4 4 6 0 4 0 4 lo Overload 4 4 7 0 4 4 hi Replace battery 4 4 8 0 4 0 4 lo General alarm 4 4 9 0 4 0 4 hi lo o Shutdown pending 4 4 10 0 4 0 4 lo o No load shutdown activated load 5 4 3 2 25 Input Phase Neutral reversed 4 4 12 hi Operating modes and...

Page 16: ...tart or if keypad O is pressed restart via front panel required or if a UPS shutdown command is given by the computer Restart depends on the setting of the auto restart function if set on the UPS will automatically restart when the mains returns if set off a manual restart is required either as in 4 2 1 step 1 or via the UPS management software As default the auto restart function is on The settin...

Page 17: ...harged during transport or storage or during the power failure Allow the UPS to recharge the batteries See also 4 6 4 4 9 General alarm General alarm comprises a group of alarms the buzzer behaviour indicates which alarm is active 1 2 secs General fault Overload see 4 4 7 Overtemperature Output out of tolerance 1 5 secs Charger failure Bypass out of limits see 4 4 6 Replace battery see 4 4 8 4 4 1...

Page 18: ...ng switch O The LEDs on the LEDbar runtime capacity shows the setting 4 Store the new settings and leave the setup mode press keypad 1 and keep it pressed while pressing 0 simultaneously Release both buttons LEDs 220 Vac 230 Vac 240 Vac output voltage disabled enabled bypass disabled enabled P N rev indication output frequency 50 Hz 60 Hz fig 4 5 setup menu NOTE The unit can be used as a frequency...

Page 19: ...through the UPS software via the USB communication port checks the actual battery capacity in order to ensure accurate runtime prediction During a deep battery test the batteries will be discharged until battery low alarm level Please note that immediately after a deep battery test the expected runtime is very short allow the UPS to recharge its batteries For details please refer to the manual of ...

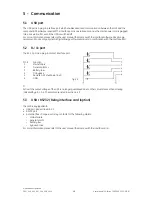
Page 20: ...t is a plug in contact interface port Pin Function 1 Mains failure 2 General alarm 1 3 Battery low 4 On bypass 5 Remote UPS shutdown RxD 6 GND fig 5 2 1 Active if the output voltage of the UPS is no longer guaranteed due to other circumstances than already indicated by pin 1 3 4 The alarms are listed in section 4 4 9 5 3 USB RS232 Relay interface card option The card is equipped with USB port as d...

Page 21: ...y authorized service personnel may remove the cabinet cover Refer to section 1 2 for further details 7 2 General The GE Digital Energy VH Series UPS is virtually maintenance free take care of proper environmental conditions and keep air inlets outlets free of dust Please read 3 2 NOTE Apart from battery replacement refer maintenance and service work to qualified and skilled personnel only Refer to...

Page 22: ...rom the UPS cabinet and or battery cabinet 2 Disconnect the DC connector 3 Loosen the 4 screws that hold the battery tray 4 Slide out the battery tray Be careful it can be heavy 5 Insert the new battery tray into the UPS fix it with the 4 screws 6 Connect the DC connector 7 Install the plastic front panel fig 7 4 2 If you want to change only the batteries and not the full tray with batteries pleas...

Page 23: ...battery start and the output has been off for a few secs see also 4 3 3 Line cord not connected Read 3 3 6 Connect line cord Dead wall socket outlet or mains voltage out of limits Contact qualified electrician Tripped Thermal Circuit Breaker See above UPS switched off automatically UPS overtemperature Allow UPS to cool down Mains failure battery discharged Wait until mains returns Programmed shutd...

Page 24: ...age 15 10 Frequency tracking rate 2 Hz sec Frequency tracking range nominal 10 Phase difference 7º Typical transfer time msec 1 Overload capability fully protected against overload and short circuits Overload behaviour during battery operation 110 during 5 minutes 150 during 5 seconds Overload behaviour during bypass operation depends on rating of thermal circuit breaker typical 125 of TCB value f...

Reviews: