background image

7

Hooking Up the VCR

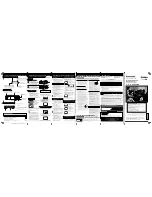
Connecting a Stereo Amplifier/Receiver 

LEFT

RIGHT

PHONO     TUNER             TAPE                   AUX

REC         PLAY

OUT TO TV

IN FROM 
       ANT.

VHF/UHF

3 CH. 4

IN

AUDIO1

VIDEO1

Back of VCR

R

L

OUT

Back of
Amplifier/Receiver

Audio/Video Cables

LEFT

RIGHT

PHONO     TUNER             TAPE                   AUX

REC         PLAY

OUT TO TV

IN FROM 
       ANT.

VHF/UHF

3 CH. 4

IN

AUDIO1

VIDEO1

Back of VCR

R

L

OUT

Back of
Amplifier/Receiver

Audio/Video Cables

Record on the VCR from an
amplifier/receiver.

Connect your VCR to a stereo amplifier/
receiver to record stereo audio.

1

. Select a hookup from pages 2 through 5

and then modify with this connection.

2

. Connect as shown.

This connection requires additional accessories
not provided.

3

. Plug in power cords of amplifier/

receiver, VCR, and TV.

4

. See ÒRecording AudioÓ on page 25.

Select the line input on the VCR to receive the
audio signal from the amplifier/receiver.

Play back stereo tapes or
receive a stereo broadcast
through an amplifier/receiver.

Connect your VCR to a stereo
amplifier/receiver to receive stereo
broadcasts or play back stereo tapes.

1

. Select a hookup from pages 2 through 5

and then modify with this connection.

2

. Connect as shown.

This connection requires additional accessories
not provided.

3

. Plug in power cords of amplifier/

receiver, VCR, and TV.

4

. See ÒTape PlaybackÓ on page 19.

Summary of Contents for VG4256

Page 1: ...VG4256 VCR User s Guide We bring good things to life ...

Page 2: ... the Please fill out the product registration card and return it immediately Returning this card allows us to contact you if needed Keep your sales receipt to obtain warranty parts and service and for proof of purchase Attach it here and record the serial and model numbers in case you need them The numbers are located on the back of the product Model No ____________________________________________...

Page 3: ...________ 15 DISPLAY Button __________________ 16 Time Counter_____________________ 16 Index Search _____________________ 17 Zero Search ______________________ 17 Commercial Scan SEARCH Button _ 17 Pause for Stop Action______________ 18 Frame Advance F ADV Button _____ 18 Automatic Tracking _______________ 18 Manual Tracking__________________ 18 TAPE PLAYBACK HI FI LINEAR Feature___________________...

Page 4: ... from below A Outside antenna Ð Turn to page 3 B Rabbit ears set top and or bow tie antenna Ð Turn to page 3 C Cable System Ð Go to question 2 2 What type of Cable TV system do you have Choose one answer from below A Cable without a box Ð Turn to page 3 B Cable box to unscramble all the channels Ð Turn to page 4 C Cable box to unscramble only pay channels such as HBO Showtime Cinemax etc Ð Turn to...

Page 5: ...al accessories not provided A Y adapter may be required to hear sound from both channels if your TV is not stereo 2 Plug in power cords of VCR and TV 3 Tune the TV to its video input to watch the VCR Continue to page 8 Continue to page 8 3 Hooking Up the VCR OUT TO TV IN FROM ANT VHF UHF 3 CH 4 IN AUDIO1 VIDEO1 R L OUT Back of VCR Back of TV 300 75 Ohm Adapter OR From Antenna or Cable Cable Antenn...

Page 6: ...a simple connection which requires fewer accessories 1 Set the 3CH 4 switch on back of VCR to either channel 3 or 4 Tune the TV to this channel and use the TV VCR button to watch the VCR 2 Connect as shown This connection may require additional accessories not provided 3 Plug in power cords of VCR TV and cable box 4 B Advanced hookup Use this hookup for slightly improved picture quality Hi Fi ster...

Page 7: ...r may be required to hear sound from both channels if your TV is not stereo 2 Plug in power cords of VCR TV and cable box 3 Tune the TV to its video input to watch the VCR View all pay channels through the VCR Continue to page 8 Continue to page 8 5 Hooking Up the VCR Cable System With Cable Box to Unscramble Only Pay Channels such as HBO Showtime Pay Per View etc OUT TO TV IN FROM ANT VHF UHF 3 C...

Page 8: ...ugh 5 and then modify with this connection 2 Set the 3CH 4 switch on the playback VCR to either channel 3 or 4 Tune the recording VCR to this channel to receive the signal from the playback VCR 3 Connect as shown This connection may require additional accessories not provided 4 Plug in power cords of VCRs and TV 5 Option B hookup Use this hookup for slightly improved copy quality Hi Fi stereo play...

Page 9: ...ough 5 and then modify with this connection 2 Connect as shown This connection requires additional accessories not provided 3 Plug in power cords of amplifier receiver VCR and TV 4 See ÒRecording AudioÓ on page 25 Select the line input on the VCR to receive the audio signal from the amplifier receiver Play back stereo tapes or receive a stereo broadcast through an amplifier receiver Connect your V...

Page 10: ... back of VCR If you used one of the advanced hookups tune the TV to the TVÕs video input See TV ownerÕs manual for details 4 Turn on the VCR Press POWER on the remote The POWER and VCR indicators light in the VCRÕs display panel Remote Stock No 221345 CLEAR MENU SPEED INPUT F ADV TRACKING STOP PLAY 1 2 3 5 4 6 7 9 8 0 PAUSE SLOW SEARCH RECORD FWD REV POWER INFO TV VCR GO BACK CHAN RF Coaxial Cable...

Page 11: ...rn it on Check the connections B Press 3 to display the CHANNELS menu C Press 1 to begin AUTO CHANNEL SEARCH The VCR automatically selects the CABLE cable TV or ANTENNA signal To change the SIGNAL TYPE A Follow steps A B above B Press 3 to switch the SIGNAL TYPE between CABLE and ANTENNA 6 Add or remove channels from the VCR s memory You may want to add or remove channels if some of the channels a...

Page 12: ...watching another channel on the TV Details are on page 20 A Press TV VCR to see the picture from the VCR The VCR indicator lights in the display panel B Press CHANNEL up or down to change channels on the VCR The channel number changes on the TV screen C Press TV VCR to see the TV channels The VCR indicator does not light in the display panel Change channels using the TVÕs remote D Return the TV to...

Page 13: ... the clock area of the VCRÕs display panel A Press MENU on remote to display the VCR MAIN MENU B Press 2 to display the TIME menu C Press 1 to display SET TIME AND DATE D Enter the time and date with the number buttons on the remote Press 0 before single digit numbers Example press 0 then 5 then 0 then 7 for a time of 5 07 Press 1 for AM or 2 for PM Press CLEAR on the remote to change incorrect en...

Page 14: ...want the VCRÕs clock to automatically adjust for Daylight Saving Time In the Spring daylight saving time begins on the first Sunday in April Clocks are set forward one hour Because the clock automatically changes from 2 00 AM to 3 00 AM keep in mind that any part of a scheduled Timer Recording that falls between these two times is not performed In the autumn daylight saving time begins on the last...

Page 15: ...hannel up to 99Ñpress two numbers Selects a cable channel over 99Ñ press and hold 1 until 1 appears on the screen Then press the other two numbers PAUSE Pauses action for viewing during playback Pauses recording to prevent recording of unwanted scenes PLAY Plays a tape POWER Turns the VCR on and off PREV CH Previous Channel Switches between two channels Select one channel then select another Press...

Page 16: ...ress TRACKING up or down on the remote or the VCR to remove any streaks from the picture if necessary Details are on page 18 5 Press STOP EJECT on the VCR or STOP on the remote 6 Press REW on the VCR or the remote End of Tape The VCR automatically rewinds the tape if it reaches the end of the tape during playback Power Off If you press POWER while a tape is rewinding the VCR turns off automaticall...

Page 17: ...s best for tapes recorded in the SP or SLP speed Fast Forward Search 1 Press FF to search forward at a faster than normal speed 2 Press FF or PLAY on the remote or PLAY PAUSE on the VCR to return to playback Rewind Search 1 Press REW to search backward at a faster than normal speed 2 Press REW or PLAY on the remote or PLAY PAUSE on the VCR to return to playback Slow Motion You can view a tape in s...

Page 18: ...e time counter resets to 0 00 00 when the tape is ejected from the VCR For example if you record a 30 minute program at the beginning of the tape and you want to go to the end of that program to begin another recording you would 1 Insert the prerecorded tape 2 Press DISPLAY twice to display only the time counter on the TV screen 3 Press FF to fast forward the tape until 0 30 00 appears in the time...

Page 19: ... Search The zero search feature allows the VCR to quickly return to a counter reading of 0 00 00 anywhere on the tape This is especially convenient when you want to watch a segment of the tape several times 1 Insert the prerecorded tape 2 Press DISPLAY twice to display only the time counter on the TV screen 3 Use PLAY FF or REW to advance to the place on the tape where you want to return quickly 4...

Page 20: ...on the remote or PLAY PAUSE on the VCR to resume normal playback Automatic Tracking The VCR has automatic tracking which adjusts the picture when you are playing back a tape recorded on another VCR Automatic tracking is turned on when a tape is inserted or the VCRÕs power is turned on Manual Tracking Occasionally you may need to manually adjust tracking on a tape recorded on a different VCR or cam...

Page 21: ...nd 1 Press MENU to see the VCR MAIN MENU 2 Press 5 to see the AUDIO menu on the TV screen 3 Press 2 to switch between HI FI and LINEAR sound Select HI FI to play back sound recorded on the Hi Fi track and for normal use The Hi Fi indicator lights in the VCRÕs display panel Select LINEAR to play back the sound recorded on the linear track such as a second audio program SAP The Hi Fi indicator turns...

Page 22: ...pe with its safety tab in place 2 If you are using one of the basic hookups make sure the VCR indicator lights in the VCRÕs display panel If not press TV VCR to turn it on 3 Use SPEED on the remote to select a recording speed The tape speed indicator appears on the TV screen 4 Select the channel to be recorded The channel number appears on the TV screen 5 Press RECORD on the VCR or REC on the remo...

Page 23: ... the time Ñ 30 minutes up to 4 hours The REC and TIMER indicators light in the VCRÕs display panel During recording press RECORD on the VCR or REC on the remote to display the time remaining on the TV screen Press RECORD or REC again to increase the recording time Stopping a One Touch Recording in Progress You can stop a recording by Pressing and holding the STOP button on the remote or STOP EJECT...

Page 24: ...nce a week 5 Press number buttons on the remote to enter the channel number or INPUT on the remote to select line input start time including AM or PM end time start date and recording speed of the recording Follow the on screen prompts Press CLEAR on the remote to correct an entry 6 Press MENU to enter your program If you have entered two programs whose times overlap PROGRAMS OVERLAP appears on th...

Page 25: ...earing Timer Recordings 1 Press MENU on the remote to display the VCR MAIN MENU 2 Press 1 to display the TIMER RECORDINGS menu 3 Press 2 to display the programÕs menu 4 Press MENU for next program or CLEAR to erase the program Recording While You re Away Timer Recording PROGRAM 1 ONE TIME CHANNEL VIDEO START TIME END TIME START DATE TAPE SPEED SLP PRESS CLEAR TO CORRECT PRESS MENU TO EXIT VCR MAIN...

Page 26: ...TEREO MONO or SAP Select STEREO for normal and stereo broadcast TV recording STEREO appears on the TV screen when the station you are tuned to is broadcasting stereo Select MONO if the stereo signal is weak and the sound is too Ònoisy Ó Select SAP to record SAP second audio program on the linear track SAP appears on the TV screen when the station you are tuned to is broadcasting SAP Set the TAPE P...

Page 27: ...ring recording to stop and start recording The VCR automatically switches from pause to stop after a few minutes Pro Tect Plus Child Lock Feature This feature is useful to tamper proof your timer recordings from unwanted changes and or protect the VCR from misoperation by other users in the household It also prohibits all operations of the VCR once the feature is turned on To Lock the VCR Press an...

Page 28: ...t segment you want to copy on the playback VCR by using FWD REW and PLAY Press PAUSE on the playback VCR Press PAUSE at the same time on both VCRs to resume copying 9 Press STOP EJECT on both VCRs when you are finished You may turn off the TV after the recording has started as it does not have to be on to copy a tape Copying and Editing Tapes Using Compatible Remote If you have a compatible GE RCA...

Page 29: ...ing to prevent recording unwanted material POWER Turns the VCR on or off RECORD Start the VCR recording Used for one touch recording Remote Sensor Receives signals from the remote control Aim the remote at this sensor with no objects between them REW Rewinds the tape when the VCR is stopped Searches the picture in reverse during playback STOP EJECT Stops the normal functions such as record playbac...

Page 30: ...r Lights when the VCR is turned on Time Channel Number or Line Input L The current time is displayed Only the AM indicator appears when the time is PM no indicator appears The channel number or line input is displayed Pressing INPUT or channel 0 0 on the remote displays the line input indicator to record from the VIDEO1 and AUDIO1 IN jacks STATUS Indicators PLAY A tape is playing REC A tape is rec...

Page 31: ...eep 285 mm Weight 8 2 pounds 3 7 kg Storage Temperature Range 22ûF to 149ûF 30ûC to 65ûC Operating Temperature Range 41ûF to 104ûF 5ûC to 40ûC Check your cable companyÔs compatibility requirements Cleaning the VCR Use a soft cloth or dusting attachment of your vacuum cleaner to clean the exterior of the VCR Remove dust from the ventilation holes on the top back sides and bottom of the cabinet Plas...

Page 32: ...nel selected with 3CH 4 switch on back of VCR Check TVÕs fine tuning Check video cable connections between VCR and TV monitor Set TV monitor to video input channel Try another tape Some snow streaks are normal during search stop action frame advance and slow motion playback Press the TRACKING button on the remote or the VCR to move streaks for the best picture Check tape Ñ it may be worn out or of...

Page 33: ...tereo or SAP Tape already rewound Cable box was not turned on at time recording was to begin Program entered incorrectly wrong channel or times Power interruption Reset clock See page 11 Check to see if time and date are correct Ñ including AM PM Program exceeded tapeÕs length or tape was not rewound beforehand VCR was not turned off at the time recording was to start No tape in VCR or cassetteÕs ...

Page 34: ...anual clearly describes how to install adjust and operate your VCR Any additional information should be obtained from your Dealer Installation and related adjustments Signal reception problems not caused by your VCR Damage from misuse or neglect Cleaning of video audio heads Remote control batteries A VCR that has been modified or incorporated into other products or is used for institutional or ot...

Page 35: ...ing 24 Timer Recording 22 23 OUT TO TV Connector 3 6 28 PAUSE Button 13 18 25 27 Pause for Stop Action 18 Pause Recording 25 Picture Search 15 PLAY Button 13 15 17 18 26 27 Playing a Tape 14 19 POWER Button 8 13 14 22 25 27 Power Indicator 8 28 PREV CH Previous Channel Button 13 Problems Solving 30 31 Product Registration i Pro Tect Plusª Feature 25 Product Registration i REC Button 13 20 23 26 RE...

Page 36: ...uct If you would like a copy of this manual in French please follow the instructions below Si un livret d instructions en français n est pas inclus avec votre appareil vous 30 en obtenir un indiquer le numéro de modèle votre nom et votre adresse en vous adressant à Thomson Consumer Electronics Attention Canadian Operations P O Box 0944 Indianapolis IN 46206 0944 10330 North Meridian Street Indiana...

Reviews: