FIRST THINGS FIRST
5
Step 4: Plug in the VCR
Match the wide blade of the plug with the wide slot in the outlet.
Be sure to insert the plug completely.
Step 5: Tune the TV
Tune the TV to the VCR viewing channel. The VCR viewing
channel is channel 3 or 4 or the TV’s video input.
•
If you connect your VCR using the ANT.IN and RF OUT jacks
with RF coaxial cable, set the 3 CH. 4 switch to channel 3 or
channel 4--the channel you want to use on your TV.
•
If you connect your VCR using the AUDIO/VIDEO jacks with
audio/video cables, select the TV’s video input to see the
signal. See the
TV Owner’s Manual.
Step 6: Turn On the VCR
Press VCR on the remote to turn on the VCR.
Step 7: Access the Menus
The MENU and number buttons let you access, select, and
change menu items. For example, to change the Auto Play
setting, you would do the following:
1.
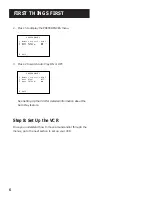
Press MENU to bring up the VCR MAIN MENU.
VCR MAIN MENU
1 VCR Plus+
2 Timer Recordings
3 Time
4 Channels
5 Preferences
6 Language
0 Exit
VCR Viewing Channel
When using the ANT. IN and RF OUT
jacks to connect your VCR, tune your
TV to channel 3 or 4.
When using the AUDIO/VIDEO jacks to
connect your VCR, tune your TV to the
TV’s video input channel.
Summary of Contents for VG4061
Page 1: ...VCR User s Guide VG4061 We bring good things to life ...
Page 24: ......
Page 32: ......
Page 36: ......
Page 42: ......


