MA-014 - TRANSFIX DGA 500 User Guide – Rev 1.1
13-Oct-15
Page 21 of 28
7.2
Sampling Process
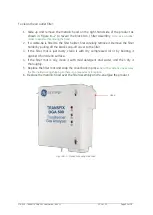
Open the door of the product and observe the operating mode on the LCD display panel.
The flowchart shown in Figure 7—4 and the accompanying steps summarise the process
to obtain a manual oil sample.
Figure 7—4: Manual oil sampling process
1.
If the product is in
Standby
mode,
proceed to step 3. If the product is
in
Measurement
mode, either wait
until the product returns to
Standby
mode or use the
TransConnect software to stop the
active measurement cycle.
2.
If an active measurement is
aborted, oil may remain in the
headspace. The display reads “
OIL
DRAINING
”. Wait several minutes for
the draining process to complete
and for the product to return to
Standby
mode.
3.
Once the product returns to
Standby
mode, remove the plug
from the ¼ in. ball valve.
4.
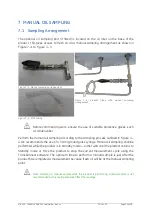
Take the PTFE tubing and connect
it to the ¼ in. ball valve (see Figure
7—2 to Figure 7—3).
5.
Remove the Luer fitting cap from
the other end of the PTFE tubing
and attach the supplied stopcock.
6.
Connect
the
remaining
oil
sampling equipment to the
stopcock e.g. syringe and perform
the oil sampling.
7.
Open the ¼ in. ball valve to allow
oil to flow to the sampling point.
8.
When finished sampling, shut off
the ¼ in. ball valve to stop the oil
flow.
9.
Disconnect the oil sampling
arrangement.
10.
Replace the plug on the ¼ in. ball
valve.
See Section 6.1 for product display panel information.
Standby
mode
Measurement
mode
Use TransConnect
to stop a
measurement
Oil Drains
Standby
mode
Attach PTFE tubing
to1/4 in. ball valve
Attach other end of
tubing to stopcock
Attach equipment
to stopcock e.g.
syringe
Open ¼ in. ball
valve and take oil
sample
Replace plug on ¼
in. ball valve
Remove plug from
¼ in. ball valve


