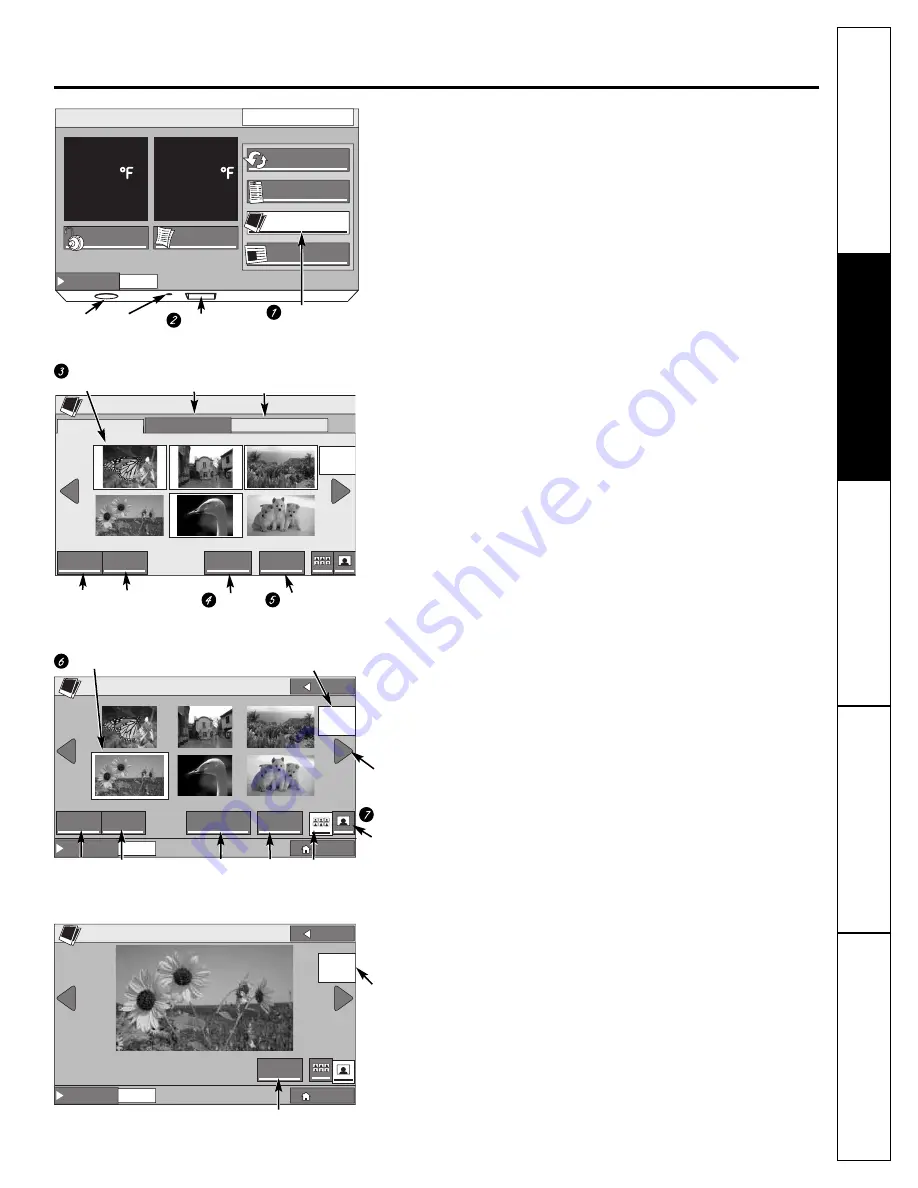
Use the
PHOTOS
button to upload and display favorite photos that can
be used as a 15-minute slide show or as a screen saver. The screen saver
shows on the LCD screen after 2 minutes of inactivity. After 15 minutes,
the backlight will go out. If the slide show is selected instead of the screen
saver, the photos will scroll through in a slide show for 15 minutes before
the backlight goes out.
Select the
PHOTOS
button on the
HOME
screen to see default photos and
to begin the process of uploading photos.
UPLOADING PHOTOS
To upload photos, insert an SD card into the slot below the display.
Up to 100 photos (6 per page) from the SD card are displayed as
thumbnails in chronological order. Up to 30 photos can be uploaded.
Photos can be selected one at a time on the screen or by using the
ALL
button if all photos (30 max) from the SD card are to be uploaded.
To deselect all photos, select the
NONE
button. When photos have
been selected, press the
UPLOAD
button. Uploading 30 photos will
take between 3 and 16 minutes. The
CANCEL
button can be pressed
at any time to stop the uploading process. When the upload is complete,
the display will show UPLOAD COMPLETE. Select the
EJECT
button to eject
the SD card and wait to be prompted to remove the card. If the card
is removed without pressing the
EJECT
button, there is the possibility
of damaging the files on the SD card. When the SD card is removed,
the display returns to the
PHOTOS
screen.
NOTE:
The dispenser will not work during photo upload.
SELECTING PHOTOS
The
PHOTOS
screen will display 6 thumbnail photos or you can
choose the full screen option. Navigate between screens using
the
LEFT
and
RIGHT
arrow keys on the sides of the display.
On the thumbnail screen, select photos one at a time by
touching that photo, select all of the photos by selecting
the
ALL
button or deselect all by selecting the
NONE
button.
SLIDESHOW
Select
SLIDE SHOW
on the
PHOTOS
screen to view uploaded
photos in a slide show from newest to oldest. (This does
NOT
set
the slide show as the screen saver. That is done in the SYSTEMS
section.)
DELETING PHOTOS
With photos selected that you want to delete, select the
DELETE
button from either the thumbnail screen or the full screen.
The
ALL
button can be used with the
DELETE
feature. You
will be given an opportunity to
CANCEL
the action before
the photos are deleted.
7
Consumer
S
uppor
t
Tr
oubleshooting
Tips
Operating
Instructions
Safety
Instructions
Installation
Instructions
ge.com
PHOTOS
F
REEZER
-2
F
RESH
F
OOD
38
L
OCK
S
UBSTITUTIONS
P
HOTOS
N
UTRITION
F
ACTS
C
ONVERSIONS
S
ETTINGS
12:00 PM
HOLD 3 SECONDS
W
ATER
D
ISPENSER
W
ATER
F
ILTER:
G
OOD
E
XTRAS
W
ATER
D
ISPENSER
B
ACK
H
OME
P
HOTOS
A
LL
N
ONE
S
LIDE
S
HOW
D
ELETE
S
ELECT
0 /12
selected
V
IEW
PAGE
1
0F
2
Number of pages available
DELETE
Button
ALL Button
to Select
All Photos
Number
of photos
available
A
VAILABLE: 7 PHOTOS
R
EFRIGERATOR
P
HOTO
U
PLOAD
A
LL
N
ONE
U
PLOAD
E
JECT
S
ELECT
4 /60
selected
V
IEW
PAGE
3
0F
10
S
ECURE
D
IGITAL
Memory Meter:
Total number of
photos available
for upload (Max. 30)
Select
photos
Selected photo
Arrow
Key
SLIDESHOW
Button
W
ATER
D
ISPENSER
B
ACK
H
OME
P
HOTOS
D
ELETE
V
IEW
PHOTO
4
0F
12
Photos
stored in
internal
memory
Photos
Button
Insert
SD Card
EJECT
Button
UPLOAD
Button
NONE Button
to Deselect
All Photos
on SD Card
ALL Button
to Select All
Photos on
SD Card
View
photos
full screen
NONE Button
to Deselect
All Photos
View photos
as thumbnails
DELETE
Button
Speaker
Reset


