


10
49-4000214 Rev 0
Dispensers
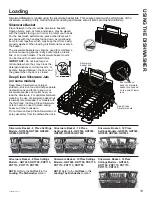
USING THE DISHW
ASHER
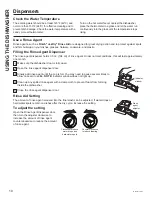
Check the Water Temperature
The entering water should be at least 120°F (49°C) and
not more than 150°F (66°C) for effective cleaning and to
prevent dish damage. Check the water temperature with a
candy or meat thermometer.
Turn on the hot water faucet nearest the dishwasher,
place the thermometer in a glass and let the water run
continuously into the glass until the temperature stops
rising.
Use a Rinse Agent
Rinse agents, such as
Finish
®
Jet-Dry
®
Rinse Aid
are designed for great drying action and to protect against spots
and film build-up on your dishes, glasses, flatware, cookware, and plastic.
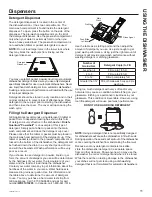
Filling the Rinse Agent Dispenser
The rinse agent dispenser holds 3.5 oz. (104 ml) of rinse agent. Under normal conditions, this will last approximately
one month.
1
Make sure the dishwasher door is fully open.
2
Open the rinse agent dispenser door.
3
Slowly add rinse agent until the cup is full. You may need to pause several times to
allow rinse aid to settle.
NOTE:
Indicator window does not light up.
4
Clean up any spilled rinse agent with a damp cloth to prevent foam from forming
inside the dishwasher.
5
Close the rinse agent dispenser door.
Rinse Aid Setting
The amount of rinse agent released into the final wash can be adjusted. If water drops or
hard water spots remain on dishes after the dry cycle, increase the setting.
To adjust the setting
Open the Rinse Agent dispenser door;
then turn the adjuster clockwise to
increase the amount of rinse agent,
counterclockwise to reduce the amount
of rinse agent.
Rinse
agent
adjuster
Clockwise to reduce
water drops and
hard water spots
Counterclockwise
to reduce foaming
Indicator
window