background image

Instrucciones 

de Instalación 

¿Preguntas? Llame a 800.GE.CARES (800.432.2737) o visite  nuestro sitio 

web en: GEAppliances.com

LEER DETENIDAMENTE.   

CONSERVE ESTAS INSTRUCCIONES.

Lea estas instrucciones en su totalidad y 

atentamente.


IMPORTANTE –


Conserve estas 

instrucciones para uso del inspector local.


IMPORTANTE –


Cumpla con todos 

los códigos y ordenanzas gubernamentales.

• 

Nota para el Instalador –


Asegúrese de 

entregar estas instrucciones la Consumidor.

ANTES DE COMENZAR

• 

Nota para el Comprador  –


Conserve estas 

instrucciones para referencia futura.

•  Nivel de habilidad 

– La instalación de este 

electrodoméstico requiere un nivel básico de 

habilidades mecánicas y eléctricas.

  La correcta instalación del producto es 

responsabilidad del instalador.

  Si se producen fallas en el producto debido a una 

instalación inadecuada, la Garantía no cubrirá las 

mismas

Horno microondas para 
colocar encima de la estufa 


PVM9005

49-40755   Rev. 1   04-19   GEA

Su modelo puede tener otras características y apariencia 

que las ilustradas en este manual.

Summary of Contents for Profile PVM9005FMDS

Page 1: ...e to Installer Be sure to leave these instructions with the consumer BEFORE YOU BEGIN Note to Consumer Keep these instructions for future reference Skill level Installation of this appliance requires...

Page 2: ...ing Space 8 Step by step installation guide Placement of Mounting Plate 9 11 Removing the Mounting Plate 9 Finding the Wall Studs 9 Determining Mounting Plate Location 10 Aligning the Mounting Plate 1...

Page 3: ...peninsula It must be mounted to BOTH a top cabinet AND a wall To avoid the risk of personal injury back injury or other injuries due to excessive weight of the microwave oven or property damage you wi...

Page 4: ...al Tin snips for cutting damper if required Electric drill with 3 16s 7 16s 1 2s and 5 8s drill bits Hammer optional Stud finder Filler blocks or scrap wood pieces if needed for top cabinet spacing us...

Page 5: ...have to be cut to fit using the tin snips in order to allow free movement of the damper The following chart describes an example of one possible ductwork installation OUTSIDE BACK EXHAUST EXAMPLE ONLY...

Page 6: ...is important that venting be installed using the most direct route and with as few elbows as possible This ensures clear venting of exhaust and helps prevent blockages Also make sure dampers swing fr...

Page 7: ...LLATION INSTRUCTIONS QUICK USE CARE ADDITIONAL PARTS PARTS INCLUDED You will find the installation hardware contained in a packet with the unit Check to make sure you have all these parts NOTE Some ex...

Page 8: ...the oven beneath smooth flat cabinets be careful to follow the instructions on the top cabinet template for power cord clearance 13 max for standard installation 15 cabinet depth requires additional...

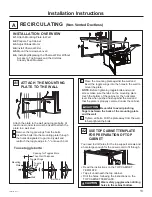
Page 9: ...ters exhaust adaptor damper and the small hardware bag Do not remove the foam protecting the front of the microwave oven Then carefully roll the microwave oven and carton over onto the top side The mi...

Page 10: ...l Measure the inside depth of the front overhang Draw a horizontal line on the back wall an equal distance below the cabinet bottom as the inside depth of the front overhang For this type of installat...

Page 11: ...Four holes must be used for mounting NOTE Holes C and D are inside area E If neither C nor D is in a stud find a stud somewhere in area E and draw a fifth circle to line up with the stud It is importa...

Page 12: ...f ventilation required for your installation and proceed to that section B OUTSIDE TOP EXHAUST VERTICAL DUCT See page 17 Adaptor in Place for Outside Top Exhaust 2 OUTSIDE BACK EXHAUST HORIZONTAL DUCT...

Page 13: ...the wall and insert the toggle wings into the holes in the wall to mount the plate NOTE Before tightening toggle bolts and wood screw make sure the tabs on the mounting plate touch the bottom of the...

Page 14: ...the top of the oven Place the blower back into the opening Slide the blower plate back onto the microwave by placing the side tabs into the slots and pushing gently until the back tab is seated into...

Page 15: ...ROWAVE OVEN NOTE When mounting the microwave thread power cord through hole in bottom of top cabinet Keep it tight throughout Steps 1 3 Do not pinch cord or lift microwave oven by pulling cord Lift mi...

Page 16: ...l and the top cabinet Install grease filters See the Owner s Manual packed with the microwave oven Insert 3 self aligning screws 1 4 1 4 through outer top cabinet holes Turn two full turns on each scr...

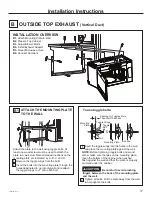
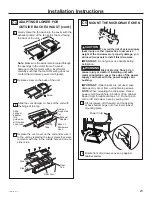
Page 17: ...H THE MOUNTING PLATE TO THE WALL B1 Attach the plate to the wall using toggle bolts At least one wood screw must be used to attach the plate to a wall stud Recommended locations on the mounting plate...

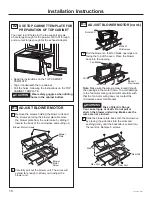
Page 18: ...up 1 Blower Plate Blower Motor Screws Blower Motor Screw 2 Carefully pull out the blower unit The wires will extend far enough to allow you to adjust the blower unit Roll the blower so that fan blade...

Page 19: ...ing cord Lift microwave tilt it forward and hook slots at back bottom edge onto four lower tabs of mounting plate Rotate front of microwave oven up against cabinet bottom 1 2 Power Cord ASSEMBLE AND I...

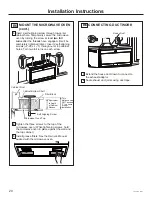
Page 20: ...ng screws 1 4 2 1 4 through outer top cabinet holes Turn two full turns on each screw Tighten the three screws to the top of the microwave oven While tightening screws hold the microwave oven in place...

Page 21: ...ggle bolts At least one wood screw must be used to attach the plate to a wall stud Remove the toggle wings from the bolts Insert the bolts into the mounting plate through the holes designated to go in...

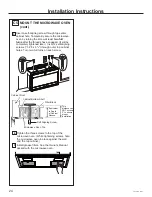
Page 22: ...oggle bolts and wood screw make sure the tabs on the mounting plate touch the bottom of the cabinet when pushed flush against the wall and that the plate is properly centered under the cabinet CAUTION...

Page 23: ...cord through hole in bottom of top cabinet Keep it tight throughout Steps 1 3 Do not pinch cord or lift microwave oven by pulling cord Lift microwave tilt it forward and hook slots at back bottom edg...

Page 24: ...Temporarily secure the microwave oven by turning the screw at least two full turns after the threads have engaged It will be completely tightened later Insert 2 self aligning screws 1 4 2 1 4 through...

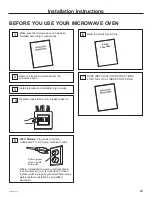
Page 25: ...from the microwave oven 2 Make sure the microwave oven has been installed according to instructions 1 BEFORE YOU USE YOUR MICROWAVE OVEN Ensure proper ground exists before use QUICK USE CARE Installat...

Page 26: ...26 49 40755 Rev 1 Installation Instructions Printed in China...

Page 27: ...ar estas instrucciones la Consumidor ANTES DE COMENZAR Nota para el Comprador Conserve estas instrucciones para referencia futura Nivel de habilidad La instalaci n de este electrodom stico requiere un...

Page 28: ...a de instalaci n paso a paso Colocaci n de la Placa de Montaje 9 10 Retiro de la Placa de Montaje 9 B squeda de los Montajes de Pared 9 Determinaci n de la Placa de Montaje 10 Alineaci n de la Placa d...

Page 29: ...0 amperios La caja del tomacorriente deber estar localizada en el gabinete encima del horno La caja del tomacorriente debe ser instalada por un electricista calificado y debe conformarse al National E...

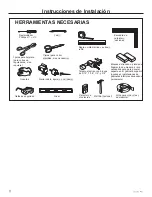
Page 30: ...equiere Taladro el ctrico con brocas de 3 15 7 16 1 2 y 5 8 Martillo opcional Detector de montantes Bloques de llenado o piezas de fragmentos de madera si son necesarios para para generar espacio en e...

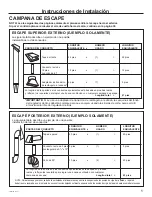
Page 31: ...pe posterior se debe tener cuidado al alinear el escape entre los espacios de los postes de viga de la pared o la pared deber a ser preparada en el momento de su construcci n dejando suficiente espaci...

Page 32: ...de di metro Longitud m xima del conducto Para lograr un movimiento satisfactorio del aire la longitud total del conducto rectangular de 31 4 R HO FRQGXFWR UHGRQGR GH GH GLiPHWUR no debe sobrepasar 14...

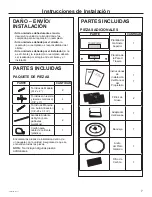
Page 33: ...stico 1 Instrucciones de Instalaci n Si la unidad se da a durante el env o devuelva la unidad a la tienda donde fue comprada para su reparaci n o reemplazo Si la unidad es da ada por el cliente la rep...

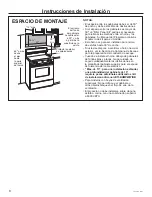
Page 34: ...horno debajo de gabinetes de fondos lisos y planos tenga cuidado de seguir cuidadosamente las instrucciones en la plantilla del gabinete superior para el espacio de tolerancia del cable el ctrico M x...

Page 35: ...i n filtros adaptador del escape regulador y la caja peque a de piezas No retire la gomaespuma que proteg el frente del horno microondas Luego con cuidado haga girar el horno microondas y la caja sobr...

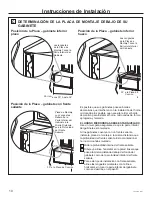
Page 36: ...a del frente saliente Dibuje una l nea horizontal en la pared trasera que posea la misma distancia debajo del fondo del gabinete como de la profunidad interior del frente saliente Para este tipo de in...

Page 37: ...o del rea E Si C y D no est n en un montaje busque un montaje en alguna parte en el rea E y dibuje un quinto c rculo que se alinee con el montaje Es importante usar por lo menos un tornillo de madera...

Page 38: ...su instalaci n y proceda a dicha secci n B ESCAPE EXTERIOR SUPERIOR CONDUCTO VERTICAL Lea la P gina 17 El Adaptador Est en el Lugar Correcto para el Escape Exterior Superior 2 ESCAPE EXTERIOR TRASERO...

Page 39: ...s tornillos Empuje la placa hacia afuera de la pared para ayudar a ajustar los tornillos 3 ADHERA LA PLACA DE MONTAJE A LA PARED A1 Adhiera la placa a la pared usando tornillos con resortes Por lo men...

Page 40: ...a colocar el calentador en la abertura Deslice el plato calentador nuevamente hacia el microondas colocando las leng etas laterales en las ranuras y empujando suavemente hasta que la leng eta trasera...

Page 41: ...sar el cable de corriente a trav s del agujero de la parte inferior del gabinete superior Mantenga el mismo apretado siguiendo los Pasos 1 a 3 Evite cortes en el cable o que se levante el horno microo...

Page 42: ...lte el Manual del Propietario embalado con el horno microondas Inserte 3 tornillos autoalineantes 1 4 28 x 2 a trav s de los agujeros del gabinete superior externo D dos giros completos a cada tornill...

Page 43: ...placa a la pared usando tornillos con resortes Por lo menos un tornillo de madera deber ser usado para adherir la placa al montaje de pared Las ubicaciones recomendadas sobre la placa de pared est n i...

Page 44: ...l Calentador 2 Con cuidado empuje hacia usted la unidad del calentador Los cables se extender n lo suficiente como para permitirle ajustar la unidad del calefactor Haga rodar el calentador de modo que...

Page 45: ...horno microondas por tirar del cable Levante el horno microondas incline el mismo hacia adelante y enganche las ranuras en el extremo inferior trasero sobre las cuatro leng etas inferiores de la placa...

Page 46: ...2 a trav s de los agujeros del gabinete superior externo D dos giros completos a cada tornillo Ajuste los tres tornillos en la parte superior del horno microondas Al ajustar los tornillos sostenga el...

Page 47: ...r lo menos un tornillo de madera deber ser usado para adherir la placa al montaje de pared Retire las tuercas mariposa de los tornillos Inserte los tornillos en la placa de montaje a trav s de los agu...

Page 48: ...esorte y el tornillo de madera aseg rese de que las leng etas sobre la placa de montaje toquen la parte inferior del gabinete cuando se las presione contra la pared y que la placa est correctamente ce...

Page 49: ...1 a 3 Evite cortes en el cable o que se levante el horno microondas por tirar del cable Levante el horno microondas incline el mismo hacia adelante y enganche las ranuras en el extremo inferior trase...

Page 50: ...el horno dando al tornillo por lo menos dos giros completos una vez que las roscas fueron colocadas M s tarde se ajustar completamente Inserte 2 tornillos autoalineantes 1 4 28 x 2 a trav s de los agu...

Page 51: ...aje del horno microondas 2 Aseg rese de que el horno microondas haya sido instalado de acuerdo con las instrucciones 1 ANTES DE USAR EL HORNO MICROONDAS QUICK USE CARE Instrucciones de Instalaci n Ins...

Page 52: ...26 49 40755 Rev 1 Instrucciones de Instalaci n Impreso en China...

Reviews: