background image

20

49-2000975   Rev. 2

Problem

Possible Cause

What To Do

Surface elements will not 
maintain a rolling boil or 
cooking is slow

Improper cookware being used.

8VHSDQVWKDWDUHDEVROXWHO\IODWDQGPDWFK

the diameter of the surface unit selected.

Surface elements do not 
work properly

Cooktop controls improperly set.

Check to be sure the correct control is set for 
the surface element you are using.

Scratches on cooktop 
glass surface

Incorrect cleaning methods being used.

8VHUHFRPPHQGHGFOHDQLQJSURFHGXUHV6HH

the Cleaning the glass cooktop section.

Cookware with rough bottoms being used 
or coarse particles (salt or sand) were 
between the cookware and the surface of 
the cooktop. Cookware has been slid across 
the cooktop surface.

To avoid scratches, use the recommended 
cleaning procedures. Make sure bottoms 
of cookware are clean before use, and use 
cookware with smooth bottoms.

Areas of discoloration on 
the cooktop

Food spillovers not cleaned before next use.

See the Cleaning the glass cooktop section.

Hot surface on a model with a light-colored 
glass cooktop.

This is normal. The surface may appear 
discolored when it is hot. This is temporary 
and will disappear as the glass cools.

Plastic melted to the 
surface

Hot cooktop came into contact with plastic 
placed on the hot cooktop.

6HHWKH*ODVVVXUIDFH±SRWHQWLDOIRU

permanent damage section in the Cleaning 
the glass cooktop section.

Pitting (or indentation) of 
the cooktop

Hot sugar mixture spilled on the cooktop.

Call a qualified technician for replacement.

Troubleshooting Tips ...


%HIRUH\RXFDOOIRUVHUYLFH

Save time and money! Review the charts on the following pages first and you may not need to call for service. If an 
error occurs in the control operation, a fault code will flash in the display. Record the error code and call for service. 
Check out self-help videos and FAQ at 

GEAppliances.com/support.

TROUBLESHOOTING TIPS

Summary of Contents for Profile JEP5030

Page 1: ...op 13 Element Cycling 14 Turn Product On Off 14 Operating The Cooking Elements 14 How To Synchronize Left Elements 15 Selecting Cooktop Settings 15 Cooktop Lockout 16 Hot Light Indicator 16 Griddle op...

Page 2: ...s into every GE Appliances product and we think you will too Among other things registration of your appliance ensures that we can deliver important product information and warranty details when you n...

Page 3: ...RU KHDWLQJ HOHPHQWV R QRW XVH D WRZHO RU other bulky cloth in place of pot holders 1HYHU XVH RXU FRRNWRS IRU ZDUPLQJ RU KHDWLQJ WKH room R QRW WRXFK VXUIDFH HOHPHQWV 7KHVH VXUIDFHV may be hot enough t...

Page 4: ...unit will also improve efficiency 7R PLQLPL H WKH SRVVLELOLW RI EXUQV LJQLWLRQ RI flammable materials and spillage the handle of a container should be turned toward the center of the range without ex...

Page 5: ...may vary from your model Cooktop Features USING THE COOKTOP Cooktop Features 1 Cooking Element s See page 14 2 Control Knob s See page 14 3 Lock See page 16 4 Sync Burners See page 15 8VHU QWHUIDFH R...

Page 6: ...s and appearance may vary from your model Cooktop Features USING THE COOKTOP Cooktop Features 1 Cooking Element s See page 14 2 Control Knob s See page 14 3 Lock See page 16 8VHU QWHUIDFH RQWUROV 8VHU...

Page 7: ...his manual features and appearance may vary from your model Cooktop Features 1 Cooking Element s See page 14 2 Control Knob s See page 14 3 Lock See page 16 8VHU QWHUIDFH RQWUROV 3 2 3 FRRNWRS 1 USING...

Page 8: ...ooktop Features Throughout this manual features and appearance may vary from your model 1 Cooking Element s See page 14 2 Control Knob s See page 14 8VHU QWHUIDFH RQWUROV 2 3 cooktop 1 USING THE COOKT...

Page 9: ...ures Throughout this manual features and appearance may vary from your model Cooktop Features 1 Cooking Element s See page 14 2 Control Knob s See page 14 3 Lock See page 16 8VHU QWHUIDFH RQWUROV 8VHU...

Page 10: ...king Element s See page 14 2 Control Knob s See page 14 3 Lock See page 16 4 Sync Burners See page 15 8VHU QWHUIDFH RQWUROV 3 FRRNWRS 1 2 3 4 Cooktop Features Throughout this manual features and appea...

Page 11: ...ures Throughout this manual features and appearance may vary from your model Cooktop Features 8VHU QWHUIDFH RQWUROV 8VHU QWHUIDFH RQWUROV 2 2 3 FRRNWRS 1 3 3 3 FRRNWRS 1 1 Cooking Element s See page 1...

Page 12: ...increase with the number of surface units that are on With 3 or 4 units turned on surface temperatures are high Always use caution when touching the cooktop H VXUH WKH FDQQHU LV FHQWHUHG RYHU WKH VXUI...

Page 13: ...ss The enamel can melt and bond to the ceramic cooktop Glass ceramic 3RRU SHUIRUPDQFH LOO VFUDWFK WKH surface Stoneware 3RRU SHUIRUPDQFH 0D VFUDWFK WKH surface Cast Iron 1RW UHFRPPHQGHG XQOHVV GHVLJQH...

Page 14: ...iter that protects the glass cooktop from getting too hot this is normal The temperature limiter may cycle the elements off more frequently if 7KH SDQ ERLOV GU 7KH SDQ ERWWRP LV QRW IODW 7KH SDQ LV RI...

Page 15: ...two elements heat This is normal KRRVH WKH HOHPHQW EXUQHU WKDW LV WKH EHVW ILW WR WKH FRRNZDUH VL H DFK HOHPHQW EXUQHU RQ RXU QHZ cooktop has its own power levels ranging from low to KLJK 3RZHU OHYHO...

Page 16: ...will glow to show that the cooktop is locked To unlock press and turn the knob to Unlock In the locked position the cooktop will produce an audible sound if any control knob is set to a position other...

Page 17: ...1HYHU SODFH RU VWRUH DQ LWHPV RQ WKH JULGGOH HYHQ when it is not in use The griddle can become heated when using the surrounding surface units Avoid using metal utensils with sharp points or rough HG...

Page 18: ...ops rub the residue area applying pressure as needed 4 If any residue remains repeat the steps listed above as needed 5 For additional protection after all residue has been removed polish the entire s...

Page 19: ...NHG EODGH 1 Turn off all surface units Remove hot pans 2 Wearing an oven mitt D 8VH D VLQJOH HGJH UD RU EODGH VFUDSHU WR PRYH the spill to a cool area on the cooktop b Remove the spill with paper towe...

Page 20: ...and use cookware with smooth bottoms Areas of discoloration on the cooktop Food spillovers not cleaned before next use See the Cleaning the glass cooktop section Hot surface on a model with a light c...

Page 21: ...49 2000975 Rev 2 21 Notes...

Page 22: ...lass cooktop due to impact or misuse See example EXCLUSION OF IMPLIED WARRANTIES RXU VROH DQG H FOXVLYH UHPHG LV SURGXFW UHSDLU DV SURYLGHG LQ WKLV LPLWHG DUUDQW Q LPSOLHG ZDUUDQWLHV including the imp...

Page 23: ...s offers a variety of accessories to improve your cooking and maintenance experiences Refer to the Consumer Support page for phone numbers and website information The following products and more are a...

Page 24: ...line anytime GE Appliances Services will still be there after your warranty expires Q WKH 86 GEAppliances com extended warranty or call 800 626 2224 during normal business hours In Canada GEAppliance...

Page 25: ...3 Cycle de l l ment 14 Tourner le bouton On Off marche arr t 14 Fonctionnement des l ments de cuisson 14 Comment synchroniser les l ments de gauche 15 S lection des r glages de la table de cuisson 15...

Page 26: ...GE Appliances et nous pensons que vous le serez aussi Dans cette optique nous vous rappelons que l enregistrement de votre lectrom nager vous assure la communication de renseignements importants sur...

Page 27: ...UH WDEOH GH FXLVVRQ SRXU UpFKDXIIHU RX chauffer une salle 1H WRXFKH SDV DX pOpPHQWV GH VXUIDFH 0rPH V LOV pr sentent une couleur fonc e ces l ments peuvent devenir chauds au point de br ler la peau Du...

Page 28: ...e DLWHV DWWHQWLRQ ORUV GX FRQWDFW DYHF OD WDEOH GH FXLVVRQ La surface vitr e de la table de cuisson conservera la chaleur apr s l extinction des commandes 1H FXLVLQH SDV VXU XQH WDEOH GH FXLVVRQ HQGRP...

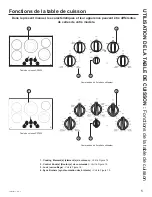
Page 29: ...UISSON Fonctions de la table de cuisson 1 Cooking Element s l ment s de cuisson Voir la Figure 14 2 Control Knob s Bouton s de commande Voir la Figure 14 3 Lock verrouillage Voir la Figure 16 4 Sync B...

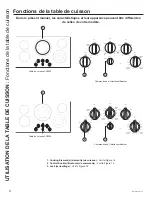
Page 30: ...sson UTILISATION DE LA TABLE DE CUISSON Fonctions de la table de cuisson 2 2 3 3 Table de cuisson CP9530 Table de cuisson CP9530 1 1 1 Cooking Element s l ment s de cuisson Voir la Figure 14 2 Control...

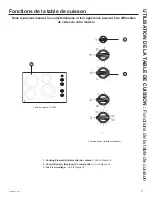
Page 31: ...od le Fonctions de la table de cuisson 1 Cooking Element s l ment s de cuisson Voir la Figure 14 2 Control Knob s Bouton s de commande Voir la Figure 14 3 Lock verrouillage Voir la Figure 16 Commandes...

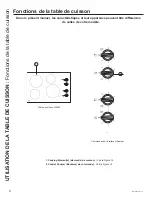
Page 32: ...de celles de votre mod le Fonctions de la table de cuisson 1 Cooking Element s l ment s de cuisson Voir la Figure 14 2 Control Knob s Bouton s de commande Voir la Figure 14 Commandes de l interface ut...

Page 33: ...isson 1 Cooking Element s l ment s de cuisson Voir la Figure 14 2 Control Knob s Bouton s de commande Voir la Figure 14 3 Lock verrouillage Voir la Figure 16 Commandes de l interface utilisateur 2 2 T...

Page 34: ...s de cuisson Voir la Figure 14 2 Control Knob s Bouton s de commande Voir la Figure 14 3 Lock verrouillage Voir la Figure 16 4 Sync Burners synchronisation des br leurs Voir la Figure 15 Commandes de...

Page 35: ...sson 1 Cooking Element s l ment s de cuisson Voir la Figure 14 2 Control Knob s Bouton s de commande Voir la Figure 14 3 Lock verrouillage Voir la Figure 16 UTILISATION DE LA TABLE DE CUISSON Fonction...

Page 36: ...orsque vous tes en contact avec la table de cuisson Placez le cuiseur sous pression au centre de l l ment de surface Assurez vous que son fond est plat Pour viter les br lures caus es par la vapeur ou...

Page 37: ...mail vitrifi peut fondre et adh rer la surface de cuisson en vitroc ramique Vitroc ramique Rendement m diocre gratignera la surface de cuisson Gr s Rendement m diocre Peut gratigner la surface Fonte...

Page 38: ...n d viter une temp rature trop lev e de la table de cuisson Ce cycle est normal Le limiteur de temp rature teint les l ments plus souvent lorsque D FDVVHUROH VH YLGH H IRQG GH OD FDVVHUROH Q HVW SDV S...

Page 39: ...e mieux la taille des ustensiles de votre batterie de cuisine Chaque l ment br leur de votre nouvelle table de cuisson est dot de son propre niveau de puissance allant de faible lev Les r glages de ni...

Page 40: ...8Q WpPRLQ OXPLQHX V DOOXPHUD pour indiquer que la table de cuisson est verrouill e Pour d verrouiller pressez et tournez le bouton jusqu Unlock d verrouiller Dans la position verrouill e la table de...

Page 41: ...WH HW QH UDQJH DXFXQ REMHW VXU OD SODTXH chauffante m me lorsque vous ne l utilisez pas La plaque pourrait devenir chaude lors de l utilisation des surfaces adjacentes vitez d utiliser des ustensiles...

Page 42: ...ur table de cuisson en vitroc ramique frottez la zone des r sidus en appliquant une pression au besoin 4 S il reste des r sidus r p tez les tapes ci dessus selon le besoin 5 Pour une protection suppl...

Page 43: ...n On doit alors nettoyer la d coloration imm diatement avant de chauffer nouveau car elle pourrait s av rer permanente REMARQUE V rifiez que le dessous des casseroles ne pr sente pas de rugosit pouvan...

Page 44: ...vitre de la table de cuisson Utilisation d un r cipient avec des asp rit s sur le fond ou pr sence de particules sable ou sel entre le r cipient et la surface de la table de cuisson Quelqu un a fait...

Page 45: ...49 2000975 Rev 2 21 Notes...

Page 46: ...LHU OHV GRPPDJHV FRVPpWLTXHV j OD WDEOH GH FXLVVRQ HQ YLWURFpUDPLTXH WHOV TXH PDLV SDV VHXOHPHQW pFDLOODJH UD XUHV RX UpVLGXV FXLWV TXL QH VRQW pas rapport s sous 90 jours depuis l installation SDUWLU...

Page 47: ...es afin d am liorer votre exp rience de cuisson et d entretien Reportez vous la page du Soutien au consommateur pour des renseignements sur l accessibilit t l phonique et en ligne Les produits suivant...

Page 48: ...SLUDWLRQ GH OD JDUDQWLH X eWDWV 8QLV GEAppliances com extended warranty ou composez le 800 626 2224 durant les heures normales de bureau Au Canada Electromenagersge ca fr soutien achat d une garantie...

Page 49: ...nte 13 Ciclos de los Elementos 14 Encendido Apagado del Producto 14 Uso de los Elementos de Cocci n 14 C mo Sincronizar los Elementos Izquierdos 15 Selecci n de las Configuraciones de la Placa de Cocc...

Page 50: ...y creemos que usted tambi n Entre otras cosas el registro de su electrodom stico asegura que podamos entregarle informaci n importante del producto y detalles de la garant a cuando los necesite Regis...

Page 51: ...gruesas en lugar de una agarradera 1XQFD XVH OD SODFD GH FRFFLyQ SDUD FDOHQWDU OD habitaci n 1R WRTXH ORV HOHPHQWRV GH OD VXSHUILFLH VWDV VXSHUILFLHV pueden estar tan calientes como para quemar aunque...

Page 52: ...HQ OD HVWXID RWURV VH SXHGHQ URPSHU GHELGR al cambio brusco de temperatura 7HQJD FXLGDGR DO WRFDU OD HVWXID D VXSHUILFLH GH YLGULR de la estufa retendr calor despu s de que los controles se hayan apa...

Page 53: ...la Placa de Cocci n 1 Cooking Element s Elemento s de Cocci n Consulte la p gina 14 2 Control Knob s Perilla s del Control Consulte la p gina 14 3 Lock Bloqueo Consulte la p gina 16 4 Sync Burners Que...

Page 54: ...ar en con relaci n a su modelo a lo largo del manual RQWUROHV GH OD QWHUIDVH GHO 8VXDULR RQWUROHV GH OD QWHUIDVH GHO 8VXDULR 2 2 3 3 Superficie de Cocci n CP9530 Superficie de Cocci n CP9530 1 1 1 Coo...

Page 55: ...Consulte la p gina 15 3 Lock Bloqueo Consulte la p gina 16 RQWUROHV GH OD QWHUIDVH GHO 8VXDULR 3 2 Superficie de Cocci n JP3530 1 Es posible que las funciones y apariencias var en con relaci n a su m...

Page 56: ...ment s Elemento s de Cocci n Consulte la p gina 14 2 Control Knob s Perilla s del Control Consulte la p gina 14 Funciones de la Placa de Cocci n USO DE LA PLACA DE COCCI N Funciones de la Placa de Coc...

Page 57: ...ueo Consulte la p gina 16 RQWUROHV GH OD QWHUIDVH GHO 8VXDULR 2 2 Superficie de Cocci n JP3536 1 3 Superficie de Cocci n JP3036 1 RQWUROHV GH OD QWHUIDVH GHO 8VXDULR Es posible que las funciones y apa...

Page 58: ...urners Quemadores Sincronizados Consulte la p gina 15 RQWUROHV GH OD QWHUIDVH GHO 8VXDULR Superficie de Cocci n PP7036 1 1 3 4 RQWUROHV GH OD QWHUIDVH GHO 8VXDULR Superficie de Cocci n CP9536 1 2 3 4...

Page 59: ...o Consulte la p gina 16 Es posible que las funciones y apariencias var en con relaci n a su modelo a lo largo del manual Funciones de la Placa de Cocci n USO DE LA PLACA DE COCCI N Funciones de la Pla...

Page 60: ...es encendidas las temperaturas de la superficie son altas Siempre tenga cuidado al tocar la estufa Aseg rese que el producto enlatado se encuentre sobre la unidad superficial Aseg rese de que el produ...

Page 61: ...esmalte puede derretirse y adherirse a la estufa cer mica Vidrio cer mico Desempe o pobre Raya la superficie Cer mica Desempe o pobre Puede rayar la superficie Hierro fundido No se recomienda a menos...

Page 62: ...aca de cocci n de vidrio se caliente demasiado lo cual es normal Es posible que el limitador de temperatura realice ciclos de apagado de los elementos con m s frecuencia si D ROOD KLHUYH KDVWD VHFDUVH...

Page 63: ...elementos calientan Esto es normal 6HOHFFLRQH HO HOHPHQWR TXHPDGRU TXH PHMRU VH DMXVWH DO WDPDxR GHO XWHQVLOLR DGD HOHPHQWR TXHPDGRU GH VX nueva superficie de cocci n cuenta con sus propios niveles d...

Page 64: ...n se encuentra bloqueada Para desbloquear la misma presione y gire la perilla hacia Unlock Desbloquear En la posici n de bloqueo la superficie de cocci n producir un sonido audible si cualquier peril...

Page 65: ...sobre la plancha a n cuando no est en uso La plancha puede calentarse cuando se utilizan las unidades de superficie cercanas No use utensilios met licos con puntas afiladas o bordes speros porque pued...

Page 66: ...de cocci n de cer mica sobre toda el rea de residuos quemados 8WLOL DQGR XQD DOPRKDGLOOD GH OLPSLH D SDUD VXSHUILFLHV GH cocci n de cer mica que no produzca rayones frote el rea de residuos aplicando...

Page 67: ...lice hojas desafiladas o da adas 1 Apague todas las unidades de superficie Quite las ollas calientes 8WLOL DQGR XQ JXDQWH GH FRFLQD D 8VH XQ UDVSDGRU GH ILOR QLFR SDUD GHVSOD DU HO derrame a un rea fr...

Page 68: ...SURFHGLPLHQWRV GH OLPSLH D recomendados Ver la secci n C mo limpiar la estufa de vidrio Se est n usando recipientes con bases speras o hay part culas gruesas sal o arena entre el recipiente y la supe...

Page 69: ...49 2000975 Rev 2 21 Notas...

Page 70: ...D SODFD GH cocci n de vidrio tales como pero sin limitarse a astillas rayones o residuos horneados que no se hayan reportado dentro de los 90 d as desde el momento de la instalaci n SDUWLU GH HQHUR GD...

Page 71: ...cesorios para mejorar sus experiencias de cocci n y mantenimiento Para acceder a n meros telef nicos e informaci n de sitios Web consulte la p gina de Soporte para el Consumidor Estos y otros producto...

Page 72: ...ppliances a n estar n all cuando su garant a caduque Q 88 GEAppliances com extended warranty o comun quese al 800 626 2224 durante el horario de atenci n comercial En Canad GEAppliances ca en support...

Reviews: